Knocks in the chassis are a frequent companion in life for VAZ 2114 owners. Many elements that can cause knocking, bad roads, and low-quality parts can cause extraneous noise in the suspension. A common source of the problem is the angular velocity distributor, or CV joint (grenade). The process of replacing a part is simple, so you can change it yourself. The question is often asked which CV joint for the VAZ 2114 is better: regular or tripoid. Among the most common arguments: tripoid is more reliable, but it hums and vibrates at high speeds. The regular one is less reliable, but the car handles better at high speed. However, you can find opposing opinions and arguments on this matter.
This article was written thanks to the help and support of the Interior Design website. This is an information portal about interior design: new products, photos, videos, the best styles, options for the perfect combination and recommendations from professionals
There is no clear answer which type is better. Operation in harsh conditions showed that there is no fundamental difference in driving sensations and reliability. The main thing is to buy a high-quality grenade made of well-hardened metal, install it correctly and monitor the safety of the anthers.
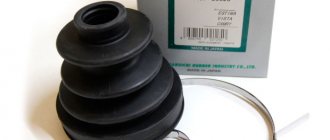
Scheme for disassembling the VAZ 2114 CV joint
Basic faults
The main problem due to which a CV joint can become unusable is the ingress of a large amount of dirt into it. This happens when the anthers are damaged, so their integrity should be checked regularly. To do this, you just need to look under the car, first turning the wheels completely in any direction, and if you find lubricating fluid, ruptures or cracks in the cover, replace the damaged part. By shaking the drive shaft a little by hand, you can check the condition of its play.
Also, the reasons for the failure of the CV joint may be its expired service life, since it is limited, and poor quality of the part (defective).
Less common is damage to the retaining ring, in which the axle shaft comes out slightly from the part during sharp turns. This contributes to the appearance of damage on the “grenade”, and after some time to its complete failure.
Cracking and knocking noises when turning the wheels are harbingers of external joint malfunctions. Signs of damage to the internal grenade are crackling clicks and strong vibration that transfers to the body during acceleration.
Instructions for removing, disassembling and assembling the VAZ 2114 gearbox
Removing the gearbox is required when troubleshooting parts and the mechanism of the gearbox itself; when replacing the clutch.
Repair work may require one business day, so the instructions below must be started in the morning. Hiring a partner with experience in this type of repair will reduce time costs and improve the quality of repairs.
Preparation
The preparation process consists of the following steps:
- to warm up the oil to be drained, we drive a vehicle for a distance of 5 km;
- we install the vehicle on an inspection ditch (pit) or drive it onto an overpass;
- We put the car on the handbrake;
- raise the hood;
- fix the raised hood;
- we install the hoist, or use improvised means, or a special device, which is a crossbar to support the engine in a suspended position.
Removing and disassembling the gearbox. Procedure for cleaning gearbox parts
We perform the following steps sequentially:
- We remove the terminals.
- We remove the battery.
- We remove the battery to the side.
- We unscrew the three bolts that secure the crankcase protection.
- We remove the protection.
- If the model is before 2003, then remove the oil level dipstick.
- Using a 17 key, unscrew the plug (plug) of the drain hole.
- Place a five-liter container under the drain hole.
- Drain the existing oil from the gearbox into a container.
- We are waiting for the oil to be completely removed from the gearbox.
- We unscrew the two locking nuts of the starter protective jacket, located below in relation to the pit, and one locking nut on top of the starter.
- Remove the protective jacket of the engine starter.
- Disconnect the power wires to the engine starter.
- We remove the engine starter from below, that is, by descending into the pit.
- Remove the clutch cable.
- Compress the spring holding the block.
- From below, disconnect the block with the wires of the speed sensor under the hood.
- Disconnect the reverse sensor wire connector.
- We unscrew the bolts under the hood connecting the ignition module bracket to the gearbox housing.
- Disconnect the torque rod bracket.
- Loosen the gear shift rod clamps.
- We remove it by pulling the torque rod from the hinge intended for changing gears.
- We take out the gear shift rod.
- Unscrew the fastening bolts to the steering knuckle of the left ball joint.
- We carry out dismantling by disconnecting the lower mounting of the gearbox to the engine (sometimes it is enough to loosen the tightening).
- Unscrew the bots.
- Removing the transmission housing
- We unscrew the bot from the lower left part of the gearbox.
- Using a board, we hang the motor.
- We remove the fixation of the left and rear (attachment to the body) engine mount by unscrewing the corresponding nuts.
- We unscrew the pair of bots that secure the rear engine mount to the transmission, holding the nuts against spinning with a second wrench.
- We dismantle the support.
- We insert a screwdriver into the hole between the engine cylinder block and the clutch housing.
- Using an inserted screwdriver, we move the box along the guides so that the rear part of its body passes over the backlight extension, and the input shaft is disconnected from the clutch.
- We remove the gearbox unit from under the car.
- We clean the gearbox parts, removing deposits with a brush.
- We clean the holes and slots from dirt.
- We wash and blow off the parts and bearings with a stream of compressed air.
- We examine the details of the gearbox.
- If necessary, we replace worn or damaged parts.
- We carry out the assembly, focusing on the procedure indicated above.
Why change
If damaged anthers are found, they must be replaced. Otherwise, dirt will penetrate into the “grenade” through cracks and tears and over time the part will fail, and there will be a need to purchase a new element and then replace it.
What do you mean it will fail? When the car moves at any turn, the CV joint will fall apart into two parts. It will be impossible to continue operating such a machine. In addition, all the oil may leak out of the box.
To avoid unpleasant consequences, it is necessary to promptly replace the damaged part.
An outer CV joint will cost 1000 - 1500 rubles, depending on the manufacturer. The price of the internal “grenade” is slightly higher than 1400 – 2200 rubles.
Types of CV joints
- Ball. The most efficient and proven type of CV joints.
- Tripoid. It is used not only in cars, but also in trucks and so on. Instead of balls, it uses rollers.
- Paired. This type has stronger material and smoother movement.
- Cam. Designed for heavyweights: trucks, buses, vans, etc. The structure consists of 2 forks that can withstand enormous loads, and a couple of shaped disks.
Prices for internal CV joints of VAZ 2114
| Manufacturer | Price, rub) |
| LADA (AvtoVAZ) | 1500 |
| BelMag | 1200-1250 |
| Loebro (GKN) | 2000 |
| Hola | 1600-1650 |
| Kraft | 1600 |
| GLO | 1500-1600 |
| FINWHALE | 1800 |
| Phoenix | 1250-1300 |
| PILENGA | 1100-1150 |
| TRIALLI | 1600 |
CV joint replacement
You can make the replacement yourself; to do this, you need to stock up on the necessary tools:
- key at 17, 19;
- heads at 13 – 17, 30;
- balloon;
- mounting blade;
- knob;
- jack;
- pliers and lubricant.
Having prepared the tools, we move on to the car.
For convenience, we drive the car onto an overpass or inspection hole. We put the handbrake on and engage the gear. For greater safety, you can put clamps under the wheels; only the rear two are enough.
The inner and outer CV joints are located on the shaft drive, therefore, the technology for replacing them is almost identical.
CV joint replacement
- We remove the crankcase protection; to do this, unscrew two bolts at the front to 17 and 2 nuts at the back to 19.
- Drain the lubricating fluid from the box (about 1/3 of the total volume).
- We use a wheel wrench to remove the wheel bolts of the side of interest.
- Take the 30mm head and unscrew the outer CV joint nut.
- Raise the car using a jack.
- We take a 13mm wrench and unscrew the two bolts (you can knock out one of the pins) from the hub that hold the ball joint.
- Using a mounting blade (mount), we move the hub away from the reaction rods.
- Pull the strut towards you and pull the CV joint pin out of the hub.
- Move the shaft drive to the side.
- Open the hood and use a pry bar to remove the inner CV joint from the box. To do this, you need to insert a mounting blade between the parts and pull it sharply towards the box.
- After the CV joint has moved a little, we move to the wheel arch and pull out the shaft drive with two “grenades”.
- We take pliers and remove the large and small clamps of the protective cover from the grenades.
- If the boot is damaged, we tear it off, and if not, then we move it to the center.
- We hit the inner race of the inner CV joint as hard as possible with a hammer until it falls off. We do the same thing, on the other side.
- Remove the rings from the shaft drive.
- We put rings from the new CV joint kit on the shaft and a new boot.
- We hammer in a new “grenade” with a hammer.
- Lubricate the CV joint with grease, and squeeze the remainder into the boot.
- Using clamps, we fix the boot on the “grenade” and the shaft.
- We do the same with the other CV joint.
- We take the shaft drive, screw the nut onto the outer CV joint and use a hammer to hammer it into the box.
- We assemble the parts in reverse order.
The importance of CV joints
The internal hinge is larger than its brother, and therefore more expensive, since it plays a more important role. It transmits rotation to the shaft from the gear. It is also installed inside the gearbox housing. The maximum rotation angle of the internal grenade is 20 degrees.
The outer hinge serves to rotate the wheel hub, and therefore it has mounting splines. The external grenade does not have much free space, so it is inferior in size. Installed next to the wheel.
Replacement results
Failure to replace the boot in a timely manner will result in the “grenade” breaking, which in turn will make it impossible to use the car. Regular inspection of boots and CV joints will prevent dirt from getting into the part.
If you find breaks in the boot, you should purchase new ones and install them. When replacing boots, you should inspect the CV joint to make sure it is in good condition. This will not take much time, but will preserve the integrity of the CV joint and save money.
If you nevertheless looked at the cracks and tears in the protective case and did not have time to replace it at the initial stage, but realized the problem from the characteristic sounds, then it is necessary to replace the damaged “grenade” as soon as possible. After the repair has been carried out, it is recommended to check the car; to do this, you need to drive it in a circle and accelerate a little on a straight road. The absence of creaking and tapping sounds is a sign of correct installation.
Repair of VAZ 2114 gearbox
According to the source of this article, provaz2114.ru, the most reliable method of keeping the mechanism in good condition is prevention of malfunctions (systematic maintenance) and proper operation. But even so, situations are possible that require prompt repairs. When the gearbox cannot be repaired, information becomes relevant about how much a new VAZ 2114 gearbox costs? Estimated price in stores is 16 thousand rubles, used: 4000-10000 rubles. When the gear knob is loose on a VAZ 2114, it is possible that the solution to the problem is to install a new one. The VAZ 2114 gearbox linkage also needs to be replaced.