01/26/2021 7,025 VAZ 2114
Author: Ivan Baranov
Don’t know how to replace the window regulator of a VAZ 2114? Our article describes what types of these devices exist, the main causes of breakdowns and much more. The recommendations are suitable for repairing almost any car belonging to the Lada Samara family, if the windows do not work on it.
[Hide]
Lada 2114 SnowMan › Logbook › Window lifters without ignition
You stop, turn off the engine, take the key out of the ignition, press the power window button to close the window, BUT IT WAS NOT THERE
. When the ignition is turned off, the window switches do not work. Now, in order to close the window, you have to reinsert the key into the ignition...
I think you are all familiar with this situation.
I overcame this “illness” in the first days of using the car, long before I registered to drive. Due to the fact that during the drive I was asked more than once how I did it, I decided to post a detailed report.
And then I started by studying the materiel.
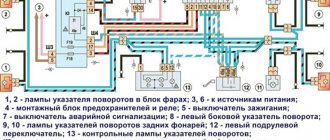
Electrical wiring diagram for VAZ 2114 electric windows
A little theory:
From the diagram it can be seen that the positive power window power wire passes through the K5 window relay and is open (pins 30 and 87). When you turn the ignition key, a plus is applied to the 85th contact of the K5 relay, the relay electromagnet turns on and closes the 30th and 87th contacts, after which a plus appears on the power window buttons.
Conclusion:
In order for the power windows to work without an ignition key, you need to bridge contacts 30 and 87 of relay K5 as in the figure below.
The red line indicates the jumper.
Let's move on to practice:
I will not impose on you any specific method of making a jumper; I will describe only the most common ones; you can choose any of these methods that seems most simple and convenient to you.
Method No. 1
In the VAZ 2108-09 mounting blocks from the factory, instead of the K6 relay (high beam), a metal jumper was installed (the jumper was installed between 30 and 87 contacts). Provided that you can find this jumper somewhere (lying in the garage, in a friend’s garage, at a disassembly site) and it is not in demand, you can install it in your mounting block instead of the K5 power window relay. Or borrow this jumper from someone and, in its image and likeness, make exactly the same one from sheet metal.
Mounting block VAZ 2108-09 AVAR 173.3722
Method No. 2
Here I will describe another method of making a jumper. We will need: - 6.4mm MALE detachable terminal - 2 pcs - 5cm wires We strip 5-7mm of insulation from each edge of the wire. Using a crimper, we crimp the connector terminals at the ends of the wire.
This is what should happen
We insert the resulting jumper instead of the K5 power window relay in the mounting block (the jumper is inserted between contacts 30 and 87).
Method No. 3
In this version, the role of the jumper will be performed by the K5 window relay itself with minor modifications. We take out the K5 relay from the mounting block, turning the relay over we will see the markings of its contacts. We take a piece of wire without insulation and wind it around relay contacts 30 and 87 (see figure below). We return relay K5 to its place in the mounting block.
Wire marked in red
Mileage: 28336 km
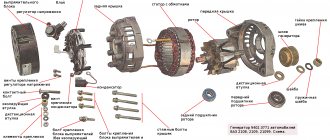
Electric windows of the front doors of VAZ 2115, VAZ 2114 (connection diagram): 1 – mounting block; 2 – power window switch for the right front door; 3 – gear motor for the electric window of the right front door; 4 – motor reducer for the electric window lifter of the left front door; 5 – power window switch for the left front door; 6 – ignition switch; K5 – relay for turning on electric windows; A - to power supplies; B - to the external lighting switch
Many cars produced recently are equipped with electric windows . Often, power windows are installed only on the front doors. But previously, VAZ 2114 and VAZ 2115 were not equipped with electric windows at all. Such cars were equipped with conventional mechanical
lifts for both front and rear windows.
In the window lift mechanism, instead of a gear reducer used in mechanical window lifters, there is only a drum into the hole of which the output shaft of the gear motor is inserted. The gearmotor consists of a worm gearbox and a DC electric motor with excitation from permanent magnets. Its design is similar to that of the windshield wiper gearmotor. The gearmotor is reversible, the direction of rotation of the output shaft depends on the direction of the current in the armature winding. To protect against overloads, it has a built-in thermobimetallic fuse.
Above is a diagram for switching on electric windows on VAZ 2114 and VAZ 2115 cars. Gearmotors 3 and 4 are switched on by switches 2 and 5 located on the armrest handles. The supply voltage is supplied to the switches when the ignition is turned on through fuse F6 and the power window relay K5, located in mounting block 1. If the power windows do not work, then it is necessary to remove the door trim and check whether voltage is supplied to the gearmotors, check the fuse and the power window relay, and restore broken connections in the wires, replace the faulty gearmotor with a new one.
Add a comment to the article
We install power windows on a VAZ 2109
Not all VAZ 2109 cars are equipped from the factory with electric windows (ESP). And if at a time when the serial production of the “nine” was just beginning, electric windows were more of a luxury for the domestic car enthusiast, today “oars” on the car doors are the exception rather than the rule. Fortunately, the domestic industry produces electric windows for Russian cars that were not originally equipped with them, including the VAZ 2109. These are the electric windows we will install on our Lada Samara with our own hands.
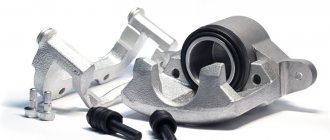
Completeness
| Power window R152-02 rear right Power window R152-03 rear left Decorative plug Plug retainer Self-tapping screw securing the plug Packaging Passport | 1 1 2 2 2 1 1 |
The warranty period for the products is 3 years from the date of manufacture.
Overall dimensions in packaging: 53.5*17.5*7 cm.
Weight: 2.035 kg.
Data sheet for electric windows "FORWARD" R152-02 for VAZ-2109 in rear doors
Types of electric windows and which ones are better for the VAZ 2109
ESPs come in various types.
- cable-type (weak and very slow, with the advantage of being cheap and being able to replace the motor separately if it suddenly burns out);
- rack and pinion (a bit weak, based on operating experience - require regular lubrication);
- articulated-lever (work quickly, make little noise, are quite powerful: they can easily cope with frozen glass).
We opt for the latter, called “Pomegranate”. Moreover, the kit of these ESPs includes everything necessary for installation - electrical wiring, buttons, plugs, all the necessary fasteners, rubber cuffs for pulling the wiring from the rack into the door.
There are also “Katran” and “Berkut”, they have a slightly different device and installation is a little more complicated, but according to reviews they are also not bad.
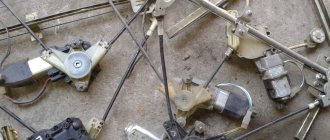
Types of window lifters
Electric window lifters used in modern domestic (and not only) cars can be divided into 3 main categories:
- Cable ones are the most affordable, but they are also weak and slow. Their only advantage is maintainability - if the motor fails, it can be purchased separately and installed in place of the broken one.
- Rack and pinion ones are faster and quite reliable, but require regular inspection and lubrication to achieve a long service life.
- Lever-hinged ones are the most modern. They are distinguished by durability, low maintenance requirements, and a combination of high operating speed and high power. Even frozen glass can be moved without much effort.
For obvious reasons, when replacing window regulators, your choice should be the latter option.
According to reviews from many owners of domestic cars, the most successful electric windows for them are the model called “Granat”.
Window regulator Garnet
Installation and connection diagram for VAZ 2109 window regulators: step-by-step instructions with photos
- Before starting work, you must turn off the power supply to the vehicle's on-board network from the battery. Or we separately turn off the power circuits for the cigarette lighter and the backlight of the instrument panel and buttons. because The power supply wiring for the power windows will be connected to these circuits in the future.
- Remove the door trim. It can be removed quite easily, but it is better to stock up on mounting pins.
- First of all, we dismantle the mechanism of the standard manual window lifter, fixing the glass (for example, using office tape) in a position that provides access to the place where it is attached to the lifting mechanism.
- Unscrew the bolts securing the door glass to the standard window lifter mechanism.
- We dismantle the guide of the standard window lifter mechanism (trapezium). Unscrew the bottom nut:
- Two nuts in the middle:
- Top nut:
- The guide is free, now all that remains is to unscrew the three nuts securing our window lifter in the area of the rotation handle.
- We take out the entire door window lifter mechanism. To do this, we bring the lower pin of the guide into the hole in the door (see photo).
- By pressing with a screwdriver, we remove the upper fastening of the guide.
- Done, the window lift mechanism is disconnected. We take it out of the door cavity.
- That's it, the standard mechanism has been dismantled, let's start installing a new one. The new mechanism is attached using standard fasteners; you don’t have to drill anything new. We place the window lifter mechanism into the inner cavity of the door through the largest technological hole in an “assembled” form (otherwise it won’t fit), as if in the “open” position of the glass.
- We fasten the mechanism inside the door using two studs, which we insert into two holes that previously held the middle part of the guide of the standard VAZ 2109 window lifter. We combine them and screw on the nuts.
- The next task is to combine the mounts on the window lift linkage system with the mount on the glass. This can be done by supplying power to the power window motor contacts from an external power source, for example, any working car battery.
- When the lift mechanism is combined with the strip on the glass, we connect them using the bolts from the kit.
- It is advisable to lubricate the rubbing parts thoroughly.
- The mechanical part is complete, let's move on to the electrical part.
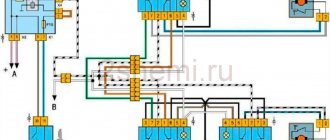
- We estimate the route for wiring from the door from the electric motor of the window lift drive to the installation location of the buttons - activators. The standard place for buttons in the high panel of the VAZ 2109 is two plugs to the right of the cigarette lighter, and we install them there. The hardest part is running the wiring from the door into the rack and then out of the rack under the dash. For this purpose, there are technological holes in the rack. You may need to use a special probe. The wiring is done with a wire with a cross-section of at least 1 mm. sq. We lay the wires in such a way that they do not touch any moving parts of the door or the ESP mechanism itself. We will take power for the electric windows from the cigarette lighter. Electrical connections are made according to the following diagram:
When the circuit is assembled, it is necessary to connect the battery power and check the correct operation of our system. We turn on the side lights and check the correct operation of the backlight of the ESP activator keys. If the backlight does not work, swap the sockets on the contacts of the keys, indicated in the diagram as 3 and 6. You can install the window lifters in the standard way, here are two diagrams:
Connection diagram for electric windows on a VAZ 2109 with mounting block 17.3722 (before 1998)
Connection diagram for electric windows on a VAZ 2109 with mounting block 2114-3722010-60, 2114-3722010-10 and 2114-3722010-18 (new model)
Refinement and installation of the ESP unit from Kalina in VAZ 2113, 2114, 2115
The content of the article:
Production of extension wires for modification of the ESP unit from Kalina in VAZ 2114
This modification is secondary. I installed the unit only because I have long wanted to control the central locking not from the button on the driver’s door, but from a button. I didn’t find any decent buttons to install them separately, so it was decided to install a block from Kalina.
I looked for a long time, read, selected options, and now I’m ripe.
The following was purchased in the store: - ESP block 1118-3709810-10 Price: 700 rubles
— ESP button 1118-3709613-10 Price: 150 rubles
— ESP buttons (from VAZ 2114. 3 pcs. Price: 270 rubles
Save to Album
— Chip for ESP Price: 100 rubles
— Terminals “mother”, “father”, “euro mother” I took with a reserve: 30 of some, 30 of others and 10 of others
— ESP wiring (from VAZ 2114. 3 pcs. Price: 540 rubles
— Chip for three contacts for small terminals Price: 30 rubles
Next I move on to a description of the manufacture of bundles.
The finished wiring from the ESP VAZ 2114 is mercilessly cut. Next, take a crimper and begin crimping the wires with Euro terminals. We crimp the other end with male terminals. And we put a heat shrink tube on the male terminals. We fasten the wires with heat shrink rings. And we get a ready-made harness for the ESP unit.
Pinout of the ESP block connector:
1. +12V for the driver's window (the glass moves down. 2. +12V for the driver's window (the glass moves up. 3. Ground 4. +12V for the driver's window 5. Ground 6. +12V for the passenger's window 7. Absent 8. Dimensions 9. +12V for the passenger window (window moves down. 10. +12V for passenger window (window moves up.
Next, we again take the finished harness from the ESP, cut it mercilessly, take a crimper and crimp it with the “mother” terminals. We crimp the other end with male terminals. And we put a heat shrink tube on the male terminals. We fasten the wires with heat shrink rings. We get a harness for controlling the central locking.
Central lock connector pinout:
1. Closing 2. Weight 3. Absent 4. Dimensions 5. Backlight weight 6. Absent 7. Opening
Again we take the finished ESP harness and cut it again mercilessly. We crimp with terminals “mother”. We crimp the other end with male terminals. And we put a heat shrink tube on the male terminals. We fasten the wires with heat shrink rings. We get a harness for the ESP of the passenger door.
Next, we take the ESP buttons from the VAZ 2114. Let's disassemble them. All we need from them is the body.
In the upper part, use a round file to grind off all excess.
First we put the top part of the button on the wires. In accordance with the pinouts, we insert the male terminals from the finished harnesses into the modified buttons. We fix the terminals in the button body with super-torque. Collecting buttons. We get a block for connecting to the original wiring. Fill the upper part of the resulting pads with silicone.
To make it easier, I provide a pinout combination diagram.
On the left is the Kalina block block, on the right is VAZ 2114
1. +12V driver ESP (window moves down. - 7 contact (to the driver button. 2. +12V driver ESP (window moves up. - 1 contact (to the driver button. 3. Ground) - 5 contact (to the driver button. 4 . +12V ESP - 2nd contact (into the driver's button. 5. Ground - 6th contact (into the driver's button. 6. +12V ESP - 2nd contact (into the passenger's button. 7. Absent 8. Dimensions - 4th contact (into the driver's button). 9. +12V passenger ESP (window moves down. - 7 contact (to the passenger button. 10. +12V passenger ESP (window moves up. - 1 contact (to the passenger button).
To illuminate the central locking button
4. Dimensions - 4 contact (in the passenger button. 5. Backlight ground - 3 contact (in the passenger button.
I consider this method to be the most optimal, since there is no need to cut into the original wiring. You just need to connect the chips and enjoy the work.
Replacing the door window lifter on a VAZ 2113, VAZ 2114, VAZ 2115
Welcome! Window lifter - this mechanism is found in almost any car, depending on the car, it can be either a mechanical type (With a handle for adjusting the position of the glass) or an electric one (In this case, the handle is removed and a button is placed together with it), in addition, we immediately note the fact that the window lifter and the glass itself are two different things (some people just confuse it) and thanks to it you can adjust the position of the glass in the car (raise it higher or lower it).
Note! To carry out the procedure for replacing the window lifter on the door, you will have to stock up on: Various types of screwdrivers, as well as a set of wrenches, if you have an extension cord with union heads, then you can use it, and thin pliers or pliers may also be needed, and if you have them If you have one, be sure to take them!
Summary:
Where is the door window lift located? On cars of the Samara 2 family, different types of window lifters are installed, namely, there are electric ones in the front, and mechanical ones in the back (If the car is in a top configuration, then there are electric ones in the back), both types are hidden in the door itself and you won’t see them without removing the trim, so for For clarity, in the photo below, the trim was removed from the front door of the car, and the window regulator itself is indicated by a red arrow in this photo.
When should you replace your door window regulator? If we are talking about an electric window lifter, then as a rule, when it fails, the glass stops going up and down when you press the corresponding button, in addition, on some cars (you most likely have already paid attention to this) it happens that the glass somehow goes down (Slowly ) and almost does not rise (you have to help with your hand), this also indicates that the window lifter has become unusable and requires replacement, but by the way, in some cases, due to the fact that the glass does not rise and fall poorly, it may not even be the window lifter itself that is to blame glass, it’s just that over time its fastening weakens and thus the glass becomes skewed, which is why problems occur with lowering and raising the glass on the car, but as for mechanical window lifters, everything is simple here, if by rotating the handle the glass has ceased to be adjusted, then the window regulator itself has failed and requires replacement.
How to replace the door window lifter on a VAZ 2113-VAZ 2115?
Note! The window lifter on both the rear door and the front door is replaced almost identically, although there are small nuances, but you don’t even have to pay attention to this, and therefore if you learn how to replace the window lifter at the front, then you can also replace it on the back door and vice versa, but there is just one But! The window lifter can be replaced both with the glass removed from the door and with the glass installed (How you do it is up to you, if you don’t want to remove the glass, then in this case you can simply fix it with a screwdriver, but if suddenly the door moves a lot, then the glass may fall and break, but this won’t happen to you with the glass removed), if you still want to remove it, then in this case read the article entitled: “Replacing glass on a VAZ”, if you don’t want to remove the glass and are sure that it will not fall, then start reading the article; in it we just described the process of replacing a window lifter with the glass installed on the car door!
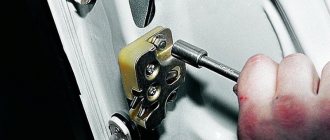
Removal: 1) Let's start with the front doors, but even if you replace the power windows only on the rear doors (And this is point 2), then still study point 1, because they are interconnected and from all these points you will understand more than you read only one of them, in general, before replacing, it doesn’t matter which door, but you will need to remove the trim from it, because the mechanism is located inside the door and without removing the trim you simply won’t get to it (For information on how to remove the trim, read the article: “Replacing the front door on a car” points 1-8), after the trim is removed, disconnect the wire block and the connector that go to the window regulator (see photo 1), then remove all the nuts (there are only three) that secure it mechanism to the door (see photo 2) and then unscrew the two bolts securing the window lifter slider to the glass frame itself (see photo 3), when the bolts are unscrewed, lift the glass to the very top if you have not removed it and fix it in this position (You can fix it using a screwdriver, see photo 4, or you can ask an assistant to hold the glass in the upper position).
Note! So that the window lifter mechanism can be removed from the door and thereby completely removed, unscrew the two screws that secure the door opening handle to the car (see photo 1), after unscrewing the screws, remove the handle by pushing it into the inside of the door and through remove the cutout in the door (see photo 2), then using thin pliers or pliers or simply by hand, disconnect the rubber holder that holds the rod on the handles (see photo 3) and after that disconnect the rod from the handle and you you can completely remove it from the car in this way (see photo 4) and therefore, when the handle is removed, remove the window lift mechanism itself through the same cutout in the car door!
2) As for the rear door and window lifter, in order to remove it, take a wrench in your hands and use it to unscrew the three nuts that secure the mechanism to the door (see photo 1), as soon as the nuts are unscrewed, unscrew the two bolts that The slider with the glass is attached to the window lifter holder (see photo 2), then fix the glass in the same way as described in the first paragraph (see photo 3) and finally, when the glass is already stationary, unscrew the three nuts securing the mechanism to the door (see photo 4) and, also grabbing it with your hand, remove it from the door and thereby completely remove it.
Installation and connection of power windows on VAZ 2114, VAZ 2113 and VAZ 2115
In recent years, electric windows have become a permanent feature of modern cars. If previously such an option was the ultimate dream of many car owners, today it is difficult to surprise anyone with it. Moreover, some VAZ models are equipped with such devices at the factory.
Despite the popularity of window regulators, car owners still end up with domestic cars with an outdated manual mechanism. By the way, more advanced models are also produced, equipped with electric windows. But the disadvantage of the latter is that they have different designs and are rarely suitable for all VAZ cars. As a rule, they are manufactured for specific models, which complicates the task of installing window regulators. For example, models are produced for Samara class cars. In this case, most often, devices are produced for front doors, but they are no longer suitable for rear doors.
The main problem with electrically driven mechanisms is jamming or failure at sub-zero temperatures. This can happen with the glass open or closed. To prevent malfunction, the device must be thoroughly lubricated.
Connecting a window regulator on cars of various models (VAZ 2114, VAZ 2115 or VAZ 2113) is a task that every car owner can implement. It is enough to be able to hold a screwdriver in your hands and set aside time to complete the work. Below we will consider the peculiarity of installing a window regulator, using the example of the front door of a VAZ 2115. The work is shown in relation to the door, on the right side.
Installation of window regulators: step-by-step instructions
1. Removing the window regulator
Before carrying out work, start by removing the weight from the car's battery to prevent an accidental short circuit in the circuit. Then proceed like this:
- Take a Phillips screwdriver and use it to remove the three screws holding the door pocket. After this, remove the latches of the product from the holes in the door trim. Please note that the pocket fastening screws simultaneously hold the lower part of the door trim on the VAZ 2115. At the same time, the pocket panel plays the role of a speaker trim.
- Using a screwdriver, pry up the window lifter handle latch by inserting the tip of the tool between the latch and the socket.
- Remove the socket, and then pry it with a screwdriver and remove the door handle trim.
- Take a Phillips screwdriver and unscrew a couple of screws securing the handle, then remove it.
- Using the tip of a screwdriver, pry up the inner handle trim and remove it.
- Unscrew and dismantle the button, after which remove the handle and the facing part of the mirror control device.
- Remove the door trim. Here you will have to overcome the resistance of the product clamps (pistons).
- Using a 10mm socket, unscrew a pair of bolts securing the glass frame to the window regulator device.
- Unscrew the nuts of the various fastenings of the window lift guide - two in the middle, one in the bottom and one in the top.
Once the work in question is completed, take a 8-mm screwdriver and unscrew the three mounting nuts that hold the window lift mechanism in place. After this, remove the lower pin of the mechanism guide from the hole in the door panel. Take a screwdriver and, with its help, remove the upper guide pin from the hole, and then remove the window regulator through the opening in the door panel.
2. Installation and connection of the window regulator
Before installing the window regulator, place it in the folded state. If required, supply power to the gear motor from the vehicle battery. Next, proceed like this:
Remember that when installing a window regulator, it is not recommended to apply lubricant until installation is complete. Otherwise, there is a high risk of lubricant getting on the interior panel during the work process.
Before installing the window regulator, prepare the necessary diagrams and follow the manufacturer's recommendations. You will need diagrams of the electrical equipment of the car and the power window.
Connection diagram for electric window regulator VAZ 2114
Then proceed like this:
- Apply power to the side window up/down switch block using the bellows.
- Connect the negative terminal to the battery terminal.
- Connect the wires and make sure the device is working.
- Place a plug in the hole in the door trim for the lift handle shaft.
- Replace the door trim (without the pocket for now), and after that, lead the switch wiring harness block into the hole installed in the trim.
- Replace the plug with the power window switch.
- Apply power to the switch and install the pocket.
Connection diagram for electric window regulator VAZ 2115
Installing a window regulator allows you to increase the level of comfort when operating a car and eliminate annoying handles in the car interior. The main thing is to have the installation diagram at hand and strictly follow the instructions in the article. In this case, installing and connecting an electric window lifter on VAZ 2114, VAZ 2115 or VAZ 2113 cars will not be difficult.
Video: Repair of electric window lifter on VAZ 2114
If the video doesn't show, refresh the page or click here
Design and types of window lifters
Window lifter for VAZ 2114
Window lifter for VAZ 2115, VAZ 2114 and other models of cars in this series can be of two main types. The mechanisms on the VAZ 2115 or 2114 do not have any fundamental differences from other models of the family.
The first of them is collapsible. They consist of two parts, a motor and a trapezoid, which are connected with fine thread bolts. If necessary, you can replace one of these parts while leaving the other. Previously, this was the most profitable option, since repairing a window regulator was much cheaper. Most often the trapeze had to be removed and replaced.
But in recent years it has been quite difficult to find high-quality trapeze on sale. Almost everything that is in stores lasts a month or two, and then again requires replacement. Therefore, collapsible device models are no longer so popular.
The second option is non-separable models. They are solid and do not allow the replacement of individual parts. On the other hand, a new non-removable factory window regulator for the VAZ 2113 and other models can last up to 3-5 years without requiring replacement. And with adequate use, even longer.
In addition to these types, devices are also distinguished by their operating principle. These are mechanical and electric windows of the VAZ 2114 and other models. The latter are also divided into lever, cable and rack and pinion. Their main difference is how the impulse of movement from the engine is transmitted to the plate holding the glass. This can be done by cable, lever or using a rack system.
1. Lever mechanism
2. Cable mechanism
3. Rack and pinion mechanism
Installation of power windows for VAZ 2114, VAZ 2115, VAZ 2113, Lada Samara 2
Electric windows are one of the favorite options of tuners. Today you won’t surprise anyone with “electric glass”; some Samara modifications are equipped with them even on the assembly line. But still, cars with manual windows more often end up in the hands of consumers. Meanwhile, there are several models of electric windows on sale. However, they are all different and are rarely suitable for installation on any VAZ 2113 car model; they often “specialize” in certain ones. There are models developed and produced specifically for Samara. The most commonly offered mechanisms are for installation in the front doors of cars. They are not suitable for rear doors.
You can read about the advantages and disadvantages of various designs of electric windows in the magazine “Behind the Wheel,” which regularly conducts tests of car accessories. Their common “trouble” is usually called failure or jamming in the cold when the glass is closed (worse if open!). Trouble can be prevented by timely and thorough lubrication of the mechanism.
Installing power windows on a VAZ 2114 is not difficult and doesn’t take long - this job can be done by any car enthusiast who has at least once held a screwdriver and a wrench in his hands. For example, let's install a window regulator in the front door of a VAZ-2115 car.
We show the work on the right front door of the car.
Before starting work, disconnect the negative cable terminal from the battery terminal.
Using a Phillips screwdriver, unscrew the three self-tapping screws (the photo shows the front one)…
...and remove the door pocket by removing its latches from the holes in the door trim.
The pocket fastening screws serve as the lower fastenings of the VAZ 2115 door trim, and the pocket panel serves as the speaker trim.
Use a screwdriver to pry up the window lifter handle lock (insert the screwdriver between the lock and the socket).
We take out the lock and the window lifter handle.
...and remove the decorative trim of the door handle.
Using a Phillips screwdriver, unscrew the two screws securing the handle...
...and remove the handle.
Use a screwdriver to pry off the inner door handle trim...
Unscrew and remove the button.
Remove the handle and trim of the mirror control mechanism.
Overcoming the resistance of six pistons,...
...remove the door trim.
Using a 10mm socket, unscrew the two bolts securing the glass frame to the window lift mechanism.