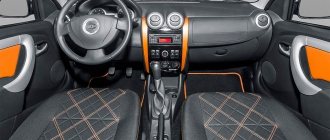
Anatomical seats for Chevrolet Niva | motorring online store
When driving a car, the driver, as a rule, monitors the road and assesses the situation on it.
His thought processes are focused and using motor skills, he gets from point A to point B as efficiently and quickly as possible. However, due to constant physical activity, many people find this exciting activity very tiring, and after several hours of driving, you just have to take a break, and suddenly you are overwhelmed by a wave of fatigue in different areas of the body. No wonder, because your neck, back, lower back, shoulders, arms, after all, were constantly at work, while your 5th point was practically motionless.
That is why, when driving, it is very important: where exactly you are “pressed”.
I very much doubt that Le Mans circuit racing drivers drive a hundred laps while sitting in the same seats as the average motorist. What kind of seats do these pilots have? Why can they drive a car for so long and not drown out the screams of the stadiums with their screams? It's simple, anatomical chairs help them with this. They allow the driver to drive an order of magnitude more without experiencing pain in the above-mentioned places.
The fact is that these seats are created exclusively for human anatomy. They are designed to support and support the back, neck, and lower back. Anatomical seats always have pronounced lateral support, so that the pilot does not get carried away to the side during sharp turns. This allows the driver to take turns more easily and removes the nominal load from the back, which is trying with all its might to compensate for the drift of the body during maneuvering.
It doesn't matter how many horses fit under the hood of your swallow. It doesn't matter which factory made it. It is important how you position yourself. If you go shopping for bread and back, then you won’t get any special PROFIT from an anatomical chair, except perhaps comfortable driving and a sporty appearance.
However, if a car is what gets you where you need to be, and this delivery takes time and effort. Then, having installed anatomical chairs, you will arrive at point B, practically not tired and will be ready for further business.
We present to you anatomical seats for Chevrolet Niva (VAZ 2123). Thanks to a special design, these seats reduce the load on the spine, which allows you to travel long distances with greater comfort, and additional lateral support provides confidence behind the wheel during sharp turns. Also, these seats will last you longer than the factory ones. Anatomical seats can be installed at any service center or by the car owner independently.
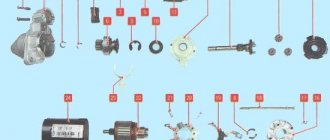
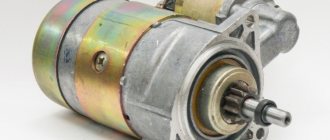
Main types of Niva starters
As a rule, owners have to choose between three models: OJSC ZIT, KZATE and ATE.
JSC ZIT 5722.3708 with planetary gearbox
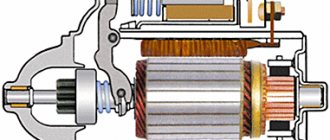
The starter of JSC ZIT with number 5722.3708 is ideal for VAZ 2121 cars. This is a model with four brushes and a DC electric motor, with a right-hand rotation type. The device receives excitation from permanent magnets flared with aluminum bushings. There is a planetary gearbox and a pull-in relay with two windings. The armature rotates in two plain bearings - installed in the cover and support.
KZATE 35.3708
KZATE modification ST-221 has been used since 1970. At that time, a version with a cylindrical manifold was used. There were also differences from the modern 35.3708 in the design of the rear cover and stator winding. It was considered trouble-free, high-speed and technologically advanced, but had a characteristic drawback - the bendix quickly deteriorated. The reason is that aluminum pads were used instead of the classic four roller steel ones.
Competent diagnostics of a gear starter
It is best to diagnose the starter on a bench. The temperature of the starting device should be within 25 degrees Celsius, and the brushes should be well ground to the commutator. The wiring used for testing must have a cross-section of at least 16 square millimeters. It is recommended to carry out several types of testing.
| Starter test type | Norms |
| In full braking mode | current consumption is no more than 550 A, and braking torque is within 7.5-13.7 N.m |
| Idling mode | current consumption is not more than 60 A, and the armature rotation speed is within 5000 rpm |
| Checking the solenoid relay | voltage no more than 9 volts with a 12.8 mm spacer installed between the gear and the retaining ring |
| Checking the turn-on relay | voltage should be no more than 8 volts |
Gear starter components need to be checked consistently. Each node needs to be tested differently.
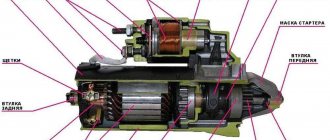
- Anchor. First check with a megohmmeter or a 220 volt lamp for ground breakdowns. The indicator must be placed directly to the slats. If a megger is used as a tester, then the resistance must be at least 10 kOhm. Next, check the turn-to-turn short circuit, inspect the commutator lamellas, and check the beating of the core. And, of course, there should be no signs of scuffs and nicks, as well as wear on various parts of the assembly. All this can cause a spell.
- Bendix. It should move freely and not be jammed on the shaft. The gear must rotate relative to the anchor shaft only in one direction. Carefully check the teeth - if they show signs of nicks, they should be sanded with an emery wheel. Severe wear on the coupling is a reason for replacement.
- Stator. Check with a special meter or a 220 volt lamp for breakdowns. The tester probes must be placed on the common terminal of the winding and the starter housing. The resistance must be above 10 kOhm, the windings must not have any burn marks.
- Lids. There should be no cracks on them. Pay special attention to the condition of the bushings - they should not show signs of wear. You should also check the fastening of the brush holder. The brushes themselves should move easily in their niches. Additionally, you need to measure the force of the springs on the brushes using a dynamometer - the norm is 9.8 N.
- Solenoid relay. Check the anchor for ease of movement. Test the plate and contacts with an ohmmeter. Turn the bolts the other way around or replace if there is significant wear.
Also interesting: Buy tires in the online store
Taking care of the starter extends its service life. There are cases where the device has served for more than 7-8 years.
| Vasily 0491 | The starter started to torment me. I turn the key, the car does not start. I open the hood, take the pliers and knock on the starter, and then the car starts. Such nonsense began to happen more and more often. and the last time it knocked for about 5 minutes, in the end I had to start it with a pusher. what do you suggest??? (shniva) |
| Vladimir 55 | change or better yet sort through. |
| Figus | I have a similar canoe. When you turn the ignition key, the retractor clicks (they said it was recently changed), but the starter does not turn. Five clicks and it starts spinning. Did I understand correctly that it is the copper plate in the retractor that is making poor contact? Is it possible to disassemble and clean the contacts? Or do I need to buy the entire retractor? |
| Sash | On the 213 Nivka they changed several traction relays, but it didn’t really work - I installed a new starter)) |
| Sunny | I don’t know how it is on modern starters, but on the old “classic” starters you could simply turn over this copper “penny” that is inside the solenoid relay. There, one side eventually stops connecting, and when they were rearranged, the second side began to work. |
| Slava N | Yes, they used to sell kits: a cover with terminals and a plate that closes them. To replace, you need a soldering iron of at least 60 watts. Previously, the closing plates were so thick and greasy. Now they look more like tin. |
| Sunny | Yes, the plates were solid |
| Andriy ibn Alyosha | Dear! I don’t get tired of repeating myself - first check, so to speak, less complex components (contact group, ignition switch). I repeat again - after such “incidents” I replaced a good native starter with an “excellent Chinese” one, and the problem turned out to be in the contact group (it’s a shame that the “non-working” starter was taken away from me and not returned, like “for reporting purposes”). If my information is not relevant in a particular case, ignore it. |
| Sanyok-Makarek | Here's how to check the CG: 1. Wire directly to the retractor command terminal - if everything works - look at the system before the retractor relay and starter (for example, the ignition switch, relay and other garbage...); if the retractor clicks, but the starter does not turn, see below; if it doesn’t even click or spark even a little bit, I scratch my head and think, am I a fool? Or maybe the wire in the retractor has burned out/fell off/was soldered poorly?..... 2. If the retractor clicks, but the starter doesn’t even try turn - with the ignition key turned to start, I bridge the bolts on the retractor with a piece of iron - if the starter starts to turn the engine - repair/replace the retractor......; if the starter starts to spin idle, there is a malfunction of the bendex (less often, the solenoid relay itself); if the starter doesn’t try to turn at all, I use a powerful wire from the battery to apply voltage to the starter itself directly - if the starter doesn’t work at all, remove it (the starter) and either repair it (brushes/windings/armature), or buy a new one……. |
| Serge454 | You take it to a proper electrician. He fixes it or doesn't fix it. If it doesn’t fix it, then install a new one and go! According to your options, you’ll be putting your ear to all sorts of bullshit for a week! It clicks and doesn’t click. But when will we live? In principle, it’s possible in the garage, but do you need it? |
| Figus | Well, don’t tell me........ Niva is just right for “digging yourself”!!!! So, what's the thrill? I drove it......to an electrician......NOT! |
| Creepy | everyone has their own quirks and inclinations... I, too, have weaned myself from “tinkering” in the car... But only in relation to the complex electronics of small assembled units... I only fix suspensions and engines myself - I don’t trust the craftsmen and it’s expensive.... To avoid tinkering, I bought myself a Toyota, to have some fun and dig around - I bought a Niva... I have money - the ashtray is full - I bought a new Niva, and there’s no point in listening, checking, repairing something.... |
| Rashevnik | This was my case. The starter on the carburetor NIVA did not engage the flywheel. I just cranked it, but when I loosened the bolts a little and pulled it towards myself without removing it, it started up without any problems. I removed the starter, checked the condition of the teeth on the flywheel and starter, the condition of the starter bushings and the operation of the bendix. I went through some things and replaced them, cleaned everything well - it worked |
| So | On VAZs the starter often warps |
| Carroseira | How can the starter be misaligned??? - it has a solid seat. |
| March | Most likely, we're talking about the rear end |
| Yoma | The Bendix will have to be replaced if it starts to turn and does not jam the gear, which means either there is oil inside, or the rollers are worn out and do not roll along the gear into the wedge of the cone slot. Bendix is not exactly cheap, but it is cheaper than a complete starter. There is another option, but this is for a very big fan of tinkering with hardware, one might say. You need to flare the bendex in a circle, halve it, select the rollers by diameter, adjust them to length, wipe everything dry and reassemble in reverse order. |
Also interesting: Niva-Chevrolet glove box lighting (installation kit) buy in the SUV online store
Tired of paying fines? There is an exit!
Forget about fines from cameras! An absolutely legal new product - Traffic Police Camera Jammer, hides your license plates from the cameras that are installed in all cities. More details at the link.
- Absolutely legal (Article 12.2);
- Hides from photo and video recording;
- Suitable for all cars;
- Works through the cigarette lighter connector;
- Does not cause interference to radios and cell phones.
Starter repair
There are 5 or more groups of faults, depending on which different methods of elimination are used. Let's take a closer look.
- There is no response from the solenoid relay; when the ignition is activated, the rotor does not operate. Primarily related to the battery. You need to check its charge or density. In addition, carefully sand the terminals with fine sandpaper and lubricate them with Vaseline. It is also possible with a similar symptom: interturn breakdown in the traction relay, armature jamming or broken wiring.
- Slow starter rotation. Again, you need to remove the battery by checking its condition and terminals. But, as a rule, in this case there is a burnout of the commutator or a malfunction of the brushes. Breakdowns in the windings and brush holder are also possible.
- Clicking sounds, the starter does not start the engine. A critical decrease in current is possible - check the terminals for oxidation. This also happens due to a breakdown inside the device.
- The starter turns, but the engine does not start. The overrunning clutch is slipping or the bendix lever (fork) is broken.
- The starter makes a strange noise when turned on. This is the first sign of loosening of the starter clamps to the body. It is also possible that it is secured crookedly. Another option is that the bushings (sliding bearings) are worn out, the armature touches the pole, the bendix does not disengage from the flywheel.
In the situations described above, faulty elements are replaced or repaired. Cleaning from dirt and oxides helps a lot.
Instructions for transferring a map file to a flash drive to increase memory capacity:
1. Buy a blank micro SD flash card. The minimum size of a flash card is 8 GB.2. Insert a blank SD flash card into the navigator.3. Connect your navigator to your PC using a USB cable. The PC must recognize the device and SD flash card as removable drives. Using the “My Computer” or “Explorer” tab, open the garmin folder on the navigator disk (the flash card disk is still empty).
We first recommend that you make a backup copy of this folder and save it on your PC. 4. On the SD flash drive, create a folder garmin.5. From the garmin folder on the navigator, cut the gmapprom.img map file and paste it into the garmin folder on the SD flash card.6. In the garmin folder on your SD card, rename the map file gmapprom.img to gmapsupp.
imgNow the map file is located on a flash card and includes the previous version of maps (“Roads of Russia. RF. Topo” version 6.1x), which needs to be updated. Disconnect the navigator from the PC and wait for the map to load. If you did everything correctly, the navigator will display the map located on the SD flash card. You can begin updating the map to the current version according to the instructions of the MapUpdater program. When updating, specify the SD drive.
In case of problems, it is enough to restore the garmin folder on the navigator from a backup copy. If you experience difficulties in carrying out such operations, then it is better for you to contact the nearest service center.
Note: flash card with the map “Roads of Russia. RF. Topo" after the update will only work in the device in which the 6.1x version card was installed, because Inside the device there must be an activation code (unlock code) for this card, unique for each device.
How to remove the starter of a VAZ-21213 car
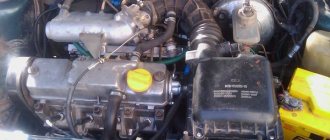
Disconnect the negative cable from the battery. We dismantle the air filter housing (see Removing the air filter housing).
Remove the front support bracket securing the intake pipe to the engine support bracket, disconnect the starter heat shield from the exhaust manifold and from the engine support bracket (see Replacing the gasket of the intake pipe and exhaust manifold of an injection engine).
1. Using a 13mm wrench, unscrew the bolt of the upper fastening of the starter to the clutch housing (this bolt also secures the rear support bracket of the intake pipe to the clutch housing). Similarly, unscrew the bolts of the middle and lower fastenings of the starter and move the starter forward.
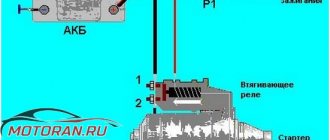
2. Disconnect the traction relay control wire.
3. Using a 13mm socket, unscrew the nut of the positive wire of the starter.
4. Remove the wire. In photo 1, for clarity, the receiver is removed, and in photos 2, 3, 4 - the inlet pipe and exhaust manifold.
5. Move the starter back along the cylinder block
6. Remove the starter.
Removing the starter from a carburetor engine is easier due to the lack of intake pipe support brackets. Install the starter in reverse order
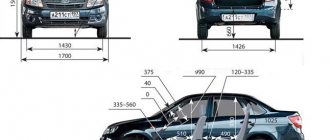
What is the volume of the tank in a Chevrolet Niva
Additional gas tank An additional tank is an excellent solution for those who are used to traveling not only in cities, but also off-road. To avoid the problem of running out of gasoline, many owners set the tank volume in the Chevrolet Niva tank.
This additional tank is not a mandatory device and the volume of the tank in the Chevrolet Niva is set if necessary. The best place to install it is the trunk of a Chevrolet Niva SUV.
Based on this, it is worth noting that, first of all, it is necessary to monitor the adsorber sensor, which directly affects the pressure in the gas tank.
Happy work! Do you still think that diagnosing a car is difficult? If you are reading these lines, it means you are interested in doing something yourself in the car and really saving money, because you already know this: Is your Shniva reliable? Many car enthusiasts claim that the domestic automobile industry is in complete ruin and there are no worthy companies producing normal cars.
However, this is a complete misconception and our engineers, albeit infrequently, can produce products worthy of attention. One of the main advantages of this car, which allowed it to reliably gain a foothold in the domestic market, is its increased cross-country ability.
The developers managed to achieve this thanks to a new generation transfer gearbox with a locking differential. The power unit is represented by a four-cylinder diesel engine with a volume of 1.7 liters and a power of 80 hp. Available modifications In the year, AvtoVAZ launched into mass production a new generation of NIVA Chevrolet, which used a more powerful power unit from Opel, in tandem with which the engineers decided to install a five-speed transfer-type manual transmission.
This combination made it possible to significantly increase the power and dynamic characteristics of the SUV. The electronic equipment of the car has also undergone significant changes.
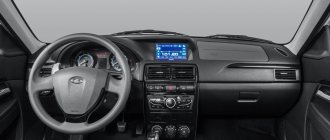
The vehicle has become more modern, comfortable and safe. tank volume in a Chevrolet Niva
The brake system is equipped with an anti-lock braking system, and the discs are equipped with ten-inch vacuum brake boosters. To increase the reliability of protection and safety of life of the driver and front passenger, the developers equipped the SUV with two modern airbags. An active air conditioning system has been installed in the car interior, providing an optimal interior microclimate.
A pleasant surprise was the presence in the updated NIVA Chevrolet line of seats with a pneumatic drive, which allows you to adjust the level of inclination and height, which significantly increases the level of comfort. The SUV leaves the assembly line in a two-volume body, the characteristic feature of which is a slightly reduced interior space in favor of the luggage compartment.
To increase the efficiency of using usable space, the fuel tank was located under the bottom of the car, and was also made in a form with a very complex design, which has a certain impact on the gasoline supply.
Characteristics of the gas tank According to the technical data sheet of the car, the SUV is equipped with a gas tank designed for 58 liters of fuel, when the supply of fuel decreases, the system will notify the driver using a special indicator located next to the dashboard.
Also interesting: Recommendations on how to select and replace the oil filter on a Chevrolet Niva
However, it should be noted that due to the design of the fuel tank and its complex shape, a dead reserve of gasoline of about 7 liters is formed in it. When the light flashes, indicating the need to replenish the fuel supply.
This usually happens at the moment when there are about 10 liters of tank volume left in the Chevrolet Niva. When refueling, the driver can add about 44 liters, which leads to the conclusion that the actual volume of the gas tank is more than 60 liters.
However, it is also necessary to understand the fact that it is impossible to give an unambiguous answer to the question about the volume of the fuel tank due to certain explainable reasons.
Firstly, the gas tank sensor is an old model, so it is unable to show the real amount of fuel, and secondly, in the warm and cold months of the year, different amounts of gasoline are placed in the gas tank. At Niva Chevrolet? Many owners of this vehicle may say that it is more important to know not this indicator, but the actual fuel consumption. To do this, you can study the car's operating manual and find out the tank volume. Working volume of the tank in a Chevrolet Niva cm3.
The engine develops power; the volume of the tank in a Chevrolet Niva is 80 liters. In this case, the torque is equal to Nm. The Chevrolet Niva has been produced since this year and during this time several modifications have been created.
In top versions, a 1.8-liter Opel engine is installed, the power of which is increased to horsepower. The engine lubrication capacity is 3.75 liters. Its viscosity class: Transmission oils from Lukoil TM-4 are made on a mineral base 80W 85, 80W and semi-synthetic base 75W and are off-season, high-quality, as additives from the world's best manufacturers are used.
They are needed for 1.6 liter gearbox housings. The same oil is used for the 0.79 liter transfer case. For the front 1.15 liter and rear 1.3 liter axles, 80W 90 and 85W are used. High temperatures, tank volume, loads and friction affect the service life and operating time of the motor. Without lubrication, gears and parts wear out quickly.
Preliminary diagnostics
A number of actions need to be taken:
- We check all the existing electrical connections that connect the starter and the battery, since it happens that poor contact between ground and positive leads to poor operation of the device, and the click of the retractor relay is heard, thereby not enough power to crank the crankshaft in the engine. This problem is eliminated by cleaning the contacts of the starter, battery, and various groups of contacts.
- We check the battery itself; it is necessary to replace the load plug itself with a proven one that is working. If there is no result, then it is necessary to remove the unit and replace it.
How many liters of tank does a Chevrolet Niva have?
Thus, it is very important to protect yourself from unnecessary fuel costs and replace the standard cover with one that has a lock. A lid with a lock is a fairly effective means of protecting the tank from draining gasoline. For this purpose, there are special models of lids with a lock that can be locked with a key. The lock in the lid design is strong enough and it is impossible to break it using physical strength.
Below in the photo you can see what a gas tank lock for a Chevrolet Niva is. When the key is turned, the thread is blocked, causing the cap to rotate idle on the neck. When the key is turned back, the lock unlocks the latches, thereby making it possible to unscrew the tank cap.
A lock built into the gas tank cap. Gas tank hatch. In the design of the gas tank, or more precisely, the body of a Chevrolet Niva car, there is such an element as a hatch. Thanks to its presence, the tank neck is hidden, thereby not disturbing the design of the car's exterior.
The hatch is called the outer cover, which is mainly made of sheet steel. The hatch is attached to the body structure using curtains, which ensure smooth opening and automatic slamming of the lid.
The gas tank flap is a weak point, as the curtains of the structure periodically fail. In some cases, repairs can be done, but this will require removing the hatch. But in most situations, a new device is purchased by choosing the appropriate color.
The hatch is removed in the following sequence: Initially, the hatch is opened directly; Using a Phillips screwdriver, you need to unscrew the two screws that hold the cover structure in place; Remove the product; Repair or replacement is carried out, after which the procedure for installing the cover is the reverse of removal.
To improve operation, the hatch must be lubricated with WD. Pressure and gas tank valve or ventilation system It is known that gasoline is a secondary petroleum product that tends to evaporate.
But since the gas tank is a closed structure, and it is opened quite infrequently, there is a risk of pressure developing inside the tank.
The tank is designed for low pressure, so if it increases, there is a risk of rupture.
Replacing the starter on a VAZ
The process of replacing the starter is quite simple and can be done at home. You will need a key “13”, as well as a new replacement part:
Required Tools
In order to remove or install the starter on a VAZ 2121, you need tools, the list of which is presented in the table below. Table - Tools required to replace the front strut
TitleNote
| open-end wrench | "at 13" |
| Head | "at 15" |
| Ratchet | With extension |
| Penetrating lubricant | For example, WD-40 |
| Metal brush and rags | For cleaning fasteners |
Starter replacement process
In order for the replacement of the starter on a VAZ 2121 to be successful, it is recommended to use the step-by-step instructions given below.
Source