Every modern car owner knows about the existence of an on-board computer, which can not only indicate the basic parameters of the operating mode (speed, consumption, temperature), but also recognize errors caused by various malfunctions. Unfortunately, Chevrolet Niva error codes cannot be deciphered without additional tables, since there are too many of them. Let's consider various diagnostic methods.
We receive the first signal about the presence of a malfunction using the indicator on the “Check-Engene” panel.
After turning on the ignition, all systems are tested, and if no errors are detected, this indicator goes out. Otherwise it remains burning. Specialized centers will quickly identify the error and not for free, but the Chevrolet Niva has a built-in on-board computer that can allow you to deal with the problem yourself.
Self-diagnosis
Without going into details of the operation of all electronics, we note that the functioning of all vehicle systems is “monitored” by an electronic control unit (ECU).
It receives information from numerous sensors. Like any computer, the ECU requires software called firmware. This firmware is capable of analyzing indicators received from sensors, comparing them with normal parameters, identifying errors and storing these errors in memory.
Carrying out self-diagnosis
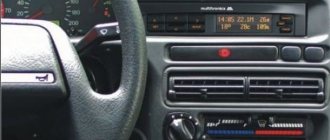
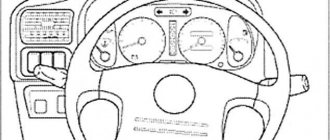
In the Chevrolet Niva, as in some other cars of the VAZ family, some parameters can be displayed on the VDO dashboard. It is often called an integrated on-board computer.
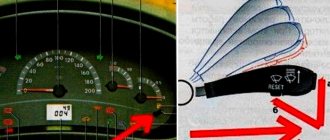
Testing is started by first pressing the daily mileage reset button and simultaneously turning the ignition key.
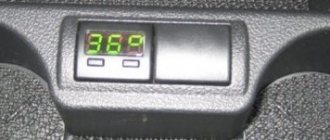
All instrument needles begin to move, which indicates the beginning of the testing process. Pressing the same button once will cause the firmware version to appear on the display, and pressing it again will give us a reading called an error code.
Panel codes should not be confused with ECU codes, which are diagnosed by external devices.
| Error code | Decoding |
| 1 | Processor faults |
| 2 | No signal from the fuel level sensor |
| 4 | Increased voltage of the on-board network (exceeds 16 V) |
| 8 | Reduced voltage on-board network |
| 12 | Control indicator malfunction |
| 13 | No signal LAMDA probe |
| 14 | Increased coolant temperature |
| 5 | Reduced coolant temperature |
| 19 | Error from HF sensor |
| 21-22 | Error with TPS |
| 24 | Error from speed sensor |
| 27 — 28 | Incorrect CO potentiometer parameters |
| 23 — 25 | Error from intake air temperature sensor |
| 33 — 34 | Error from the MAF sensor |
| 35 | Error from sensor XX |
| 41 | Error from phase sensor |
| 42 | Ignition system malfunction |
| 43 | Error from knock sensor |
| 44 — 45 | Rich/lean fuel mixture |
| 49 | Loss of vacuum |
| 51 — 52 | ROM/RAM errors |
| 53 | No signal from CO potentiometer |
| 54 | No signal from the octane corrector |
| 55 | Load on the power unit |
The operation of the on-board computer cannot be called flawless, since many errors arise as a result of software failure. You have to reset the errors by holding down the daily mileage reset button in testing mode. This diagnostic method is not entirely convenient for the reason that the error code can be the result of the sum of two codes at the same time (10=8+2).
Check engine error
If a check light comes on on a Niva Chevrolet car, this warns that there are malfunctions associated with the operation of the engine. The light comes on at the moment when the engine begins to detect a failure or error and writes a specific code into its memory.
Let's look at the main reasons why this warning may appear:
- The air/fuel mixture is incorrect. This problem is eliminated by filling the tank with higher quality gasoline.
- Low engine oil level
- Engine overheated
- There are problems with the ignition system, which may be due to a faulty spark plug or ignition coil
- The power system is faulty. It is possible that fuel injection into one of the cylinders has stopped.
- Lambda probe faulty
- A separate sensor in the ECM system has failed
We can conclude that in some cases, when the engine starts and the check light is on, this may indicate that the engine is operating in emergency mode and the problem is not very critical. If the engine starts and stalls, then this is most likely a problem with the fuel supply or the crankshaft sensor has failed.
In any case, it is better not to use the car until you find out the exact reason.
Diagnostics with a scanner
The information in this section is quite extensive, since there are many types of scanners.
The basic principle of their operation is that all data, including errors, is transmitted from the ECU to a special diagnostic connector, which in a Chevrolet Niva is located on the driver's side under the steering wheel.
The scanner's job is to read and decode these messages.
Note that there are dealer scanners, that is, those that are designed for a given car. For Chevrolet Niva this is BC State.
It is inserted into the panel instead of the signaling device, and the information loop is prepared from the factory.
Universal scanners should be connected to the diagnostic connector. The most popular scanners today are models that allow you to transmit information via Bluetooth.
To do this, you need to install the appropriate application on your smartphone, for example, OpenDiag, and connect it to the scanner.
The program interface allows you not only to read the parameters, but also to manage some of them. You can also reset all errors from your smartphone. There are scanners with their own display. All error information in the form of codes is displayed on this display.
Decoding codes
Now we suggest that you familiarize yourself with the decoding of the combinations. Why errors may occur and how to eliminate them can only be found out as a result of diagnostics.
The elm327 channel published a video showing the diagnostic procedure for a Chevrolet Niva using a special adapter and an Android-based mobile phone.
Common mistakes
First, let's look at deciphering frequently occurring problems that occur in the Chevrolet Aveo in the back of the T250, T300, Niva and other models.
Chevrolet Niva error codes
Errors transmitted through the diagnostic connector are displayed on an external device as a four-digit code. There are special tables that allow you to decipher these codes.
| Code | Explanation |
| P0102 | Low signal level of the mass air flow sensor (MAF). |
| P0103 | High signal level of the mass air flow sensor (MAF). |
| P0112 | low signal level of the intake manifold temperature sensor (ITM). |
| P0113 | High signal level of the intake manifold temperature sensor (IMT). |
| P0116 | The signal from the coolant temperature sensor (TTOZH) is out of the permissible range. |
| P0117 | Low signal level of the coolant temperature sensor (DTOZH). |
| P0118 | High signal level of the coolant temperature sensor (DTOZH). |
| P0122 | Low signal level of the throttle position sensor (TPS). |
| P0123 | High signal level of the throttle position sensor (TPS). |
| P0130 | Incorrect signal from oxygen sensor No. 1 to the converter. |
| P0131 | Low level signal from oxygen sensor No. 1 to the converter. |
| P0132 | High level signal from oxygen sensor No. 1 to the converter. |
| P0133 | Slow response to enrichment or depletion of oxygen sensor No. 1 to the converter. |
| P0134 | Lack of signal (open circuit) of oxygen sensor No. 1 to the converter. |
| P0135 | Malfunction of the oxygen sensor heater circuit No. 1 to the converter. |
| P0136 | Short circuit to ground in the N9 oxygen sensor circuit 2. |
| P0137 | Low level signal from oxygen sensor No. 2 after the converter. |
| P0138 | High level signal from oxygen sensor No. 2 after the converter. |
| P0140 | Lack of signal (open circuit) of oxygen sensor No. 2 after the converter. |
| P0141 | Malfunction of the heater circuit of the oxygen sensor No. 2 after the converter. |
| P0171 | The fuel supply system (fuel-air mixture) is too lean. |
| P0172 | The fuel system (air/fuel mixture) is too rich. |
| P0201 | Open circuit for controlling the injector of the 1st cylinder. |
| P0202 | Open circuit in the 2nd cylinder injector control circuit. |
| P0203 | Open circuit in the 3rd cylinder injector control circuit. |
| P0204 | Open circuit in the 4th cylinder injector control circuit. |
| P0261 | Short circuit to ground in the 1st cylinder injector control circuit. |
| P0262 | Short circuit to the source of the on-board network of the injector control circuit of the 1st cylinder. |
| P0264 | Short circuit to ground in the 2nd cylinder injector control circuit. |
| P0265 | Short circuit to the source of the on-board network of the injector control circuit of the 2nd cylinder. |
| P0267 | Short circuit to ground in the 3rd cylinder injector control circuit. |
| P0268 | Short circuit to the source of the on-board network of the injector control circuit of the 3rd cylinder. |
| P0270 | Short circuit to ground in the 4th cylinder injector control circuit. |
| P0271 | Short circuit to the source of the on-board network of the injector control circuit of the 4th cylinder. |
| P0300 | Random/multiple misfires detected. |
| P0301 | Misfire detected in cylinder N91. |
| P0302 | Misfire detected in cylinder N9 2. |
| P0303 | Misfire detected in cylinder N9 3. |
| P0304 | Misfire detected in cylinder N9 4. |
| P0327 | Low signal level of the knock sensor (DS). |
| P0328 | High signal level of the knock sensor (DS). |
| P0335 | There is no signal from the crankshaft position sensor (CPS). |
| P0336 | The crankshaft position sensor (CPS) signal is outside the permissible limits. |
| P0337 | Short circuit to ground in the crankshaft position sensor (CPS) circuit. |
| P0338 | Open circuit of the crankshaft position sensor (CPS). |
| P0340 | Malfunction of the camshaft position sensor (CPS) circuit. |
| P0342 | Low signal level of the camshaft position sensor (DPRV). |
| P0343 | High signal level of the camshaft position sensor (CPS). |
| P0422 | The efficiency of the neutralizer is below the permissible threshold. |
| P0441 | Incorrect air flow through the valve. |
| P0443 | The canister purge valve control circuit is faulty. |
| P0480 | Cooling fan N91 relay control circuit malfunction. |
| P0481 | Cooling fan N9 2 relay control circuit malfunction. |
| P0500 | Incorrect vehicle speed sensor signal. |
| P0503 | Intermittent signal from the vehicle speed sensor. |
| P0506 | Low idle speed (idle speed control blocked). |
| P0507 | High idle speed (idle speed control blocked). |
| P0560 | The on-board network voltage is below the system operability threshold. |
| P0562 | Reduced voltage of the on-board network. |
| P0563 | Increased voltage of the on-board network. |
| P0601 | Controller ROM checksum error. |
| P0603 | Error writing/reading external RAM of the controller. |
| P0604 | Error writing/reading internal RAM of the controller. |
| P0615 | Open starter relay control circuit. |
| P0616 | Short circuit to ground in the starter relay control circuit. |
| P0617 | Short circuit to the on-board supply source of the starter relay control circuit. |
| P1135 | Malfunction of the oxygen sensor heater circuit No. 1 to the converter. |
| P1140 | The signal from the mass air flow sensor (MAF) is incorrect; the measured load parameter differs from the calculated one. |
| P1141 | Malfunction of the heater circuit of the oxygen sensor No. 2 after the converter. |
| P1386 | The test pulse or controller knock channel integrator is out of tolerance. |
| P1410 | Short circuit to the on-board power source of the canister purge valve control circuit. |
| P1425 | Short circuit to ground in the canister purge valve control circuit. |
| P1426 | Open circuit for controlling the canister purge valve. |
| P1501 | Short circuit to ground in the electric fuel pump relay control circuit. |
| P1502 | Short circuit to the on-board supply source of the electric fuel pump relay control circuit. |
| P1509 | Overload of the idle air regulator (IAC) control circuit. |
| P1513 | Short circuit to ground in the idle air regulator (IAC) control circuit. |
| P1514 | Short circuit to the on-board power source (or open circuit) of the idle air regulator (IAC) control circuit. |
| P1541 | Open circuit in the electric fuel pump relay control circuit. |
| P1570 | There is no response from the car anti-theft system (ATS) or the circuit is open. |
| P1602 | Loss of on-board power supply voltage in the controller. |
| P1606 | Incorrect rough road sensor signal. |
| P1616 | Low level of rough road sensor signal. |
| P1617 | High level of rough road sensor signal. |
| P1640 | Error writing/reading internal flash RAM (EEPROM) of the controller. |
| P1689 | Incorrect code values in the controller fault memory. |
Video “Resetting Airbag Error”
If malfunctions are found in the operation of certain systems, then the first thing to do is to correct them. If after repair the codes remain in memory and do not disappear, then you can eliminate them yourself.
There are several options for resetting errors:
If the Chevrolet car was diagnosed using the Chevrolet Explorer program, then information about faults can be deleted through the utility.
In addition, there are other options for resetting codes:
User Alex Moss talked about self-resetting an Airbag fault using the example of a Chevrolet Epica.
Computer diagnostics
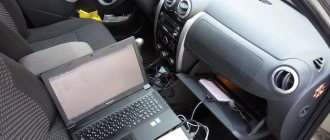
The most complete diagnosis is possible with a computer or laptop. In order to use this method, you must purchase an adapter. This adapter performs two functions at once. It is an adapter from a K-line port to a USB port or to a COM port. It also acts as a decoder, which allows you to transmit signals from the ECU to the PC. You will also need to install the appropriate software on your laptop. There are a lot of free versions on the Internet. There are universal programs, as well as programs written for a specific car. After connecting to the computer, you will need to turn on the ignition and launch the program. The connection will happen automatically.
The interface of the computer program is very convenient and allows even an inexperienced user to navigate intuitively. All functionality can be divided into several sections. These are parameters, errors and settings. If the first two sections are informational, then using the third section you can control the vehicle systems.
Self-diagnosis procedure for Chevrolet Niva via OBD2 connector
Determine where the OBD2 connector is located
The location of the connector also depends on the type of connector. You can study this issue in the article: “Location of the diagnostic connector on the Chevrolet Niva”
Determine which scanner is suitable for your car
The selection of a scanner (adapter) for a Chevrolet Niva depends on the connector, as well as on the needs of the diagnostician / car owner.
To select diagnostic equipment, use the calculator: “Scanner selection for Chevrolet Niva”
Download the diagnostic program for the scanner
The diagnostic adapter requires software that can be installed on a laptop or smartphone/tablet. Auto scanners with their own software shell and display do not require software.
To select a program for the adapter, go to the section: “Programs”
Use the instructions and carry out diagnostics
When you purchase an adapter, instructions are included with the adapter. More detailed instructions on diagnostic scanners and descriptions of their operation are posted in the section: “OBD2 car scanner reviews”
Identify errors and decipher them
Error codes and their interpretation are displayed in the scanner program interface. You can also study the complete database of errors for your car in the section: “OBD2 error codes for Niva Chevrolet”
Make repairs according to the error code
The unit is repaired according to the decoding of the error (problem) or contact a car service to eliminate a particular malfunction.
Check errors again
A good choice for a novice diagnostician
By following the link on the right you can get acquainted with the scanner for autodiagnostics “Scan Tool Pro”. This is an official dealer website that provides a 12 month warranty.
NIVA CLUB
International Niva Club
Search
- Links
- Unanswered topics
- Search
- Online store "NIVA SHOP"
Active topics
ECU errors. Check-Engine - the light came on!
- Go to page:
Check-Engine - the light came on!
Post by ILIA » 13 Dec 2010, 16:14
Re: Injector light came on!
Post by Anton » 13 Dec 2010, 16:16
Re: Injector light came on!
Post by Captain » Dec 13, 2010, 6:30 pm
Re: Injector light came on!
Post by ILIA » 13 Dec 2010, 18:40
Re: Injector light came on!
Post by Magellan » Dec 13, 2010, 07:54 pm
Re: Injector light came on!
Post by ILIA » 14 Dec 2010, 13:12
Re: Injector light came on!
Post by ALK » Dec 14, 2010, 01:27 pm
Who knows what's going on behind the fence of the zoo? ©
Re: Check-Engine - the light came on!
Post by Portada » Dec 14, 2010 6:35 pm
ECU errors. Check-Engine - the light came on!
Post by Axen » Mar 19, 2011, 03:24 pm
All ECU errors and symptoms are malfunctions. It is known that it is difficult to identify some faults even when identifying an error. The error must match the classifier. (for all types of ECU.
specify) First position: B — is for body codes P — is for powertrain codes C — is for chassis codes
Second position: 0—code common to OBD-II 1—manufacturer code
Third position - type of malfunction: 1 - fuel system or air supply 2 - fuel system or air supply 3 - ignition system 4 - auxiliary control 5 - idle speed 6 - ECU (ECU) or its circuits 7 - transmission 8 - transmission
The fourth and fifth positions are the serial number of the error.
Here are several types of ECUs installed on AvtoVAZ: https://www.chipautovaz.ru/Article06.aspx PS: Before asking questions, visiting the link is required! In the question, indicate the model and modification of the ECU. etc.
Re: ECU errors
Post by Axen » Mar 19, 2011, 4:30 pm
Re: ECU errors
Post by dimanoff2007 » Mar 19, 2011, 4:54 pm
Re: ECU errors
Post by Xavi » Mar 19, 2011 5:27 pm
What does error 8 mean?
In the table for decoding error codes of the on-board computer, error number 8 means that there is low voltage in the electrical network of your Chevrolet. To eliminate it you need to do the following:
- check the battery charge status;
- diagnose and, if necessary, repair the generator.
Most often, error 8 appears due to problems with the battery. It may lose its capacity over time and produce a voltage less than 8 V required for the normal functioning of the electrical network and vehicle sensors. Similar procedures are carried out if the network voltage is too high.
If you think that the error message was not generated by the on-board computer due to a problem, then you can check its readings. To do this, remove the negative terminal from the battery for 10 minutes, and then plug it back into the power supply. If there are no problems, then the error on the dashboard will disappear.