Steering column VAZ 2108, 2109, 21099
The content of the article:
Installation of an adjustable steering column from a VAZ 2114 in a VAZ 2109
I was quite worried about the fact that my VAZ 2109 does not have the ability to adjust the steering wheel height. This is especially inconvenient since I have UNP anatomical seats installed. They sit a little lower than the factory ones. The issue is resolved quite easily. The younger brothers of the VAZ 2115 family have a height-adjustable steering wheel.
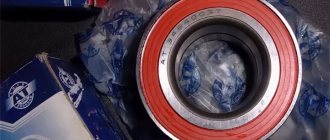
For modification we need this part, an adjustable column from a VAZ 2114.
So, let's start disassembling the steering column. And after 15 minutes of work, the interior of my nine already looks like this:
We remove the old column. Below you can see the difference between the standard steering column of the VAZ 2109 (in the photo it is on top) and the adjustable column from the VAZ 2114 (in the photo it is below).
There is one caveat when installing a new speaker. It is necessary to place spacers between the body of the installed column and the body, and it is advisable to increase (replace) the mounting studs.
In the future, everything is installed without any problems or modifications. Let's put everything back in place. I also used the steering column cover from a VAZ 2114.
As a result, we get these extreme positions of steering wheel adjustments!
Highest steering position:
Lowest steering wheel position:
Once again I achieved the desired result. Right now I can set the steering wheel to a position that is comfortable for me.
Installation of an adjustable steering column in a VAZ 21099
It seems like a hackneyed topic, BUT nothing really is written anywhere. Therefore, I will write everything down as much as possible. I'll start with perhaps the most exciting question. Is the steering column from 2110 suitable? There are 3 types of steering columns: 1. The oldest one is from the VAZ 2110 (the adjustment knob is located on the left side), yes it fits, its casing is similar to 2108, only there is a slot for the handle. In terms of style, this column is best suited for VP, I think so. It fits without the slightest modifications, etc.
it looks like this, this is the steering column from 2110
2. The same column from the VAZ 2114, it looks like we are all used to seeing. The adjustment knob is located at the bottom. In terms of the style of the casing, it is best suited for the Euro panel, again IMHO. It gets up just the same without a single hitch.
top one in the photo
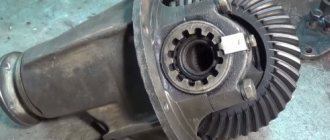
3. Well, the third is the steering column from a VAZ 2110 with power steering. The adjustment knob is located at the bottom, like the 14, and that’s where the similarities end.
this is what the column looks like
The difference is fundamental: - the intermediate shaft is completely different
- the shaft on which the steering wheel is directly attached is longer than 14 - the height travel is greater - I came across a column with a spacer plate for a new body with a Europanel for the 10th family
so to summarize, take any column to your taste, just look carefully at the shaft
What kind of blemish is this on the intermediate shaft?
circled
a lot of different crap: - remains from blocking the shaft (such a blocking crutch) - for balancing and a bunch of other things, to be honest, I don’t know what this is for, so I’ll just advise you to look for a column without it. Again, this is my personal opinion. Now, let's move on to the installation. unscrew the old column and forget about it. First we stick the new one into the rail (there is a special groove there, so that it fits into the slots in only one position). But it is screwed to the body with 2 studs (in the front), in the old version of the body the studs are welded and with 2 shear bolts (I didn’t fool around - I installed regular bolts
as you can see, I have a newer body style
To be honest, I was too lazy to try on the heels, but don’t skimp on the long ones. Especially if you are going to install a europanel
These are factory studs for the europanel
as you can see in the back there are regular bolts
Don't forget to put the ignition switch back on
It’s logical to ask, why is it needed at all? Yes, in fact, the old speaker was quite high enough, but when you go on the highway or, in principle, on long trips in a straight line, my hands begin to numb. This is where adjustment should come to the rescue. + to top it all off, in the VP it was hard for me to see the instrument panel behind the wheel.
Installation of power steering 2110-2112 in VAZ 2109
Task: installing power steering on Lada 2109
Stages: 1. Installation of the pump (and all associated) 2. Installation
Photo gallery of our works
Repair of double-circuit power steering pump BMW X5
Mileage: 130,000 thousand km
Reason for repair: The active stabilizer jammed and, as a result, all the seals on the dual-circuit power steering pump were squeezed out
Result: Repair of the power steering pump, replacement of all seals and seals. Replacement of the stabilizer
BMW E39 steering rack repair
Mileage: 220,000 thousand km
Reason for repair: The steering rack boots were torn, the shaft was rusty
Result: Steering rack overhaul, shaft grooving and replacement of the complete repair kit
Repair of steering gearbox of Volvo FM12 truck
Mileage: 250,000 thousand km
Reason for repair: Leaking steering gear due to severe corrosion on the steering gear shaft
Result: Replacing the steering gear repair kit and grinding the shaft
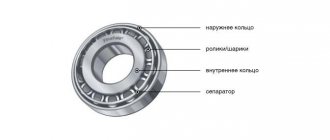
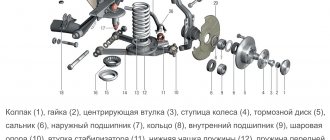
General information about the steering of VAZ 2108 / VAZ 2109 / VAZ 21099
Steering:
- Steering wheel,
- Upper steering column cover,
- Steering gear,
- Steering shaft flange,
- Steering shaft,
- Steering shaft pipe,
- Lower steering column cover,
- Ball joint,
- Tie rod end,
- Anther,
- Steering gear rack,
- Steering rod mounting bolt,
- Lock plate,
- Tie Rod,
- Front strut swing arm.
Steering wheel nut,
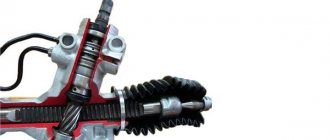
The vehicle uses a rack and pinion steering mechanism. The steering wheel, through a damper element, is connected to the steering shaft, at the end of which the steering gear drive gear is installed. The drive gear is in mesh with a rack, pressed against it by a spring, which allows you to adjust the degree of engagement. The rack has the ability to move longitudinally in the steering gear housing, the left side of which is closed with a protective rubber plug, and the right side has a pressed pipe with a longitudinal groove. The spacer bushings of the rubber-metal hinges of the inner tie rod ends pass through the groove of the pipe, which are attached directly to the rack with bolts installed inside the bushings. The steering rods are connected to the rotary arms of the left and right telescopic struts of the front suspension by ball joints located at the ends of the outer rod ends. The rods can be adjusted in length by means of a tube, which is screwed onto the end of the rod and secured with locknuts.
Service reference data
| Steering wheel play (measured along the rim), deg/mm | No more than 5/18 |
| Steering gear lubricant | FIOL–1 (20 |
When purchasing a book in PDF
1. You will be able to download the book immediately after payment.
2. The book will be downloaded in PDF format, and you can download it to any device.
1. All books are of ideal quality, since we work with publishers directly.
2. Electronic books are in no way inferior to paper books and are their complete analogue.
3. Our company has offices in Ukraine, Russia and Poland, you can always contact us at a specific address.
4. All payments on the site are maximally protected and are made using global payment systems.
Perhaps the automatic requests do not belong to you, but to another user accessing the network from the same IP address as you. You need to enter the characters into the form once, after which we will remember you and be able to distinguish you from other users exiting from this IP. In this case, the page with the captcha will not bother you for quite a long time.
You may have add-ons installed in your browser that can make automatic search requests. In this case, we recommend that you disable them.
It is also possible that your computer is infected with a virus program that is using it to collect information. Maybe you should check your system for viruses.
If you have any problems or would like our support team, please use the feedback form.
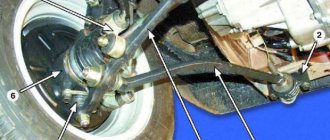
Let's analyze the removed steering rack of front-wheel drive VAZ 2108, 2109, 21099 cars and their modifications. The steering rack will have to be disassembled when deciding to repair it (this is one of the stages of repair) and not replace it with a new one in case of malfunctions. Namely, the appearance of knocking noises (the rack knocks), vibrations and shocks on the steering wheel, increased play in the steering wheel - problems that are very common on VAZ 2108, 2109, 21099 cars.
special keys for disassembling steering rack 2108
Features of disassembling the steering rack of VAZ 2108, 2109, 21099 cars
We will not consider removing the steering rods, protective cover and cap, because everything is simple there, but then it’s more complicated. To make work easier, the body of the rack can be clamped in a vice, but you can also do everything on your knee.
— Remove the steering rack stop
To do this, use a special wrench to unscrew the plug (nut) of the stop and remove it.
use a special wrench to unscrew the steering rack stop plug
We take out the spring located under the plug.
Use a slotted screwdriver to pry it up and remove the stop ring.
Turn the rack shaft (with an open-end wrench set to 14) clockwise until the end of the stroke and, pressing on the protruding part of the rack, move the stop.
We remove the rack stop itself from its body (you can use special thin pliers, insert them into the hole for the spring in the stop and pull it out, or simply knock it out with a sharp blow of the rack body on a wooden block due to inertia).
removing the steering rack stop 2108
— Remove the steering rack shaft with bearing
Remove the shaft boot.
Remove the shaft lock washer.
We unscrew the bearing nut with a special wrench and remove it.
unscrew the rack shaft nut 2108 with a special wrench
We remove the rack shaft with bearing. We use a lever: we hook it to the flat on the shaft with a long open-end wrench size 14 and, leaning it on the mounting (or a wide wrench), pull out the shaft.
remove the rack shaft using a lever
— Pull the rail itself towards the short part of the body
— Use a screwdriver to remove the rack support sleeve
— We remove the needle shaft bearing from the steering rack housing (you can use a special puller or drill two holes in the end of the rack housing with a 2 mm drill and knock out the bearing through them). The needle bearing should be removed for replacement only when it is clearly worn out, since it rarely fails.
a rack removed from the body, a support sleeve and holes for drilling through which the needle bearing is knocked out
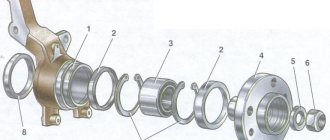
The steering rack of VAZ 2108, 2109, 21099 cars is completely disassembled.
elements of the removed steering rack shaft 2108
If necessary, use a puller to compress the ball bearing from the rack shaft using a pipe. First remove the retaining ring from the shaft.
Removing the steering rack shaft bearing using a three-legged puller
Notes and additions
— After disassembly, we completely wash the rack body and all removed elements. Next, we carry out the rejection of faulty parts, their replacement and assembly.
More articles on VAZ 2108, 2109, 21099 cars
Each component and unit of the car requires careful attention and timely maintenance. There can be no trifles here, because even the smallest cotter pin with a minor crack can lead to big troubles. By default, the steering mechanism should be serviced and diagnosed first - this is safety on the road, neglect of which can lead to very undesirable consequences.
The value of the rack in the VAZ 2109
The steering rack in front-wheel drive cars - VAZ 2108, 2109, 2111 and the like, is responsible for the operation of the entire steering mechanism. Ignoring the symptoms of problems that may arise with its technical condition can lead to undesirable consequences, including jamming of the mechanism, which is not the most pleasant surprise in traffic. Therefore, repairing the steering rack of a VAZ 2109 and other front-wheel drive cars should not be a surprise to the driver.
Signs of a faulty steering rack
With the help of a steering rack in front-wheel drive cars of most manufacturers, including domestic ones, the rotational movement of the steering wheel is transmitted using a rack and pinion mechanism to the swing arms, which turn the front wheels through steering rods. How this works can be seen in the figure below.
Diagnostics and repair of the VAZ 2109 steering rack must be carried out if the following symptoms become noticeable:
- Grinding noise when turning the steering wheel in the rack area;
- Leaking grease from seals;
- Periodic sticking of the steering wheel;
- Increased play in the steering mechanism.
Each of these symptoms needs to be checked, but if at least one of them is confirmed, the first thing you have to do is dismantle the steering rack for disassembly and fault detection.
Removing the steering rack
Dismantling the rack is a lengthy process, as it involves preliminary disassembly of many components. We do not pretend to present the optimal way to remove it, but as an example, consider the following procedure, if necessary, providing it with explanatory pictures:
- We hang the front of the car with a jack so that the wheels can be removed. Don't forget the wheel chocks.
- We provide full access to the steering rack by disconnecting the gas adsorber, wires and moving them to the side. After this, you can unscrew the bolt from the spline joint, having first aligned the wheels with the steering wheel. The bolt is located in the area of the pedal assembly, and to unscrew it we use a spanner or a cardan head.
- We clean the tie rod mounting nuts from dirt and undo them with pliers. Unscrew the nuts with a spanner wrench. To disconnect the rods, we need a puller, which we install as shown in the photo. Then we unscrew the rods from the rack housing. But it is better to remove the crankcase along with the rods - it will be easier to remove them in a vice.
- Having freed the steering rack, we take it out through the wheel well, clean it, wash it and clamp it in a vice.
Disassembly and defectiveness of the steering rack
We have the rack in our hands, now we can carry out complete disassembly and troubleshooting and replacement of parts. We would recommend purchasing a repair kit that includes all the parts to be replaced. Since the rail has been removed, it would be advisable to go through it completely.
Now we completely disassemble the steering rack, trying not to lose anything, there are many small parts there. First, remove the anthers, stops and end caps. After this, use an octagon, as shown in the photo, to unscrew the screw plugs and remove the spring, thrust bushings and retaining rings.
Then we remove the bearing and carefully inspect it for play. The repair kit must contain a replacement one, therefore, even if our bearing is in good condition, it is better to install a new one. We take out and inspect the drive gear, and it will allow us to remove the rack itself completely.
Next it will be a little more difficult. Now you need to replace the support shaft bushing and rubber bands, which should be in the repair kit. This is what they look like. Old and new.
Without removing the rubber from the bushing, you need to place it in the crankcase, and only then cut off the rubber with a sharp knife.
But this is not the biggest problem. Next we will change the needle bearing. To dismantle it, you need a special key, which not everyone has. Therefore, we will do without it. We will need a drill and a 1.5 mm drill bit. With this drill we will drill a hole so as to loosen the end of the bearing. Now it’s easy to knock out the old bearing from the crankcase using a punch. It looks like this.
Before pressing in a new needle bearing, be sure to thoroughly rinse the entire steering rack housing - there may be chips and debris left there after drilling. The hole that we drilled cannot be left like that and must be eliminated. The easiest way is a mixture of superglue and metal filings. The mixture hardens very quickly and this will not prolong the repair much.
Now you need to lubricate everything that is lubricated. To do this, use Litol-24 in any package or any other grease. Grease for CV joints is also suitable. Now you can assemble everything in reverse order and install the rack on the car.
There is nothing more to add - by rebuilding the steering rack ourselves, we saved a lot of money and learned how to do it ourselves, which is even more expensive than money.
Repair kit for rack VAZ 2109
It won’t hurt to familiarize yourself with the repair kits that are sold in car dealerships. They can be either complete or incomplete. The complete repair kit should include:
- Needle bearing;
- Support bearing;
- Retaining rings;
- Plastic support sleeve;
- Two rubber seals for the bushing;
- Spring;
- Set of gaskets;
- Boot cover;
- Rail;
- Drive gear;
- Set of ties for anthers.
The shortened set does not include the rack and pinion itself, but the full set may rarely be needed. Only when overhauling the rack.
After repairs, do not forget to tighten the fastening bolts and nuts several times every 200-300 km - they can become loose due to vibration. While operating the car, also do not forget to look at the rack boots. They can be of different quality, so it is not surprising if they ask for replacement after 10-15 thousand kilometers.
In general, repairing a steering rack is a simple but lengthy process, so you need to try to perform all repair operations as efficiently as possible. And then you will forget for a long time about knocking in the steering and steering play.
Repair
The first thing you will need to carry out your own repairs is a repair kit.
They are available at almost any auto parts store. However, we strongly recommend that you buy only high-quality kits so that the result of your DIY repair lasts as long as possible. What you need for work
The proposed kits are incomplete and complete. You will definitely need the following kit components:
- Needle bearing;
- A pair of rubber seals for the bushing;
- Support sleeve made of plastic;
- Set of gaskets;
- Spring;
- Retaining rings;
- Support bearing;
- Drive gear;
- Boot cover;
- Rail;
- Set of ties for the boot.
Repair kit Now that the kit is ready, the tools are available, and there is enough free time, you can get to work.
- First, remove the boot, end caps and stops. As you disassemble elements, even the smallest and insignificant at first glance, be sure to evaluate their current condition. If necessary, all worn-out elements will be replaced with new ones taken from the repair kit.
- Using an octagon, unscrew the screw plugs, which will allow you to remove the springs, retaining rings, and thrust bushings.
- Remove the bearing and check if it has any play. The repair kit includes a new bearing, so if the old component is in satisfactory condition, it is better to replace it immediately. It’s not for nothing that you took on such a complex process to get everything done 50%.
- Remove and inspect the drive gear. Next, you can completely remove the rail itself.
- Be sure to replace the support shaft bushing, not forgetting about the rubber bands. They are also included in the kit.
- Take your time to remove the rubber bands from the sleeve. First, insert the element into the crankcase, after which you can cut off the elastic with scissors or a sharp knife.
- The most difficult step is replacing the needle bearing. To remove it, you will need a special key. But you can do without it. In this case, arm yourself with a 1.5 mm drill bit and a drill. Using a drill, make a hole in such a way as to loosen the end of the bearing. Use a punch to knock out the old bearing from the crankcase.
- Before installing the new needle bearing, be sure to thoroughly clean the steering rack housing of accumulated debris and steel shavings from drilling.
- The hole made cannot be left. To eliminate it, you can mix metal filings with superglue. This mixture will harden quickly and give an excellent result.
- Lubricate literally everything that can be lubricated in the steering rack assembly. Experts advise using Litol 24 or other lubricants of similar quality. It wouldn't hurt to lubricate the CV joints.
- Reassemble the unit by following the reverse sequence of dismantling.
If you don’t have a key to remove the needle, repairing the steering rack yourself allows you to significantly save on replacement, plus gain a lot of experience in performing far from the simplest work related to your VAZ 2109. But you can do it easier, without taking any risks, by contacting a trusted car service center.
Unit in a vice
Checking status
Having completed the repair, you should not think that now the steering rack will serve tens of thousands of kilometers and will no longer cause you trouble. Like many other components, the condition of the rack must be periodically monitored.
What to look for
Your actions
Mounting nuts and bolts
These fasteners are subject to vibration after repair as they are used. Therefore, it is recommended to check and tighten them every 250-300 kilometers.
You can check it a little less often, approximately every 500-1000 kilometers, depending on the operating conditions of your car. Due to different quality, some anthers can last quite a long time, while others will require replacement after 10 thousand kilometers. The choice is yours which parts to use
The rack itself should be constantly monitored
Listen to the behavior of the steering mechanism, pay attention to the above signs of malfunction. As part of a scheduled technical inspection, be sure to include a check of the steering racks in the list of activities.
The repair cannot be called complicated, but it takes a lot of time
Plus, it is extremely important to perform all operations as carefully and efficiently as possible. Otherwise, the result will not last long and you will soon have to interfere with the design of the VAZ 2109 steering unit again
Dismantling
You will not be able to assess the current condition of the steering rack unless you dismantle the device.
There is no optimal way to dismantle the steering rack, since the process in any case involves quite labor-intensive, time-consuming work that involves disassembling many components.
Now you have a choice - completely replace the steering rack or try to repair it. The second option will take more time, but will save an impressive amount of money.
Removing the steering rack
To remove the steering mechanism you will need an inspection pit or a lift. Once under the car, you need to unsplit the steering pin nuts and knock the pins out of the steering arms.
After this, you need to unscrew the spline joint locking bolt located in the pedal area. Also remove the plastic casing that covers the steering shaft. After this, using a 13mm socket, unscrew a pair of nuts on each side that press the steering mechanism to the car body.
Carefully remove the brackets securing the steering mechanism. After this, we disconnect the drive gear from the steering shaft and lift the right side of the car with a jack, and then pull out the steering mechanism of the car through the window in the wheel well.
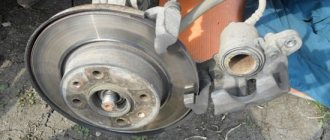
Specifically, on the car being repaired, there was severe shaking in the area of the steering shaft. Also, the steering wheel can wobble a lot from side to side. There is significant play both left and right and up and down.
Before starting work, you should disconnect the negative terminal from the battery. We need to remove the steering wheel, remove the plastic signal trim, unscrew it with a 24mm socket and a long wrench:
After this, we take the steering wheel with both hands and alternately pull it towards ourselves. Unscrew the tube:
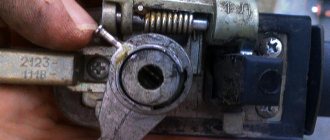
Disconnect the plug with wires. Next we need to remove the ignition switch, in our case the bolt heads were broken off, most likely this was done at the factory or at an official dealer to protect against theft. We will try to use a chisel to turn it counterclockwise.
Or, if you have a semiautomatic welding machine, you can weld studs to the bolts and unscrew them. Don’t forget to purchase new, normal bolts in advance so that you can easily tighten them during assembly. Pull out the retaining ring:
After this, you can remove the handle and unscrew the nut, take out the bolt and bushing. Use a 13mm socket to unscrew the bracket (2 bolts and two nuts):
Using a 13mm wrench or socket, unscrew the last mounting bolt:
The old bearing can be knocked off with a hammer. We knock out the other bearing using a mandrel, which we insert into the “binoculars”.
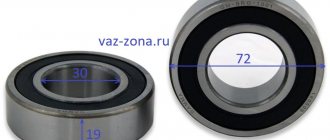
New original bearing from VAZ, number in the spare parts catalog 6-1000805. It is placed inside with the plastic part. To make the bearing seat easier, lubricate the steering shaft, you can use silicone grease. I recommend lubricating the bearings themselves with lithol. We assemble in reverse order; the video shows the entire process from start to finish.