The brake system fault indicator is on
Most often, the reason is trivial - like a low level of brake fluid in the reservoir or excessive wear of the brake pads equipped with the corresponding sensors. Another simple reason could be... the parking brake is on (it happens that the limit switch is simply faulty). However, brake fluid leaks can also be the cause of a decrease in the level - they must be urgently identified and eliminated.
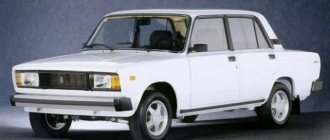
Brake system VAZ 2107
The braking system on the “seven” ensures safety when driving. And if the engine is needed for movement, then the brakes are needed for braking. At the same time, it is very important that braking is also safe - for this purpose, the VAZ 2107 was equipped with brake mechanisms that use the friction forces of various materials. Why was this necessary? This was the only way in the 1970s and 1980s to quickly and safely stop a car speeding at high speed.
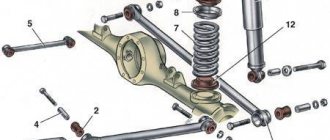
Brake system elements
The brake system of the “seven” consists of two main components:
- service brake;
- parking brake.
The main task of the service brake is to quickly reduce the speed of the machine until it comes to a complete stop. Accordingly, the service brake is used in almost all cases of driving a car: in the city at traffic lights and parking lots, when the speed of traffic decreases, when disembarking passengers, etc.
The service brake is assembled from two elements:
- Braking mechanisms are various parts and assemblies that have a stopping effect on the wheels, as a result of which braking occurs.
- The drive system is a series of elements that the driver controls to apply the brakes.
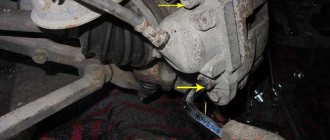
The “seven” uses a dual-circuit braking system: disc brakes are installed on the front axle, and drum brakes are installed on the rear axle.
The purpose of the parking brake is to completely lock the wheels on the axle. Since the VAZ 2107 is a rear-wheel drive car, in this case the wheels of the rear axle are blocked. Locking is necessary when the car is parked to prevent the wheels from moving arbitrarily.
The parking brake has a separate drive that is in no way connected to the drive part of the service brake.
The handbrake is the element of the parking brake visible to the driver.
How does it all work
The principle of operation of the VAZ 2107 brake system can be briefly described as follows:
- The driver, while driving along the highway, decides to slow down or stop.
- To do this, he presses the brake pedal with his foot.
- This force immediately falls on the valve mechanism of the amplifier.
- The valve slightly opens the supply of atmospheric pressure to the membrane.
- The membrane acts on the rod through vibration.
- Next, the rod itself exerts pressure on the piston element of the master cylinder.
- The brake fluid, in turn, begins to move the pistons of the working cylinders under pressure.
- Due to pressure, the cylinders are expanded or pressed (depending on whether disc or drum brakes are on a given vehicle axle). The mechanisms begin to rub the pads and discs (or drums), due to which the movement speed is reset.
The system includes more than 30 elements and assemblies, each of which performs its own function during braking
Features of braking on the VAZ 2107
Despite the fact that the VAZ 2107 is far from the most modern and safe car, the designers made sure that the brakes worked flawlessly in emergency situations. Just because the system on the “seven” is dual-circuit (that is, the service brake is divided into two parts), it is possible to brake even one part of the circuit if the other is depressurized.
Therefore, if air gets into one of the circuits, then only that needs to be serviced - the second circuit is working properly and does not need additional maintenance or bleeding.
Video: the brakes on the “Seven” failed
Parking brake ineffective
Have you tightened the lever, but the car still tries to roll downhill? In the simplest cases, the parking brake just needs to be adjusted normally. In addition, oiliness of the brake pads can affect it. It happens that the cables are jammed in the sheaths. Possible causes include oily discs or drums. Completely worn out pads may be to blame. And if the parking brake does not release the car, then most likely the pads are frozen or rusted to the brake drums.
Basic faults
The brake system itself is quite simple, but some of its elements require special attention. Main types of faults:
- The brake fluid leaks, resulting in a drop in pressure in the system. If a preliminary inspection does not find a leak, it is necessary to check the brake master cylinder. We bend the noise-insulating mat located under the brake pedal and inspect for streaks in the area of the rubber seal of the master cylinder. The presence of drips will indicate that the cause has been found and requires disassembling the cylinder and then replacing the cuff. If there is a vacuum booster, the brake master cylinder must be removed and inspected.
- When you release the brake pedal, the car drives sluggishly. Reason: the rear or front pads are jammed. Seized pads are identified by checking the heat of the corresponding wheel. We touch each disk - the hottest one will be jammed. In the case when these are the front wheels, you can, after removing the wheel, move the brake cylinder. If this fails, you will have to replace it with a new one. In the case of rear pads, the brake wheel cylinder will need to be replaced.
- When you press the pedal, braking does not occur, but it does when you press it several times in a row. This may indicate the presence of air in the system. The solution to the problem is to bleed the brakes to remove air.
- Problem with the handbrake. Most often this problem occurs in winter. It manifests itself in the fact that after a long period of parking, when the handbrake is released, the wheels remain locked. The reason is that the parking brake cable is frozen. During its operation, moisture gets there and freezes in winter. If the casing is severely damaged, it will have to be replaced.
Brake master cylinder diagram
Vibration when braking
This is a fairly common malfunction that is associated solely with critical or uneven wear of the discs or drums, and the repair will consist of replacing them.
Car shifts to the side when braking
The malfunction is due to either a failure of the working (wheel) cylinder or wear of the pads. Replacing them (or repairing them) will solve the problem.
The VAZ 2107 brake pedal fails: the main reasons
The brake system must be sealed and free of air. If the pedal begins to fail, then, with a greater degree of probability, we can say that depressurization has occurred, that is, air has entered the system.
- rust formation on the pedal linkage;
- failure of the vacuum booster;
- unadjusted distance between the cylinder piston and the pedal itself;
- lack of fuel fluid in the system.
It is also important to remember that brake fluid is an aggressive substance that can destroy thin pipes and even lines. That is why it is important to use only high-quality TZ. Low-quality liquid can form cracks through which it then flows out safely. But the flip side of the coin is that when you press the brake pedal, air leaks through these cracks.
Brake overheating
This type of malfunction is usually identified by the appearance of a burning smell. This is usually accompanied by an increased pedal travel, which begins to feel weak, as well as an increased braking distance. The cause of overheating can be either excessively active driving with constant braking, or simple forgetfulness, that is, the parking brake is too tight.
Additionally, possible culprits include seized cylinders and calipers.
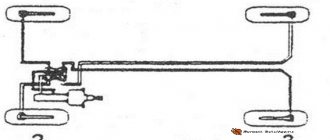
↑ Brake light adjustment
If the brake light switch is too close to the pedal, then it does not return to its original position, valve 9 (see Fig. 7–2), pressing against body 22, separates cavities A and E, and the wheels are incompletely released when the pedal is released.
The position of the brake light switch is adjusted by moving it when nut 5 is released (see figure). Install it so that the brake light buffer lightly touches the pedal stop, while the pedal free play should be 3–5 mm. After completing the adjustment, tighten nut 5.
WARNING! Adjust the free play of the brake pedal with the engine not running.
Noise when braking
High-frequency noise, squealing, and whistling can occur both during braking and, sometimes, during normal movement. The reason is the off-design mode of friction of the friction material on the working surface of the brake disc. Extreme wear on the brake pads and severe corrosion of the brake disc (often on the inside, “invisible” side) may be to blame. It happens that the brake pad lining has peeled off from the base. The list of possible causes continues with contamination of the pads, warping of the disc due to local overheating, improper fastening of the pads in the caliper, left pads or discs, etc.
Replacing front brake hoses
Replacing the front brake hoses on a VAZ 2107 is not a difficult procedure, and before performing it, you need to pump out the fluid from the expansion tank. To pump it out, it is better to use a rubber bulb or syringe. Before you start doing the work, you will need to grab a tool and get started.
- First, let's start removing the front wheel from the desired side. We remove the front wheel in order to free access to the hose.
- When access to the eyeliner opens, you must first clean the joints with a wire brush, and then treat them with WD-40 or similar lubricant.
- 5-10 minutes after treating the connections with lubricant, you can begin to unscrew the fittings. To do this, use a special 10 mm key with a slot.
- The key has a special stopper in the form of a bolt, which is screwed in after it is put on the metal tube.
- We proceed to loosen the bracket nut, for which you need to hold the fitting with a key “17”.
- As soon as the connecting coupling on the metal tube is loosened, you can remove the special key and continue unscrewing by hand.
- After disconnecting the hose, a rubber boot must be placed on the end of the tube to prevent dust or water from entering the system.
- To release the second end of the fitting from the bracket, you will need to remove the bracket with pliers.
- Using a flathead screwdriver, unscrew the screw that holds the trim bracket to the caliper. After this, you can dismantle the part.
New hose in place - Using a “14” wrench, you need to unscrew the bolt securing the second fitting.
- The copper washers must be replaced, and then proceed to install the new hose on the caliper. It is important to take into account one nuance - the tip of the fitting should be directed downward, not upward.
Read, it may come in handy: How to replace brake fluid on a “classic” VAZ
After screwing the second fitting, you can begin to perform similar actions, but on the other front wheel. This completes the installation of the front hoses, but do not rush to install the wheels in place, as you will need to perform the procedure of removing air from the system (bleeding the brakes).
Install and screw the locking bracket
When the brake pedal is released, one of the wheels slows down
The following reasons are suspected: jamming of the wheel cylinder piston, swelling of the brake cups, deformation of the brake pipe, jamming of the pads due to contamination of the guide, peeling of the brake pad lining of the drum brake. It happens that the tension spring of the drum brake shoes is weakened or broken, the parking brake is overtightened, or the cable is stuck in the sheath.
- Do you know which faults you can drive with and which ones you cannot? Take the test and check your driving skill level.
- To increase the life of your car, use additives from SUPROTEC. Original SUPROTEC products can be purchased at.
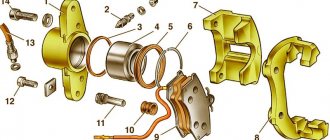
↑ Front brake caliper parts
1 - piston; 2 — dust cap; 3 - sealing ring; 4 — caliper with cylinders; 5 — connecting tube of wheel cylinders; 6 — air release fitting; 7 — pad pressure springs; 8 — brake pad mounting pins; 9 — cotter pins; 10 — springs; 11 — lining wear indicator wire; 12 — brake pads.
Instructions for assembling and disassembling the rear mechanism of the Lada 2107 with your own hands, the procedure for removing and installing the cylinder of the Lada 2105, checking the cylinders of the VAZ 2104, VAZ 2105, VAZ 2107. Operation and repair of the brakes of the Lada 2104. Checking the brake booster and cylinder of the Lada 2107. Maintenance of the front and rear brake mechanisms, regulator fret 2105.
Wheel cylinder: 1 — pad stop; 2 — protective cap; 3 - cylinder body; 4 - piston; 5 - seal; 6 — support cup; 7 - spring; 8 - crackers; 9 — thrust ring; 10 - thrust screw; 11 - fitting; A - slot on the thrust ring
Remove the protective caps 2, then press out the pistons 4 assembled with the parts of the device for automatically adjusting the gap between the brake pads and the drum of the VAZ 2104, VAZ 2105, VAZ 2107 from the cylinder body.
Wheel cylinder parts: 1 - piston assembly; 2 — cylinder body; 3 - thrust screw; 4 - thrust ring; 5 - crackers; 6 - spring; 7 — support cup; 8 - seal; 9 - piston; 10 - protective cap
Install the piston assembly with the automatic device on a special device so that the protrusions of the device cover the head of the thrust screw 3. Using a special screwdriver, turning the piston 9, unscrew the thrust screw 3 from the piston. Remove the seal 8 with the support cup 7 and the crackers 5 from the screw. Separate the thrust ring 4 and the thrust screw 3. Assemble the automatic device for adjusting the gap between the shoes and the VAZ 2107 drum and the wheel cylinder itself in the reverse order, taking into account the following:
— tighten the piston thrust screws with a torque of 3.9–6.9 N·m (0.4–0.7 kgf·m); Slot A on the rings should be directed vertically upward; deviation from the vertical is allowed no more than 30°. This arrangement of the slot ensures more complete removal of air from the brake drive of the VAZ 2107 VAZ 2105 wheel when bleeding the brakes; — to pre-compress the thrust rings, press the pistons into the cylinder body using a special device in the shape of a VAZ 2104 cylinder with a conical internal hole; — the force of pressing the piston into the cylinder must be at least 343 N (35 kgf); if the force is less than 343 N (35 kgf), replace the thrust ring; — when pressing the piston into the cylinder, it is necessary to maintain dimensions of 4.5–4.8 mm and 67 mm (maximum) for a free fit of the VAZ 2105 brake drum; — before installing parts into the cylinder body, lubricate them generously with brake fluid.
After assembly, check the movement of each piston in the cylinder body of the VAZ 2104, VAZ 2105, VAZ 2107. They should move easily within 1.25–1.65 mm. Replace the protective caps 2 last.