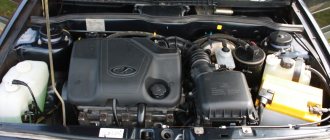
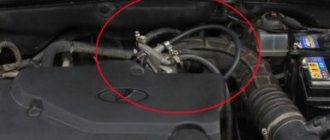
How to change coolant
Important! Before you begin the replacement process on the VAZ 2109, you must disconnect the “-” terminal from the battery.
Replacement should only be carried out when the engine is cool.
You can change the coolant only when the engine has completely cooled down!
Draining process
- To drain the cooler, place your car on a horizontal platform. If there are no such conditions, then try to make the front of the car slightly higher.
- Move the heater control lever all the way to the right.
Heater lever position
- Remove the ignition module with bracket.
- Unscrew and remove the reservoir cap.
Unscrew the lid of the antifreeze tank
- Place a container under the drain plug, the volume of which should be approximately 10 liters to drain the old cooler.
- In order to drain the old cooler, unscrew the plug located on the engine cylinder block.
Unscrew the plug on the cylinder block
- Drain the old coolant completely.
- Wipe the engine if liquid gets on it.
- Unscrew the drain plug located on the radiator and drain all waste fluid from it into a previously prepared container.
Radiator drain plug
Filling process
- We tighten the drain plug located on the radiator and the plug on the cylinder block.
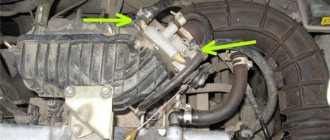
- Loosen the clamp holding the coolant drain hose and disconnect it from the throttle fitting.
- The hose must be held by hand.
- We pour new coolant into the tank and wait until it appears in the hose. Fill approximately 4-5 liters.
- Reinstall the hose onto the fitting.
- Install the clamp and tighten it.
- We pour coolant into the expansion tank until its level rises to about 0, a total of 7-8 liters should be required.
- Screw the tank cap tightly until it stops.
- We put the ignition module in its place.
- We start the car and warm up the engine to operating temperature.
- We turn off the car and check the antifreeze level.
- If necessary, top up. The level should be around about.
How to replace coolant on a VAZ 2108-VAZ 21099?
Draining: 1) Let's start with the fact that there is nothing complicated about this; the main thing, as always when making repairs, is to know some of the nuances, first you will need to drive your car into the inspection hole and at the same time the car should stand level, in extreme cases it is allowed that the front part of the the car was slightly higher than the rear one, but not the other way around, besides, when the car enters the pit and you turn off the engine, be sure to let it cool completely, otherwise you will get burned by the coolant when you drain it, at operating temperature of the engine, the fluid temperature reaches about 85 -90 degrees.
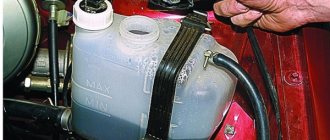
2) After preparing the car, open the hood, as soon as you open it, find the cap that covers the expansion tank (Indicated by the arrow) and unscrew it, depending on the year of manufacture of the car, this tank may look different, but is always present in the same place, which is shown in the photo below:
3) Now sit in the car and turn the heating knob all the way to the right (Unfortunately, the knob is not visible in the photo below, but the place to which you will need to turn it is indicated by an arrow), as soon as you turn it, get out of the car and climb under its bottom , while there, remove the crankcase protection so that it does not interfere with draining fluid from the radiator, or if instead of the protection you have a standard engine mudguard installed, which was installed from the factory on all cars of the Samara family, then read the detailed article on its removal, it is called: “Replacing the mudguard engine for VAZ."
4) After you remove all the interfering protection, proceed to draining the coolant, to do this, completely unscrew the two plugs, but before unscrewing, place an empty 10-liter container under them, that is, first start, for example, with the radiator plug, it is made in the form some kind of valve that needs to be unscrewed not with a key, but simply with your hands (This plug is indicated by a white arrow in the small photo, it is unfortunately poorly visible), as soon as you unscrew this plug, liquid will immediately flow out of the hole that it covered (Therefore, substitute the container in advance), wait until until this liquid is completely drained, as soon as it has drained, proceed to unscrewing the plug of the cooling jacket (Indicated by a red arrow, as you can see, this plug is very small), but to unscrew it you need to gain access to it and it is closed by the ignition module, so you will have to remove this module together with a bracket, for more details on how to remove the module, read the article: “Replacing the ignition module on a car”, after removing the module, completely unscrew the plug of the cooling jacket and wait until all the liquid has completely poured out of the hole, after draining the liquid, wipe all places on the which got liquid and the engine included.
Coolant change process
The first mandatory conditions when replacing antifreeze in a VAZ 2109: the procedure is carried out only on a completely cooled engine and before starting it, the “-” terminal must be disconnected from the battery.
The tools used to replace antifreeze can be an open-end wrench set to “13”, a screwdriver and a container for draining antifreeze, the volume of which is at least 8 liters.
To replace the antifreeze, you must place the car on a horizontal platform and begin work in accordance with the following step-by-step instructions:
- Open the hood and unscrew the cap covering the expansion tank.
- In the car interior, set the heating knob to the extreme right position.
- Remove both plugs completely, placing an empty container underneath in advance.
- Wait until all the antifreeze has drained from the cooling system.
Flushing the cooling system can be carried out using several types of liquids at once, including:
- distilled water;
- acidified water;
- special means for flushing the engine cooling system.
Flushing the cooling system is carried out either in warm weather outside or in a warm box.
The algorithm for filling antifreeze is quite simple and can be completely implemented on its own, even by those car enthusiasts who can be considered inexperienced:
- We tighten the drain plug and loosen the clamp holding the antifreeze drain hose.
- Fill at least 4-5 liters of coolant into the tank.
- Install the hose onto the fitting.
- Install and tighten the clamp.
- Pour antifreeze into the reservoir until it stops at the MAX mark.
- Screw the tank cap tightly and put the ignition module in its original place.
- Warm up the engine to operating temperature and check the antifreeze level.
Replacing coolant on a VAZ 2109 with an injector has some of its own features, namely the use of a throttle assembly.
Necessary tool for draining coolant on VAZ 2109-2108
You won’t need too many tools, but it’s still worth mentioning the minimum that will be needed:
- Phillips screwdriver
- socket head 13
- ratchet handle or crank
You will also need the following materials:
- two 5 liter canisters of antifreeze - I used a red Fellix Carbox
- a dry rag to wipe up traces of liquid if you spill it
- thin hose about 50 cm long - optional
- drain container
Replacement
The procedure for replacing antifreeze can be divided into four main stages:
- Draining the old coolant;
- Flushing the system;
- Filling with new antifreeze;
- Checking the functionality of the system.
Now we will go through each stage separately.
Expansion tank
Draining old coolant
- To work you will need a pit or overpass. In garage conditions this is not a problem.
- The procedure should only be started with a cold engine. Do not add new coolant if you just turned off the engine a couple of minutes ago. Otherwise, there is a risk of cracks in the cylinder block.
- Remove the negative terminal from the battery.
- Place a prepared container with a volume of about 10 liters under the car.
- Remove the cap from the CO expansion tank.
- Using a socket or a 13mm wrench, unscrew the drain plug from the cylinder block.
- Hold the plug so that the coolant pressure does not blow it away. There is no point in losing such an element.
- When all the liquid has come out, screw the lid on.
- Drain the coolant now from the radiator by unscrewing the plastic plug. The liquid will flow into the prepared container.
- Screw the drain cap on by hand. No tool required here.
Drain procedure
Flushing
If you find traces of contamination in the drained antifreeze, the liquid has acquired a rusty tint, it is better to rinse the system thoroughly. If you ignore this recommendation, the new antifreeze will not last long, so you will soon have to change it again.
- For washing, use special compounds or ordinary water. It is better to use distilled water, but if you really want to save money, take tap water;
- Pour CO flushing liquid into the system through the neck of the expansion tank;
- Start the engine, raise the speed a little and let the engine run for about 10 minutes;
- Turn off the engine and repeat the draining procedure according to the instructions that you read above. Only now the system will not contain antifreeze, but a flushing composition;
- Repeat flushing as necessary until the water coming out of the drain holes is clear.
Flushing the system
Flushing is just a recommendation and not a mandatory procedure. But those who regularly flush the system claim that it works more reliably and longer this way. So decide for yourself what to do.
Fill
To fill in new antifreeze, you don’t have to do anything complicated. You just need a special watering can. Many containers in which antifreeze is sold are not particularly convenient for pouring directly from them. Use a funnel to avoid spilling coolant.
It is extremely important to know exactly how much antifreeze is in the cooling system. The coolant for the VAZ 2109 requires 7.8 liters. Therefore, antifreeze should be purchased in 8-liter containers.
- Take a watering can and insert it into the neck of the expansion tank. This way you won’t spill precious grams of antifreeze.
- Check that all drain plugs are securely tightened. Otherwise, the coolant will simply spill out onto the floor and you will have to buy new coolant.
- Start gradually pouring in new antifreeze.
- Stop periodically for 1-2 minutes so that the liquid has time to distribute throughout the system.
- After filling the system, add coolant to the middle of the expansion tank level.
- Next, the most important thing is to get rid of the air that has entered the cooling system.
- Air accumulates in the upper pipe. To remove it, you just need to squeeze the upper pipe several times. Squeeze until you feel liquid appear inside.
- Bleed the cooling system. To do this, use a screwdriver or a size 8 wrench to unscrew the clamp that holds the return hose to the CO expansion tank (return).
- Now close the fitting with your finger, onto which the return line is put, so that air cannot escape from there.
- Next you need to blow into the expansion tank. Just imagine that you are trying to inflate the tank like a balloon.
- This will create pressure and coolant will begin to flow from the expansion tank into the CO, and excess air will escape through the return.
- As soon as antifreeze begins to flow out of the return line, the procedure can be stopped.
- Replace the return line and tighten the clamp.
- Reconnect the negative terminal of the battery, close the cap of the expansion tank and check the quality of the work done.
It is not recommended to begin active operation of the vehicle without checking.
Examination
Checking for coolant replacement is easy, but this does not make the importance of this procedure underestimated.
- Start the engine, let it run for a few minutes at medium speed;
- As the new coolant heats up, coolant will begin to flow from the return into the expansion tank;
- If the liquid spills out, you did everything right;
- Make sure the thermostat, temperature sensors, and cooling fan are working;
- When the engine temperature rises, the thermostat opens if it is working properly. Feel the bottom of the thermostat. If it is warm, everything functions perfectly;
- Wait for the fan to automatically turn on, cool the system, and shut down. Again, this behavior indicates the performance of the sensor and fan.
As you can see, changing antifreeze (or antifreeze) on a VAZ 2109 car with your own hands is not at all difficult. Therefore, it is not at all necessary to pay someone to do a job that takes literally an hour of your time and does not require complex dismantling procedures.
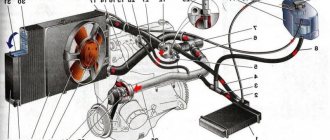
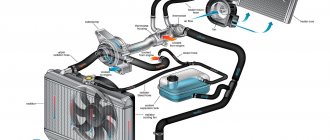
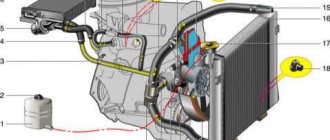
Coolant The cooling system of the “nine” engine is a closed circuit through which the working fluid – liquid (coolant) – is forced to circulate. The main elements of the circuit are an expansion tank, two radiators, a centrifugal-type vane pump, a thermostat and pipes.
Replacing coolant on VAZ 2108, VAZ 2109, VAZ 21099
Welcome! Coolant - it is only needed for the cooling system and in other systems of the car it is not used anywhere else, thanks to it the engine is cooled during operation and thus the engine takes longer to boil (If the system is working properly, it practically does not boil at all), if the liquid is removed from system, it will work, but it will boil so quickly (in about 5-10 minutes) that you will have to constantly turn off the engine of the car and wait until it cools down at least a little, besides, you will not be able to find out the temperature of the engine without liquid , because the sensor that monitors the temperature usually reads the temperature not of the engine (It’s just that everyone is already accustomed to calling it that, although the temperature of the liquid and the engine may even differ) but of the coolant itself, and how will it determine the temperature if this liquid is not there, therefore For the future, under no circumstances should you drive a car if all the fluid suddenly leaks out, since you won’t drive far and will most likely ruin the car’s engine.
Note! To replace this fluid in a car, you will need: An empty container of at least 10 liters (Although you can take less, it is best to stock up on a 10 liter container to avoid spilling the liquid), as well as wrenches, and a clean rag to use. wipe your hands and if liquid gets on the car engine, wipe it off it; in addition, you may need hex keys and different types of screwdrivers!
Summary:
When should you change the coolant? If you follow the manufacturer’s advice (we don’t recommend doing as the manufacturer says, but just take a note to yourself), then the fluid needs to be changed in cars of the Samara family every 50,000-75,000 thousand km. mileage, but in reality the liquid may become unusable earlier, factors such as the quality of the liquid (If it is fake, then 1000 km will be enough for it to change its color) and its expiration date (Each coolant has its own) are responsible for this. expiration date and after its expiration it must be drained and replaced with a new one, otherwise all the additives that are in it will stop working and the engine will firstly boil faster and secondly corrosion inside the parts will begin where the liquid leaks, the liquid has an anti-corrosion additive and thus when the shelf life of the liquid expires, then all additives cease to act as they should), by the way, when the liquid becomes unusable let’s talk, any liquid you probably paid attention to when purchasing has a color (Red, blue, etc.) .d.), if after a short period of use the liquid changes its color to reddish (a shade of rust), then the liquid is fake, it must be immediately replaced with a new one, in general, high-quality liquids have a very persistent shade and they retain their color for quite a long time and in the end they only darken, so if your fluid immediately changed color after filling it and driving the car for a short time, then you also filled it with a fake, which is best replaced with new fluid.
Note! When you come to a car store (Unlikely, but they can), we recommend that you check the fluid there for its quality, of course you will have to open it to do this, but if you first buy the fluid and later check it with the sellers, then you should not have any problems with the purchased fluid, You can find out in more detail about how you can check a liquid for a fake and find out how antifreeze and antifreeze differ from each other in the article: “Useful information about antifreeze and antifreeze on VAZ cars”, everything is described in detail there!
What to choose?
Today, when replacing coolant on domestically produced cars, people most often talk about antifreeze. But in addition to antifreeze, antifreeze is actively used for more modern cars.
For the VAZ 2109 cooling system, it is quite possible to use antifreeze rather than antifreeze.
| Coolant type | Peculiarities |
| Antifreeze |
|
| Antifreeze |
|
Variety of assortment
Taking into account the characteristics of each of the presented types of coolant, certain conclusions can be drawn:
- If we take into account the quality characteristics, antifreeze is significantly superior to antifreeze.
- Antifreeze is more practical, given its adaptability to our cars. Its composition is developed with an eye to the local climate, car quality and road conditions.
- You can ask for antifreeze from any oncoming driver passing by if your VAZ 2109 breaks down.
- The characteristics of antifreeze are quite sufficient to ensure the normal functionality of the CO.
Practice shows that it makes no sense to overpay for antifreeze to fill the cooling system of a VAZ 2109.
Device
Necessary tool for draining coolant on VAZ 2109-2108
You won’t need too many tools, but it’s still worth mentioning the minimum that will be needed:
- Phillips screwdriver
- socket head 13
- ratchet handle or crank
You will also need the following materials:
- two 5 liter canisters of antifreeze - I used a red Fellix Carbox
- a dry rag to wipe up traces of liquid if you spill it
- thin hose about 50 cm long - optional
- drain container
DIY guide for replacing antifreeze in a VAZ-2109
It is better to drive the VAZ-2109 into a garage, in the basement of which there is a special inspection hole. But not every driver can afford such a luxury, so lifting the VAZ-2109 onto an overpass using a jack is quite enough. If this is not possible, simply place the machine on a level surface.
Replacing antifreeze in domestic cars consists of step-by-step actions:
- Find the terminals on the VAZ-2109 battery and remove them, armed with a key designed for 10. Then move the stove heater control lever to the right until it stops.
- Pull out the expansion tank cap.
- Carefully use wrenches to get rid of the crankcase protection fasteners; your task is to remove it.
- Place a container under the radiator after unscrewing the cap.
- Wait until the old antifreeze has completely drained into the canister. Screw the lid on the container and set it aside out of the way.
- Using a socket or a 13mm wrench, unscrew the drain plug located in the block. The antifreeze needs to be poured out from here too.
- Once the system has been cleared of all coolant, move on to the carburetor. Take a screwdriver and forcefully loosen the clamp securing the heating hose. Remove the hose.
- The VAZ-2109 injection engine has a throttle assembly, so it is necessary to loosen the screw on the antifreeze supply hose. Then disconnect the pipe.
- With the help of a friend, carefully fill in new antifreeze, and at this time the assistant should observe the fitting from where the pipe was removed. You need to install the pipe back as soon as the first drops of antifreeze appear, this means that the expansion tank is full.
- When the hose is mounted in the same place, add coolant to the maximum level indicated on the tank, install the terminals and start the VAZ-2109 engine. Leave the motor in the active position until the fan turns on; if this is not possible, at least wait until the thermostat opens. Pay attention to whether the heater is working correctly.
- If no problems or shortcomings are noticed, add more coolant, if necessary. Please note that at this time the engine must cool completely, otherwise hot antifreeze will burst out like a fountain when the expansion tank is opened, you and everyone nearby may get burned.
Replacing coolant in the engine cooling system of VAZ 2108, 2109, 21099 cars
It would seem that a simple procedure for replacing the coolant (coolant) in the cooling system of a carburetor or injection engine of VAZ 2108, 2109, 21099 cars and their modifications has some features without knowledge of which, as a result, you can get a number of problems (for example, constant overheating of the engine and knocking out the cover expansion tank).
Therefore, we will analyze the replacement procedure taking them into account.
Necessary tools, accessories and spare parts
— Socket wrench or socket “13”
— A canister or two coolants (antifreeze, antifreeze) – 8 liters
Details about choosing antifreeze or antifreeze: “Choosing coolant for the engine cooling system of VAZ 2108, 2109, 21099 cars.”
— Wide container for collecting old coolant (basin) with a capacity of at least 8 liters
— Funnel for filling liquid
— Phillips screwdriver for removing the pipe clamp
Preparatory work
— We install the car on a pit or overpass
— Remove the engine crankcase protection
— Remove the mudguards of the engine compartment
— We place a container under the engine to collect old coolant
— Let the engine cool down
The procedure for replacing the coolant in the engine cooling system of VAZ 2108, 2109, 21099 cars
Draining old coolant
— Drain the coolant from the radiator
To do this, unscrew the radiator drain plug by hand. Drain the liquid.
— Drain the coolant from the engine cylinder block
Unscrew the drain plug on the cylinder block. We use a key or head at “13”. Drain the liquid.
— Remove any remaining old coolant from the system
Unscrew and remove the plug from the expansion tank
After which a little more old fluid will flow out of the radiator and cylinder block drain holes.
We squeeze the radiator pipes with our hands to expel the last remaining liquid.
— We screw back the drain plugs of the radiator and block
Adding new coolant
— Remove the supply pipe from the carburetor heating unit or throttle assembly of an injection engine
— Fill in new coolant
Insert a funnel into the hole in the expansion tank and pour liquid through it. There is no need to add all the liquid at once. Fill in a couple of liters and squeeze the cooling system hoses. A couple more liters, then squeeze again. In this way, air is removed from the system. Air will also escape through the removed carburetor heater hose or throttle body. When liquid appears from it, put the hose back and tighten it with a clamp.
Breakdowns and leaks of coolant from the reservoir
Modern car enthusiasts know that coolant leaks quite often occur on the VAZ 2109, which leads to serious overheating of the engine. Factors influencing antifreeze leakage are:
- insufficient tightening of pipe clamps;
- the appearance of cracks or abrasions in the pipes;
- radiator malfunction;
- the appearance of an air lock when filling antifreeze;
- all sorts of breakdowns in the cooling system.
If there is still an antifreeze leak, then the first thing you should check is the pipe connecting the radiator and thermostat. If there is moisture at the junction of the tube and the thermostat, then there is a leak. In this case, the way out of the situation is to replace the gaskets.
Another serious problem is coolant leakage into the engine. A similar problem is diagnosed by checking the condition of the spark plugs. If a white coating forms on the spark plugs, it means that antifreeze is getting into the engine.
determine the coolant on a VAZ 2109
- the appearance of sediment at the bottom of the expansion tank under the hood;
- antifreeze loses its natural color and appears rusty;
- the appearance of flakes in the coolant, which are especially noticeable at high temperatures;
- the appearance of foam on the surface of the coolant, which indicates a loss of the basic properties of the coolant.
If these symptoms occur, you must immediately replace the coolant to prevent further damage to the engine, which could result in costly repairs.
How to replace coolant on a VAZ 2109
In this article we will look in detail at how to drain antifreeze on a VAZ 2109 and completely replace it. We’ll also look at how to fix a leak.
It is necessary to change antifreeze or antifreeze according to the manufacturer's instructions or if the vehicle is operated at low temperatures. Any brand of antifreeze has a certain operating temperature, when reduced, the process of its crystallization can begin. To carry out the work, we need a lift, overpass or inspection hole.
Briefly about replacement
The process of replacing antifreeze on VAZ 2109 engines is carried out either once every three years, or once every 60 thousand km, or (advisable) when carrying out repair work on cooling system units. The operation route looks like this:
In this article we will look at how to drain and refill antifreeze on a VAZ 2109. Replacing antifreeze or other coolant is usually required in several cases. From time to time, we have already said that the properties of such technical fluids are lost over time and they need to be changed. Or you decided to fill your car with antifreeze from a different brand and a different color. Some other options are also possible, which will come from you personally. To replace, we will need the following tool: - a key set to “8” - a hexagon set to “12” - a container for old antifreeze Before you start replacing antifreeze or antifreeze, depending on what is in your car, it should be noted that these liquids are very toxic and You should be careful when working and do not allow these liquids to come into contact with your body, eyes or other organs. The replacement should be done on a pit or a lift, so it will be much more convenient for you to work, and to carry out work on a cooled car, in order to prevent burns, the coolant heats up very much. So let's start replacing the tholos on a VAZ 2109 - we will assume that you have already installed the car on a lift or inspection hole and it is convenient for you to work, you have already changed into work clothes and prepared all the necessary tools, now we open the cap and unscrew the cap of the expansion tank.
— after this, in the cabin you should open the heater tap by moving the heater tap handle to the extreme right position as shown in the figure.
— under the car you need to unscrew the bolts to remove the protection from the engine crankcase
-after the protection is removed, you should unscrew the radiator drain plug so that the coolant does not spill under the plug, you should place a previously prepared container where we will drain the used antifreeze.
— now that the antifreeze has been drained from the radiator, you should also drain it from the engine; to do this, unscrew the drain plug of the cylinder block after first installing the container for waste coolant in a new place.
— next we need to loosen the clamp and pull out the heating hose from the carburetor fitting
- now you should tighten all the drain plugs that were unscrewed earlier - after this you should start pouring antifreeze into the expansion tank until it begins to flow from the carburetor fitting. After this, pull the hose into place and tighten the clamp. After this, we look at the antifreeze level in the expansion tank and, if necessary, add it, naturally closing the expansion tank cap after that.
Moreover, it is worth noting that the cap of the expansion tank should be screwed tightly. Since it is under pressure and if the tightening is weak, antifreeze may begin to leak through it. After replacement, start the engine and warm it up to operating temperature, always turning on the fan. You should definitely check whether the fan turns on, because if the engine overheats, this will mean that you will have to make expensive repairs.
The procedure for replacing coolant on a VAZ 2109-2108
So, the first thing you need to do is unscrew the cap in the expansion tank to relieve pressure in the system - this will allow antifreeze or antifreeze to drain faster:
Then we put a thin hose on the outlet of the radiator tap, which is located in the lower right corner and turn off the tap:
And at the same time, lower the end of the hose into the drain container. Personally I did it like this:
At the same time, you can immediately unscrew the plug in the engine block with a key number 13:
And substituting another container, we wait until all the coolant drains from the block and the cooling radiator:
If antifreeze or antifreeze flows out of the system and is very dirty, has traces of rust and other particles, then it is necessary to flush the cooling system several times, pouring ordinary water into it and draining it back. This procedure must be repeated until the water comes out clean!
Then you can screw the block plug back in:
Also close the radiator tap and you can start pouring new antifreeze into the VAZ 2109-2108 system.
This must be done in a thin stream without sudden movements, so as not to form an air lock. Otherwise, you will have to drive it out later by opening the cap of the expansion tank and, with the “face” raised, heavily revving the engine on a warm engine.
After the new coolant is poured into the system up to the mark in the MAX expander, tighten the tank cap and start the engine. Let it run until the radiator cooling fan comes on. Then you can turn off the engine and, after a long stay, check the fluid level in the tank again. If it drops below the MAX mark, you need to top it up to the required level!
Antifreeze vs antifreeze
On sale you can find coolants labeled “Tosol” or “Antifreeze”. What it is? Let's understand this issue a little.
Antifreeze is any liquid that can freeze only at very low temperatures. Strong alcoholic drinks can be called antifreeze - they do not freeze at subzero temperatures. Antifreeze is a domestic brand of antifreeze that is blue in color and has a sweetish odor.
But antifreeze brands G11, G12, G12+, G12++ are foreign analogues of antifreeze. It is a green or red liquid with a longer service life. The composition contains a large number of additives that improve the performance of the cooling system. As for the cost, foreign antifreezes are slightly more expensive than domestic ones.
When is it necessary to replace antifreeze?
VAZ 2109 antifreeze needs to be replaced on time
- This issue should not be overlooked in any case. Because if the antifreeze is unsuitable, the engine will not cool properly.
- If the engine does not cool to the required degree, then there may be problems with the cooling system (partial failure) and spare parts will have to be replaced.
- In the worst case, the engine may boil - this does not bode well for you and your car.
- Thus, the engine must be well cooled, especially in winter. In winter, problems most often arise with the cooling system.
- In view of this fact, it is better to prepare in advance. That is, in the fall it is necessary to change the antifreeze.
- It is advisable to change antifreeze every autumn closer to winter. You should also replace parts of your car's engine cooling system that are damaged or close to failure.
Note! It is especially recommended to change antifreeze every year on older cars, since there is a greater likelihood of rust contaminating the radiator and other parts of the cooling system.
- Also, if rusty antifreeze is detected in the car’s cooling system, it is extremely necessary to flush the system. This will be mentioned below.
Features of coolant replacement technology
fluid replacement The procedure for replacing used antifreeze on a VAZ 2109 is fraught with a significant pitfall: in the process of filling the system with a new composition, there is a high probability of air pockets appearing. When the engine warms up for the first time after replacing the coolant, it is necessary to monitor the engine temperature:
- the coolant temperature arrow is approaching the red zone, and the cooling fan has not worked and cold air is blowing from the heater - there is an air lock in the system;
- hot air comes from the stove, but the fan does not work at the set temperature (about 105-107 degrees) - the fan is faulty;
- The fluid level in the expansion tank tends to increase.
The correct method of filling the system with liquid will help to avoid the appearance of an air lock:
- pour antifreeze into the expansion tank (full filling of the container is allowed);
- disconnect the compound supply hose from the throttle assembly heating fitting;
- add the composition as the expansion tank is emptied;
- if there is a phenomenon of liquid leakage from the heating fitting of the throttle assembly, put on the antifreeze supply hose (you may need to create a slight pressure in the tank (one or two deep exhalations into the tank are enough);
- close the tank.

