Engine cooling system
The cooling system is liquid, closed type, with forced circulation.
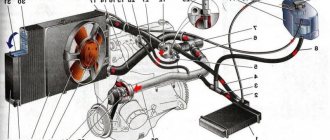
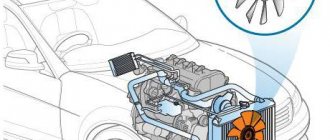
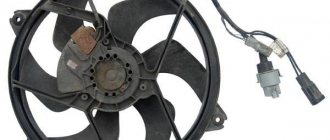
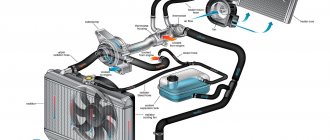
The tightness of the system is ensured by valves in the expansion tank plug. The inlet valve is normally open (the gap between it and the rubber gasket is 0.5–1.1 mm) - in this case, the system communicates with the expansion tank. When the engine heats up, the liquid expands and is forced into the tank; when it cools, it returns back. The inlet valve closes when there is a sharp increase in pressure in the system (boiling liquid), while the outlet valve is also closed. It opens when the pressure in the system reaches approximately 0.5 kgf/cm2, which increases the boiling point of the liquid and reduces its losses. The thermal operating conditions of the engine are maintained by a thermostat and a radiator fan. On a carburetor engine, the fan is mechanically driven and mounted on the coolant pump pulley. On an engine equipped with an injection system, two electric fans are installed in front of the radiator and are activated by command from the electronic engine control unit. Carburetor engine cooling system
Injection engine cooling system
1 – expansion tank; 2 – expansion tank plug; 3 – pipe for draining fluid from the heater radiator; 4 – hose for draining fluid from the heater radiator; 5 – heater tap; 6 – heater radiator; 7 – hose for supplying fluid to the heater radiator; 8 – hose for supplying fluid to the carburetor heating block; 9 – hose for draining fluid from the carburetor heating unit; 10 – thermal vacuum switch of the recirculation valve; 11 – thermostat bypass hose; 12 – coolant pump cover; 13 – fan impeller; 14 – coolant temperature sensor for the instrument cluster; 15 – radiator supply hose;
16 – radiator; 17 – radiator cap; 18 – radiator drain plug; 19 – fan casing; 20 – radiator outlet hose; 21 – coolant pump drive belt; 22 – coolant pump housing; 23 – hose for supplying coolant to the pump; 24 – thermostat; 25 – coolant supply hose to the throttle body; 26 – coolant drain hose from the throttle body; 27 – coolant temperature sensor for the injection system; 28 – electric fan impeller; 29 – electric motor; 30 – electric fan casing.
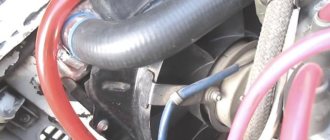
The coolant pump is a vane, centrifugal type, driven from the crankshaft pulley by a V-belt. The pump housing is aluminum. The roller rotates in a double-row bearing with a lifetime supply of lubricant. The outer ring of the bearing is locked with a screw. A pulley hub is pressed onto the front end of the roller, and a plastic impeller is pressed onto the rear end. For the correct position of the pump pulley groove, the distance from the mating surface of the pump cover to the outer end of the hub must be 84.4 ± 0.1 mm. When installing the cover with the gasket, check the gap of 0.9–1.3 mm between the impeller blades and the pump housing. To do this, you can use plasticine rollers: they are placed on equidistant impeller blades, a cover is installed, the nuts securing it are tightened, then the cover is removed and the remaining thickness of the plasticine is measured - it is equal to the gap.
Axial and radial play in the pump bearing that can be felt by hand is not allowed. If the bearing or self-pressing seal of the pump fails, it is recommended to replace the pump cover complete with the roller and impeller.
The redistribution of liquid flows is controlled by a thermostat with a solid heat-sensitive element. On a cold engine, the thermostat valve closes the pipe leading to the radiator, and the liquid circulates only in a small circle (through the thermostat bypass pipe), bypassing the radiator. The small circle includes the heater radiator, intake manifold, carburetor heating unit (on engine 21213) or throttle assembly (on engine 21214). At a temperature of 78–85°C, the valve begins to move, opening the main pipe; in this case, part of the liquid circulates in a large circle through the radiator. At a temperature of about 90°C, the main valve opens completely, and the bypass valve closes, and all the liquid circulates through the engine radiator. The main valve stroke must be at least 6.0 mm.
You can evaluate the serviceability of the thermostat by heating the lower radiator pipe: it should be cold until the liquid temperature (according to the indicator) reaches 80–85°C, and hot when it rises to 85–90°C. The thermostat is beyond repair. In case of malfunction, loss of tightness, or deformation of the pipes, it is replaced.
The radiator consists of two vertical plastic tanks (the left one has a baffle) and two horizontal rows of round aluminum tubes with pressed-on cooling plates. To increase cooling efficiency, the plates are stamped with a notch. The tubes are connected to the tanks through a rubber gasket. The liquid is supplied through the upper pipe and discharged through the lower. There is a coolant drain plug at the bottom of the left reservoir.
For better radiator airflow, casings are designed to direct air flow from the fan(s).
On the 21213 engine, the main fan shroud consists of two halves (lower and upper), the lower half has a rubber seal on the radiator side. An additional guide casing is installed in front of the radiator. On the 21214 engine, electric fans rotate in a casing in front of the radiator.
The expansion tank is made of translucent polyethylene, which allows you to visually monitor the fluid level (3–5 cm above the “MIN” mark on a cold engine).
To monitor the coolant temperature, a sensor is screwed into the engine cylinder head and is connected to a temperature gauge on the dashboard. An additional temperature sensor is installed in the exhaust pipe of the 21214 engine, which provides information to the electronic engine control unit (see here).
The heating system is described here.
Video
Replacing the water pump
The process of replacing the pump on a VAZ 2121 car of various modifications consists of the following steps.
- Purchasing a new pump.
- Preparation of tools and workplace.
- Disassembling the unit and dismantling the old pump.
- Installing a new pump and checking its functionality.
The specified sequence of work may change. If you are not completely sure that the pump will fail (perhaps the antifreeze is leaking due to wear on the gasket), you should buy a new pump only after dismantling and diagnosing the old one.
Pump selection
In addition to the standard product from AvtoVAZ, the following pumps are installed on the VAZ 2121 car:
- Fenox;
- Hepu;
- Luzar.
To cool the engine of an all-wheel drive vehicle, the new impeller is more efficient
The listed brands offer pumps with plastic and cast iron impellers. Despite the prejudice of car enthusiasts towards plastic products, it is better to choose plastic - the material is durable, lightweight and does not corrode.
You should pay attention to the dimensions of the impeller so as not to buy a fake or an old-style product, the efficiency of which is much lower
The original pump can be identified by the manufacturer's marks on the body
On VAZ 21213-21214 cars you can install a pump with catalog number 2107–1307011–75 from classic VAZ models. However, the standard Niva pump has a reinforced design, so such a pump will last noticeably less, and it can only be installed in extreme cases.
If the impeller breaks or otherwise damages the housing, it will also have to be replaced. Pumps are available for sale as individual pumps or as a set with a housing. The pumps for carburetor and injection engine options are absolutely identical.
Video: choosing a water pump for VAZ 2121
Required Tools
If there is a metal engine protection installed under the bottom of the car that blocks access to the lower bolt of the generator, it will have to be removed. This will require an inspection hole or overpass. Otherwise, you can reach the bolt without a hole - thanks to the high ground clearance of the car.
To remove the alternator belt, you need to loosen the nut that secures it.
To replace the VAZ 2121 pump you will need:
- flat and Phillips screwdrivers;
- mount with a spade-shaped end;
- standard sets of spanner wrenches and sockets with a wrench equipped with a ratchet;
- a short hose and a container for draining antifreeze (a basin or a plastic canister with a cut off side);
- rags, gloves;
- high temperature sealant;
- liter container with antifreeze antifreeze.
To replace the pump you will need a standard set of tools, protective gloves and a liter canister of antifreeze
When draining antifreeze from the system, some of the liquid will spill. Therefore, you should purchase a liter coolant container in advance for topping up.
Work order
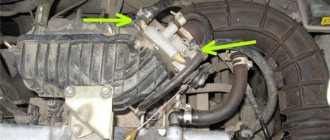
If access to the lower bolt of the generator is blocked by the engine protection, it must be removed on an overpass or inspection pit. Then you should loosen the nut on the generator mounting bolt without unscrewing it completely. In addition, on the VAZ 21214 injection model, you need to dismantle the air duct connecting the receiver to the plastic air filter box.
On the VAZ 21214 injection model, the air duct connecting the receiver to the plastic air filter box is dismantled
The coolant is drained in the following order.
Dismantling the pump
The procedure for dismantling the pump is the same for all modifications of the Niva.
The belt drive of the hydraulic pump will not interfere with changing the pump on a VAZ 21214
Use a rag to remove traces of antifreeze from the engine and body. Use a short knife or sandpaper to clean the housing mounting flange.
Installing a new pump
The new water pump is installed in the reverse order. In this case, a number of important points should be taken into account.
One liter of antifreeze purchased in advance will be enough to compensate for losses when draining the coolant. Don't forget to tighten the nut on the bottom bolt of the generator and install the air duct on the injection version. Start the engine, warm it up to 90°C and wait until the cooling fan turns on. This is proof that there are no air pockets in the system.
Lada 4×4 3D Gan-Gan › Logbook › restyling of the cooling system or thermostat 2123 on Niva 21213
Hi all. winter is ending. The cold has subsided a little. but the field is not getting any warmer... but there is no buzz. The culprit was a jammed thermostat. on old fields, as on classics, the cooling system is very ancient and its performance is not up to par. on 23 they changed this for the better. a closed circuit appeared on them. (For those who want to argue and troll this point, I won’t answer. Most cars are now produced according to this scheme. It’s all over, Google will help you!) In short, we change one scheme to another p.s. I previously installed twin standard 21214 fans for visual aid.
I decided to change it - we’re going to the spare parts store. Fortunately, there are no problems with this.
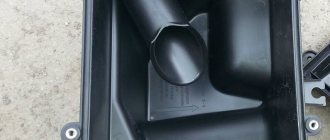
I needed 1. thermostat 2123 2. lower hose 2123 3. upper hose 2123 (I didn’t need it) 4. lower hose-tee 2123 5. thermostat hose 2108 6. exhaust pipe for the gazelle stove (I don’t remember which motor) 7. hose 10 mm. 2 meters (with a reserve) 8. hose 18 mm. 2 meters (with a reserve) 9. tank 2123 10. tank plug gazelle 11. a bunch of clamps norma. 12. antifreeze
I changed absolutely everything. all tubes and clamps! so as not to climb there for at least a year.
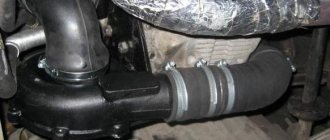
there is one problem left. — this is the output from the pump body to the stove according to the old scheme. since this metallic shit was exported to the trash (by the way, it was copper, idk like it is now)
Possible problems and their causes
Like any vehicle system, the cooling circuit must be regularly monitored and worn parts replaced. The first indicator of possible problems will be the level of coolant in the expansion tank. The main breakdowns of the cooling systems of VAZ Niva models:
- Maximum engine heating with cold main radiator pipes means the thermostat is broken. The part cannot be repaired, only replaced.
- Electric fans in injection systems turn on uncontrollably or do not start at all. This is an indicator of a breakdown of the sensor that transmits data to the controller.
- A faulty sensor on the cylinder head causes incorrect data on the control panel or its complete absence.
- A constant decrease in antifreeze level indicates a leak somewhere in the circuit.
Recommendations
Comments 31
Hello, please tell me, does it make sense to remake the cooling circuit according to the Shnivy principle, what are the advantages compared to the standard one? because I want to and I don’t quite understand why.
Hello. everything is simple + 1. closed system (the coolant boiling threshold increases). there is a secondary advantage - this is more correct combustion of fuel at high temperatures (motor efficiency). secondary minus - this engine is more loaded with temperature and pressure (in a nutshell. cylinder head mechanism, i.e. cylinder head gasket. An obvious example - a 1.6 engine with an 8 cl head on a Kalineprior. There this caused 2 problems. 1. the quality of the responsible unit like the cap of the expansion tank and the cylinder head gasket being pierced, the stove stops heating, exhaust gases go into the interior radiator and the tank. Look for more details on the forums of this engine (there is NOT a metal package there, like on the 16 cl.)). You can put a metal package on the field. but this can only be installed on an ideal engine (new or just rebuilt, the metal package does not tolerate a misaligned fit. You need to remove the plane from the block and head. And the issue of detonation arises at 92 because the combustion chamber will be slightly smaller. This is already 95 th plus - the engine efficiency is higher) 2. the interior radiator warms up faster. 3. 2123 more quality parts than 2101/2121 - 1. cost of rework. 1.1. The pump must be replaced with a 2123 assembly. (replaced when capitalizing) 2. DO NOT allow the expansion barrel to be empty. 3. the issue of the motor being pressurized (the pressure on 2101/2121 is approximately 0.2 bar. When on 2123 it is 1.3-1.4 bar) p.s. I did it. because I only drive the 95. The motor was capitalized FROM and TO. The efficiency of my motor is above average. and I prefer to keep up with the times. quality of parts at 2123. p.p.s. rework costs 2 years. Works great under the carb and under the injector. There are no problems with cooling and heating either in winter or in summer. I consider the remodel successful and worthwhile!
Can I have a photo of the radiator cap after modification? Thankful.
she is no longer there. radiator 21213 was replaced by 2123 that year. The cover has been disposed of. in fact it was like that. I cut off the rod from the radiator cap that holds the spring. and under the cover I cut out a thin gasket (from the chamber). The gasket is needed to prevent leakage, because... The cooling system 2121/2101 is characterized by the absence of pressure in it. the pressure in the cooling system 2123 is 1.6 bar. The cover from 21213 is naturally not designed for this; without a gasket it leaks.
The pressure in the system is up to 1 atm. After doing my CO trick, it’s a little inconvenient to bleed the air, so I’m thinking of switching to a closed one.
operating pressure for 2101/2121 0.2-0.4 bar. and usually increases when the gasket under the head is broken due to the passage of exhaust gases into the CO, in common parlance it “boils in the tank”
Good afternoon, why is the cork in the gazelle barrel? I installed it from shnivy. But recently I was skidding in the snow... and antifreeze began to press out from the top tube of the expansion tank