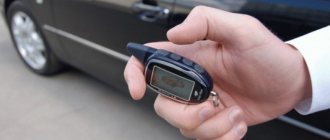
The Russian auto industry, unfortunately, only recently began to really listen to consumer feedback and make adjustments to the design of its cars. For several years, the question of an integrated seat heating system has been raised, which is very relevant in cold regions. This request was taken into account, but installation of this system at the factory is carried out only on new models, and is planned for those that are under development.
Thus, consumers actually received nothing, since the Russian auto industry refuses to produce this system separately for specific car models.
Universal
There are a large number of universal seat heating systems on the market, including for Kalina 2. At the moment, the most popular configuration is “Emelya”.
This is due to the excellent price/quality ratio, as well as high safety and availability in different regions. Compared to the standard set, the universal one is larger in size, but its characteristics are better. It heats up faster due to the use of slightly different technology in the design. As a rule, most motorists whose car does not have a heating system installed from the factory prefer the Emelya system. It fits well on virtually any make and model, making it truly universal.
How to install heated seats on Kalina yourself
heated seats Kalina or Grant
When carrying out work independently, it is necessary to carry out a number of specific actions in the following sequence
:
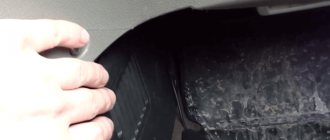
- remove the seats by unscrewing the special plastic covers on both sides;
- separate the back and seat by removing the bolts securing them;
- in the lower area of the backrest, lift the upholstery and install a heating system in this place, also mount the elements directly on the seat itself;
- Carefully place the trim in the same place and connect the connectors for the separate heated seats and backrests;
- remove the white connector and connect it to the power supply on the gearshift lever;
- be sure to install the special fuse included in the kit;
- install buttons to turn the equipment on and off in a convenient place.
When installing, it is important to follow all instructions for the specific heating kit. For more reliable fastening, as well as ease of operation, it would be better to remove the seats from the car, although this is not a prerequisite
The installation steps are not at all complicated; doing them yourself will not be difficult; you only need basic skills that are easy to master. The result is worth it, because warm seats in the winter will provide a particularly comfortable environment inside the car.
source
Composition of a seat heating kit and how to install heaters on Granta with your own hands
Preparation for installation of heating elements
Before connecting the heated seats on the Grant, you need to secure the heaters under the upholstery of the seats. Of course, it is more convenient to do this on dismantled “seats”, previously disassembled into two parts: the back and the support. Creating acceptable conditions for installing heating elements is the goal of the preparatory stage. By the way, when determining the reasons for the knocking of hydraulic compensators, there is a slightly different logic.
Preliminary activities are carried out according to the following scenario:
- Disconnect the power supply to the seat belt sensor located under the seat. In many trim levels, this option is available only to the driver.
- Using an E10 head mounted on the knob, unscrew the four bolts connecting the base of the seat frame to the body and remove the seat. For ease of access to fastening elements, move the seat to the farthest or closest position. Similarly, remove and pull out the second front “seat” from the passenger compartment.
- Remove the backrest angle adjustment knob by prying it off with two flat-head screwdrivers.
- At the junction of the backrest and seat, remove the plastic covers on the left and right sides by unscrewing one screw each.
- Unscrew 2 bolts on each side securing the backrest frame to the metal base.
- Detach the backrest from the seat.
- Repeat steps 3-6 for the second chair.
Factory covers are attached to the frame with four clips. On the reverse side, the fixing elements are clamped with wires. Having untwisted the latter, we tighten the fabric. Before removing the backrest cover, disconnect the plastic lock at the bottom of the structure. When assembling, it is advisable to replace the wire with plastic clamps.
Installation of heaters
The purpose of preliminary positioning is to achieve such an arrangement of the heaters that the wires exit into the joint of the backrest and seat. You won't be able to play with the longitudinal base - the standard kit is designed strictly according to the dimensions of the depressions. After removing the protective tape, glue the element to the frame. If necessary, the foam is trimmed to allow the wire to exit unnoticed.
How to install heated seats on Kalina yourself
Tuning Kalina's interior The whole process involves several stages of work, which consist of installing heating elements and connecting their system to the car seats. It is better to purchase heated seats Kalina or Grant.
When carrying out the work yourself, it is necessary to carry out a number of specific actions in the following sequence
Connection diagram for seat heating buttons VAZ 2110
- remove the seats by unscrewing the special plastic covers on both sides;
- separate the back and seat by removing the bolts securing them;
- in the lower area of the backrest, lift the upholstery and install a heating system in this place, also mount the elements directly on the seat itself;
- Carefully place the trim in the same place and connect the connectors for the separate heated seats and backrests;
- remove the white connector and connect it to the power supply on the gearshift lever;
- be sure to install the special fuse included in the kit;
- install buttons to turn the equipment on and off in a convenient place.
When installing, it is important to follow all instructions for the specific heating kit. For more reliable fastening, as well as ease of operation, it would be better to remove the seats from the car, although this is not a prerequisite
The installation steps are not at all complicated; doing them yourself will not be difficult; you only need basic skills that are easy to master. The result is worth it, because warm seats in the winter will provide a particularly comfortable environment inside the car.
The option “Heated rear seats of a car” is no longer uncommon; it can be found in the list of equipment even for budget foreign cars. AvtoVAZ is constantly improving its LADA models, but the turn has not yet come to heating the rear sofa. Let's figure out how to equip your car with this useful function with your own hands.
Installation and connection of heated rear seats for all LADA cars (XRAY, Vesta, Largus, Granta, Kalina, Priora and Niva 4x4) is carried out in the same way. There are no fundamental differences. In this example, the modification process is shown on a Lada Priora car.
Why built-in heated seats are better
The first problem is that the quality of many capes leaves much to be desired. It is not uncommon for a cape to catch fire directly under a person sitting on it. The risk of getting burned is quite high, not to mention the fact that the clothes will probably be ruined.
The second problem is that the capes heat up differently. For some, the temperature reaches 40 degrees, and this adversely affects reproductive function in men.
The third problem lies in the fact that there is usually only one cigarette lighter socket in a car, therefore, it will only be possible to connect the heated driver’s seat, and, as a rule, there are also passengers in the car. You can, of course, use a splitter, but the current consumption will be too high, and the fuse in the splitter will not withstand it. In addition, when using capes and covers, extra wires appear in the interior, which can interfere with driving the car. Using covers on the rear seats of a car is out of the question due to the insufficient length of the electrical cable.
Main types of electric heating systems
As already mentioned, such systems differ in configuration, as well as in the time that may be required to install them.
. Some types of kits can be installed in a matter of seconds, while others can take about six hours.
All designs are divided into subgroups
depending on the following criteria:
How to make heated seats on a VAZ 2110 without contacting a service center
According to the type of heating element used
Depending on the area to be heated
- Electrically heated seats only;
- heated seat and back area.
Depending on location
- easy installation on the surface of the covers;
- more complex installation under the cover.
Depending on operating modes
- a simple device with on and off buttons;
- begins to work upon contact with a person;
- a device that maintains temperature conditions at an automatic level, etc.
There are also two types of system designs
Standard heating
It is equipped with a reliable and safe design, which is quite suitable for long-term service. In this case, special threads are used that perform the heating function. Certain thermostats are built into the system. The buttons of such a device have self-locking properties. Standard equipment is designed to heat the seat and back area.
There is a wide variety of different universal heating systems
. One of the most common today is the Emelya set, which is of high quality. The elements of the kit are an order of magnitude larger in size than in standard equipment, but they also heat up faster. This will be one of the profitable options if the heating system is not installed by the manufacturer.
Car rear seat heating installation
Solution
The obvious solution would be to install heated seats on your viburnum yourself. However, there are many nuances in this matter that require a qualitative study of the theory. There are a large number of different systems on sale, with different operating modes, and, accordingly, with different prices.
Depending on the complexity of the design and the number of built-in modes, installation can take up to several hours. In this case, if you do not have enough knowledge and experience, it is better to turn to specialists. Since if you install it yourself, there is a very high chance of damaging the product, after which you will have to overpay for the second set.
Absolutely all designs that are present on the market can be divided into 2 types:
- 1. Thread;
- 2. Carbon fiber.
At the same time, just dividing into 2 types does not complete the range of systems. They differ fundamentally from each other in the type of heating, technology used, location in the cabin, type of installation, type of operation, etc.
There are a huge number of nuances that are extremely difficult to deal with on your own.
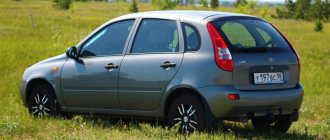
Lada Kalina Hatchback 2011, 85 l. With. - other
Lada Kalina, 2006
Comments 35
Please tell me! Where is the diagnostic connector located? In your photo there is an empty space for the connector, and that’s exactly what I have. Or is there no connector at all, or did you move it? I've dug through everything on my viburnum, I can't find the connector, or is it not there at all?!
I did it myself according to the same scheme, but took power from the cigarette lighter, later I will remake it on a separate branch
Respect to the author!) An interesting idea is how to make only one butt-heater for the driver's side, it turns out that only one relay is required?
Do the buttons automatically turn off when they get too hot?
Hello.Please give me a link where I could buy seat heaters. I want to fit them in my Niva.
Cool! I have heating pads, I’ll probably do the same. Thanks for the detailed description!
In general, everything is fine, but the inclusion of the backlight and the on state is not clear. There are 5 contacts on the button.
Dear greetings to everyone, I agree the wiring on the cigarette lighter is bad, but for 3 months now my heating connected through the cigarette lighter makes me happy, pah pah pah!
The diagram shows that from pin 2 there is a wire going to pin 87, but there are two wires + and - and. I can’t figure out what’s wrong, or am I mistaken, or has no one noticed?
everything is clear and understandable, I’ll make trouble for myself, just not the Emelya, but the factory ones, and I won’t disassemble the gray hair, but stupidly put it under covers and sew it on
guys)))) why are you doing this through the cigarette lighter? Of course, I understand everything, but basically the wiring burns due to voltage, the cigarette lighter has thin wiring, the load is large, for me it keeps the phone charging and the backlight at maximum ((((I also plan to install heating on my viburnum, I just know how to disassemble the seats, I think I won’t take the Emelya, but I’ll take the factory one))) thank God we have a lot of this in Togliatti)))) and I think I’ll do everything like from the factory, I’ll probably have to pull it directly from the battery)))
exactly what I was looking for, everything in detail, thanks for the post)
And in general it’s a TEST! Great job! Ugh ugh ugh so that it works without problems.
I’ve been studying this topic for a while now and I’m amazed. Why doesn't anyone install fuses? Of course, I understand that it’s in the mounting block for the cigarette lighter, but it’s better to put one more just before the heater (4A*12V=48W) + on top of that, I would put another relay in this circuit for the plus after the cigarette lighter block, and the manager would apply it to it would be from the ignition switch. Otherwise, we had a case. The man had a luxury Viburnum, drove the car into the garage in the evening, and it BURNED, along with the garage! The relay is stuck. I myself, when OKA had a periodic low beam relay, stuck. The probability of two relays sticking at once is much less than one. So you need to BE INSURED! Just in case.
Can you draw a diagram?)))based even on this one?
good report. I’ll have to stir it up myself, otherwise I’m tired of poking at the cigarette lighter.
source
Top 5 modifications to Lada Kalina
Hi all.
This means that two years have passed since I owned this car, and as much as I remain satisfied with it, I have 5 life hacks for you that will help you when operating this car. Well, I think that thanks to these life hacks, your car will also make you happy. Because the car, in this case, is mine for the sixth year, 2006, and there were some problems that it would be advisable to eliminate immediately.
Something is not a jamb, something, well, more has been done to improve it. Well, I still want to share with you, maybe this video will be useful to someone. So let's go.
Lifehack No. 1
This is Kalina's ECU, that is, almost all of Kalina's owners have probably encountered it; those who haven't, they already know about the drawback in the location of the ECU. Initially, Kalina's ECU is located here under the panel.
And there is a stove above the ECU, and Kalina’s stove tends to leak, but we’ll talk about this later, why and how. When the radiator leaks, the heater usually floods, which means the brains of the ECU.
That is, the ECU costs, I have a Boshev one, it costs about 7 - 8000. Like any other ECU, that is, approximately, that is, any other ECU in this area costs. Here, no matter what your situation is, that is.
Here's how I solved this problem? That is, immediately when I bought the car, I got it from there, screwed it on there with these covers and installed it here.
This is how I have it located here, here I have the lighting for the legs, that is, here, I placed it under the glove compartment, there it does not bother anyone, no one kicks it, as I initially thought that they would touch it with their feet, no one doesn't hurt, doesn't interfere with anything.
That is, I secured it with two bolts, the first, the second and that’s it. That is, this is enough. It stays here, nice, warm and dry. That is, I think this should be done first of all when buying Kalina.
Because if your brain is flooded, it’s a waste of money, which is unnecessary, so first of all, those who don’t know yet, be sure to do it. It literally takes 20 minutes and will save your wallet very well.
Suspension
So, then, the second thing I would like to talk about is the suspension. How did I encounter the suspension? That is, it didn’t leak, it didn’t knock or anything, but it kind of rattled, not just knocked, it sort of rattled and rattled, it was here, there were some knocks in the supports, that’s it, and so on.
In short, I read and realized that the Grant suspension, that is, it was better designed, the Kalinovsky jambs in the supports were removed, well, in short, without hesitation, I bought Grant struts assembled with supports, with springs, everything, both front and rear.
Here. I went to Avito, searched for Grant and found a broken Grant with 15,000 miles on it, so they were bought from it, I paid 3,000 rubles for all the racks. That is, the front, the back, everything is assembled, here.
That is, the suspension was changed about six months after the purchase, that is, a year and a half later, I did not regret at all that I installed it.
Now, since it has proven itself only from the best side, no noise, very soft, pleasant. Exactly, that is, the main thing is that there is a drain, that’s it. That is, I really liked the pendant, so I kind of recommend it.
The stove doesn't heat well
The second thing I encountered when owning this car is that the heater does not heat up enough. That is, well, sometimes it seemed like there wasn’t enough heat, that’s it. Plus airing the system and so on.
I also read it and realized that this was also done better on Grant than on Kalina. Well, as it were, Granta is the same Kalina, that is, with the jambs eliminated. That's why many people installed a Granta thermostat.
I installed it too, but you won’t be able to see it here. I installed, here, a Grant thermostat. That is, what are the advantages? It has much less, it has much less pipe of any kind.
That is, it is generally simpler. I'll leave you a link under the video to my DriveDvorra, where I have everything chewed up. So, what’s the point, that is, who is interested in Grant’s soda and in general in what I’m talking about, in general in all the alterations, that is, go in and read there.
What can I note, then, after the rework? Now, the main advantage here is that the contour is small, when I sit in the car, the wind is blowing - it’s inconvenient to talk about.
A small cooling circuit on the Grant thermostat, it goes, that is, the engine and the heater radiator, that is, what do we get? We start the car, as soon as the engine warms up, it immediately releases heat into the interior onto the radiator.
That is, before, if I was driving to work in winter, that is, I literally had to get to work so that it would become more or less warm in the car, now, that is, it’s enough to drive, well, warm up a little and drive a couple of kilometers .
And that’s it, it’s already kind of warm in the car, that’s it. That is, this is the main advantage. There’s no airing, there’s none of that. But, that is, the point is airing, you will have air in the stove, well, the stove there is, in general, a honeycomb, but alteration will not help.
You also need to monitor the condition of the cap on the expansion tank. For myself, I found such caps, which means they are, well, a cap for the expansion tank, it’s called “Avtopribor”, in a blue box it says “Avtopribor”, these are good caps.
But once a year I still try to change them. Well, here the opinion of potassium growers is generally divided, that is, into two types. Some say that it’s better not to mess with your native system, it’s just that you have a handicap there, that’s not the point, there are those who seem to change and are happy.
Here. I am one of those who change and am happy and have not regretted it at all. In terms of money, it all worked out, I installed all the pipes there that were needed, well, I installed everything new in short, it came out to about 3000, I don’t regret it at all, that is, there are only advantages.
Mirrors
The next thing I would like to note when owning a Gran, oh Kalina, is the mirrors. That is, mirrors from 2006, I won’t even say, to be honest, at what price, they cost very small drops like this, those who have them know that after restyling they already have these.
Procedure
Initially, you need to remove the seats, depending on the make and model, the process and tools may vary. Next, you need to separate the backrest and seat, since the system will be installed alternately.
- After this, you need to lift the lower part of the trim on the back of the seat and install a heating system there. In the same way, install the system on the seat itself.
- After this, it is necessary to return the casing to its original place as carefully as possible, without damaging the appearance. Once the casing is in place, you need to connect the system connectors to each other.
- On the gearshift lever, connect the white wire to the power supply, which must first be removed. Absolutely all kits include a fuse; its installation is mandatory.
- Determine the most convenient and ergonomic location for installing the heating system control buttons.
- After all the above steps are completed, the backrest and seat are placed back in their place and carefully secured.
Power supply or how to connect the heated front seats on the Lada Granta correctly
The cost of installation work at an unofficial service station is at least 2,500 rubles. For this money, already purchased heating elements will be installed in the car seat and the circuit will be connected according to the manual. All that remains is to make an anti-freeze product according to a home recipe and hit the road. This is for the quick ones. Painful owners will probably not like the electrical part of the integration.
Disadvantages of the standard kit
The instructions indicate how to install heated seats on the Grant and connect it to the on-board network. According to what is written, the electrics connect and function like this:
- The permanent plus is taken from the hazard warning button.
- The ground is connected to the bracket for fastening the standard wires of the negative pole.
- The standard fuse is replaced with a more powerful one.
- The heating is turned on/off using the buttons directly.
Only one function is correctly implemented - turning off the heating when the ignition is turned off. Otherwise, the connection scheme is not entirely successful:
- The positive wire that goes to the emergency light is thin and will probably work at the limit.
- The contact group of buttons operates in a dangerous mode, since it is not intended for power loads.
Competent connection diagram
An unfortunate result of the standard connection algorithm is a melted fuse. Such a reaction indicates that the circuit is operating at its limit. An alternative scheme for connecting heated seats will help to avoid this. It involves the use of two four-pin relays and powering them from switch K4, which supplies the output “+” after turning on the ignition.
Additional items
It is advisable to carry out installation work after purchasing an additional mounting block of reduced size. You will also need regular contacts for connecting two relays and two Lyra contact elements linking a 10A fuse. We also add additional wires with a cross-section of 4 and 1.5 mm2 to the shopping list.
Search "+"
So, in order to connect the heated front seats on the Grant, you need to find out the number of the output plus of relay K4, which appears after turning on the ignition. This can be either the 87th or the 30th contact.
Usually this is contact element No. 30, but it doesn’t hurt to make sure once again. We remove the relay and diagnose. The test is carried out by connecting a 12V lamp to the 30th contact of the mounting block and ground. After activating the ignition, the lamp should light up.
Connecting elements
It is convenient to disassemble the connection map of the key components of the circuit in the figure. The sequence of actions when assembling the chain is as follows:
- Pull out the “+” terminal, found during the K4 relay test, and connect two wires to it: one (4 mm2) - to the fuse and then to the 87th contact, the second - the control plus from the heating button (pin No. 1). Make a jumper and integrate it back.
- On the “+” route to the seat heating relay, install a 10A fuse by integrating the “Lira” contacts.
- At the second end of the received “+”, make branches for the second switch and control button, connect them to the 87th and 1st contacts.
- Make two ground wires with jumpers that will be attached to the 85th, A and C terminals.
- Route the control wiring and the backlight wire from the buttons to the mounting block. Connect 2nd contacts to 86th; B – with fuse fastening element F9 or F10.
- Connect your “+” heating elements to the 30th contacts of each relay.
It is convenient to make jumpers or branches using male-female contact pairs. It is better to avoid “twists” by connecting the wires directly in the block and making bends.
Connection
Rear seat heating connection diagram:
It is better to take contact “B” from a protected high-current circuit with a fuse. Contacts “A” and “C” can be found in the ERA-GLONASS lighting lamp, in the ISO radio or cigarette lighter connector. Before starting the connection, do not forget to disconnect the negative terminal of the battery.
Installation and connection of heated rear seats on a Lada Vesta on video in several episodes:
Let us remind you that we previously told you how to connect heated windows/mirrors to an additional alarm channel on Lada Vesta and XRAY, as well as how to turn on the heated windshield through a separate button.
Found an error? Select it and press Ctrl+Enter..
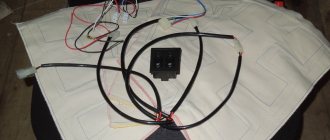
Today I finally decided to equip my car with heated seats, because summer is ending and winter is coming))), we need to prepare the sled in the summer, as popular wisdom says.. So, what do we need for this:
1. Heating pad plugged into the cigarette lighter 2 pcs. 2. Relay 90.3747 (4 pin) 2 pcs. 3. Block for relay 2 pcs. 4. Heating button VAZ 2114 2 pcs. 5. Block for buttons 2 pcs. 6. Connector to the heater (you can use the cigarette lighter socket) 7. Terminals, wires, insulation
Tools: knife, wire cutters, pliers, tester (multimeter)
For ease of operation, you can remove the front seats, but I didn’t. did this. Remove the left and right protective shields:
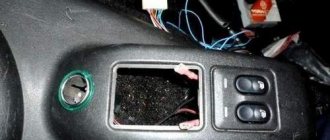
We unscrew the plastic rim around the handbrake and remove the sensor... without this you cannot unscrew the screw that holds the floor tunnel lining:
Remove the cover of the diagnostic connector and unscrew the connectors themselves, disconnect the cigarette lighter connector:
Raise the gearshift lever housing and remove the tunnel lining:
So, I connected all the wiring according to the diagram downloaded from the Internet. I'm not very good at electrics, so I connected it as in the diagram through the heated rear window button, although they said on the forum that you can connect to the ignition relay. but I didn’t change the scheme and did everything according to it:
This is how I sat, twisted the wires and crimped the terminals:
According to the diagram, it was necessary to get to the heated rear window button, and for this you need to disassemble the center console. Well. forward. Connected to +12V to the block. in the picture on the top right:
Installation
- kit “heated front seats”, for example, from a VAZ 2110 or Priora (article 2170-6513010-03);
- seat heating control buttons (for example, those from the VAZ 2110 have article number 2110-3709710);
- relay 4-pin (1119-3747210-10);
- wires.
Installation of heating mats
- Remove the rear sofa and rear seat backs (instructions for XRAY, Vesta, Granta/Kalina).
- I removed the trim from the seats (held on by rings).
- Insert heating into the backrest and sofa.
- Install the seat trim in the reverse order.
Installing buttons for heated rear seats
in a place convenient for you. For example, in a floor tunnel.
Design of the LADA Kalina cooling system
Cooling system: 1 — expansion tank; 2 — radiator outlet hose; 3 - inlet hose; 4 - radiator; 5 — steam exhaust hose; b — radiator supply hose; 7 — electric fan; 8 — electric fan casing; 9 — coolant temperature sensor; 10 — coolant temperature indicator sensor; 11 — throttle assembly; 12 — bracket for the coolant pump pipe; 13 — coolant pump; 14 — coolant pump pipe; 15 — heater radiator supply hose; 16 — heater radiator outlet hose; 17 — exhaust pipe; 18 — coolant pump pipe hose; 19 — thermostat housing
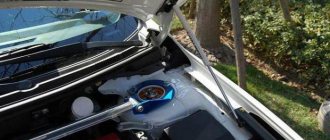
Expansion tank. Coolant is poured into the system through the expansion tank. It is made of translucent polyethylene, which allows you to visually monitor the liquid level. To do this, the marks “MAX” and “MIN” are marked on the wall of the tank. In the upper part of the tank there is a pipe for connecting to the radiator steam exhaust hose, in the lower part there is a pipe for connecting to the inlet hose. Expansion tank viburnum
Expansion tank cap with valves. The tightness of the system is ensured by the inlet and outlet valves in the expansion tank cap. The exhaust valve maintains increased (compared to atmospheric) pressure in the system on a hot engine (due to this, the boiling point of the liquid becomes higher, steam losses are reduced}. It begins to open at a pressure of at least 1.1 bar. The intake valve opens when the pressure drops to system relative to atmospheric pressure by 0.03-0.13 bar (on a cooling engine).Expansion tank cap with valves
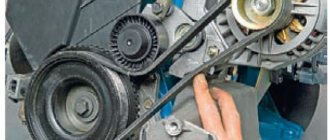
The coolant pump is a vane, centrifugal type, driven from the crankshaft pulley by a timing belt. The pump housing is aluminum. The roller rotates in a double-row bearing. The bearing is lubricated for its entire service life. The outer ring of the bearing is locked with a screw. A toothed pulley is pressed onto the front end of the roller, and an impeller is pressed onto the rear end. A thrust ring made of a graphite-containing composition is pressed to the end of the impeller, behind which there is an oil seal. The pump housing has a control hole to detect fluid leakage when the pump fails. It is recommended to replace the pump as an assembly. The redistribution of liquid flows is controlled by a thermostat. Coolant pump Kalina
The cooling system consists of two so-called circulation circles:
- The movement of liquid through the cooling jacket and radiator forms a large circulation circle.
- The movement of liquid through the engine cooling jacket, bypassing the radiator, is a small circle of circulation.
The cooling system also includes a heater radiator and a throttle body heating unit. Liquid circulates through them constantly and does not depend on the position of the thermostat valves.
Thermostat. It has a solid temperature-sensitive element and two valves that redistribute the flow of coolant. On a cold engine, the main thermostat valve blocks the flow of fluid from the radiator and the fluid circulates only in a small circle, bypassing the radiator. At a temperature of (85±2) °C, the thermostat valves begin to move, allowing liquid flow into the radiator and closing the bypass channel. At a temperature of about (100±2) °C, the main valve opens completely and the bypass valve closes. Almost all the fluid circulates in a large circle through the engine radiator. Thermostat viburnum
Coolant temperature sensor. To monitor the coolant temperature, a sensor is screwed into the engine cylinder head, connected to the temperature indicator in the instrument cluster. In the outlet pipe, next to the thermostat housing, there is a coolant temperature sensor that provides information to the controller. Coolant temperature sensor viburnum
The heater radiator is built into the engine cooling system and is designed to heat the passenger compartment by circulating hot coolant through it.
The radiator consists of two vertical plastic tanks (the left one with a baffle) and two horizontal rows of round aluminum tubes passing through the cooling plates. The tubes are connected to the tanks through a rubber gasket. The liquid is supplied through the upper pipe and discharged through the lower. Next to the inlet pipe there is a thin pipe for the steam removal hose. The radiator has a casing with an electric fan. There is a drain plug at the bottom of the right tank. radiator viburnum The fan maintains the thermal operating mode of the engine and is switched on via a relay based on a signal from the controller.
Checking ventilation and stove Lada Kalina
Car owners claim that Kalina’s heater heats much better than previous VAZ models. It sometimes breaks down and requires repair. Do a full system diagnostic to ensure it's working properly.
- We start the car engine.
- Turn the left handle counterclockwise and place it in the blue zone.
- We place the fan speed switch in each of the 4 positions one by one. If the fan does not rotate in one of the positions, then check the power supply circuit of the device.
- Turn the speed controller to maximum.
- Using the right handle (damper control) we check the redirection of air flows. If we notice that there is no change, then the damper drive needs to be repaired.
- Warm up the engine to 90°C. Turn the left handle to the extreme position of the red zone.
- The air that comes out of the panels should blow warm air.
- Return the left stick to the blue zone. Cold air will come out of the nozzles again.
- If the temperature of the air flow does not change due to a change in the position of the regulator, then the control of the central damper drive is faulty.
Main types of electric heating systems
As already mentioned, such systems differ in configuration, as well as in the time that may be required to install them.
. Some types of kits can be installed in a matter of seconds, while others can take about six hours.
All designs are divided into subgroups
depending on the following criteria:
According to the type of heating element used
:
Depending on the area to be heated
:
- Electrically heated seats only;
- heated seat and back area.
Depending on location
:
- easy installation on the surface of the covers;
- more complex installation under the cover.
Depending on operating modes
:
- a simple device with on and off buttons;
- begins to work upon contact with a person;
- a device that maintains temperature conditions at an automatic level, etc.
There are also two types of system designs
:
Standard heating
It is equipped with a reliable and safe design, which is quite suitable for long-term service. In this case, special threads are used that perform the heating function. Certain thermostats are built into the system. The buttons of such a device have self-locking properties. Standard equipment is designed to heat the seat and back area.
There is a wide variety of different universal heating systems
. One of the most common today is the Emelya set, which is of high quality. The elements of the kit are an order of magnitude larger in size than in standard equipment, but they also heat up faster. This will be one of the profitable options if the heating system is not installed by the manufacturer.
Selecting a heating kit for installation
The assortment presented in stores is wide enough so that every customer can choose the appropriate kit for installation with their own hands. These are mainly products from German, Russian and Chinese manufacturers. As practice shows, German kits (for example, WEACO) are the most reliable; their only drawback is their high price. But they are absolutely universal, they can be used in any car, both in the front seats and in the rear seats. This heating has several degrees of protection against overheating and two operating modes.
As an alternative to German products, domestic production kits and Autoterm have proven themselves well. Their products are not inferior to German ones in terms of reliability, and their consumer qualities are also quite high. All models of built-in seat heating are protected from overheating by means of a thermal relay; they use reinforced cable as a heating element. Some models have an automatic shutdown feature when overheating.
DIY seat heating installation
Before you start installing it yourself, you should pay attention to the operating mode switch buttons included in the kit, or more precisely to their size and method of fastening. The button from the kit may not fit into the standard place on the panel, and you may have to either purchase the required number of buttons suitable for a particular car, or choose a different location for installation. Options for buttons and installation locations can be seen in the photo:
The installation of seat heating begins with the installation of heating elements under the seat trim. This is the most difficult stage of the work, since you will have to completely remove the casing in order to properly install the heaters. For an untrained driver, one seat usually takes about four hours. Installing heating elements in the rear seats takes about the same time.
Connecting heated seats, as a rule, does not cause any special problems. The diagram provided by the manufacturer is quite detailed and understandable even for beginners.
One kit allows you to install heated seats for the driver and front passenger. If you also need heated rear seats, you will have to buy another set. The connection diagram will remain the same, i.e. Installation will not cause any additional difficulties.
» alt=»»>
Dear customers, in order to avoid mistakes when sending the electric seat heating kit 1118-6513010 with wires and buttons to the VAZ 1117/1118/1119, in the “Comment” line indicate your car model, equipment, year of manufacture.
When you have to get behind the wheel of a Lada Kalina in severe cold, and feel the cold seat on your back and because it’s lower, you involuntarily have to think about the fact that it wouldn’t hurt to have heated seats in the car. The fact is that the standard heated seats on the VAZ 1117/1118/1119 are found only in the luxury version of the last years of production, and in all other cars of this series heating is not provided. However, you shouldn’t despair, because anyone can do independent repairs and connect heating.
Most modern cars are equipped with many systems that provide comfort to the driver and passenger, one of which is heated seats. It is controlled using a block, looks attractive, modern, not only fits beautifully into the interior, but is also very easy to use.
Despite the fact that seat heating is a relatively new option on the bells and whistles market, this did not stop it from gaining global recognition among all motorists in the world in such a short period of time. Thanks to heated seats, the car driver can get rid of the unpleasant sensations that accompany him every time he gets into a “cold” car.
Manufacturers of heated seats have begun to produce seat heating kits for motorists who do not have this option included, which allows them to install it themselves, thereby saving their “fifth point” from unpleasant sensations.
A built-in (factory) assembled seat heating kit (for 2 seats) is installed on cars for the Lada Kalina (1117-1118-1119) by default.
The product is created according to the formula “length of the heating filament – material resistance – on-board network voltage.”
This means that a heating filament of this length (at a voltage of 12.5-13.5 Volts) cannot heat up more than 53°C.
The fabric base of the heating is made of non-flammable material, the heating nichrome thread is in fluoroplastic, which together completely eliminates the possibility of the product catching fire.
– Heating element (voltage 13.5 V; power 55 W) – 4 pcs.
– Heating buttons – 2 pcs.
– Mounting kit for connection – 1 pc.
– Installation diagram – 1 pc.
Standard seat heating 11180-6513010 for cars of the VAZ 1117/ 1118/ 1119 family are supplied to the assembly line of AVTOVAZ OJSC, the product has been tested and has a high degree of reliability.
How to connect seat heating on a Kalina
(this malfunction is most likely on LADA KALINA NEW produced in 2013 with heated seats produced by Teplodom LLC)
1. Disconnect the seat heater from the vehicle’s on-board power supply and connect a device that measures the circuit resistance (multimeter). A working heating element must have a circuit resistance according to the design documentation ≤ 4 Ohm.
2. If the device shows an open circuit, then turn off the seat back heater and install a jumper (“crocodile clip”) instead.
3. If the device also shows an open circuit, then it is necessary to inspect the thermal relay for external damage. The arrow indicates the location of the thermal relay.
4. Partially remove the seat cushion upholstery.
5. Release the heater outlet.
6. By pulling out the outlet, bend the pillow heater and remove the protective layer to open access to the thermal relay.
7. Remove the protective tube from the thermal relay and, if there is no visible damage, use the second “crocodile” to bridge its contacts.
If there is a circuit (resistance ≤ 8 Ohm), record “thermal relay malfunction”. If the device shows an open circuit, then the heater is faulty.
(Seat heater manufactured by Teplodom LLC)
1. On a damaged seat, the burnt location of the seat upholstery is visually determined
2. In the burnout zone, the number of wires of the heating element is determined.
3. Distinctive feature of the heating element used:
- six copper wires with a cord (thread) in a fluoroplastic sheath - see photo 2;
- nineteen copper wires in a fluoroplastic sheath - see photo 3.
Summary
The technology for installing heated front seats on the Lada Granta consists of two stages: installing heating elements under the factory seat covers and connecting them to the on-board electrical network. The proposed electrical circuit organization scheme raises doubts.
The manufacturer of the branded kit suggests connecting the heaters directly to the buttons, and powering them from the alarm control button. Since the circuit is quite loaded, it is better to organize the heating power through two relays with a separate fuse. It is also advisable to replace the buttons - they do not indicate the operating mode.
Lada Kalina - fuse and relay blocks
Lada Kalina 1
The first generation was produced in 2004, 2005, 2006, 2007, 2008, 2009, 2010, 2011, 2012 and 2013 under the internal serial numbers
VAZ-1117, VAZ-1118, VAZ-1119
with sedan, hatchback, and station wagon bodies. In this article we will show a description of fuses and relays of the 1st generation Lada Kalina with block diagrams and photographs. Note the fuse responsible for the cigarette lighter.
p, blockquote 1,0,0,0,0 —>
p, blockquote 2,0,0,0,0 —>
The design of the blocks and the purpose of the elements in them may differ from those presented and depend on the year of manufacture and level of equipment of your Lada Kalina. Check the description with yours, printed on the back of the protective cover, or other technical documentation.
Recommendations
When installing most heated seat systems, it is absolutely not necessary to remove the seats. The installation can be done this way. However, to ensure maximum comfort for the specialist, it is recommended to remove the seats. In addition, some models require the removal of seats, since the specific design does not allow them to be properly installed in any other way.
In general, installation is not a difficult process if you select an average, popular system model on the market. To carry out such work, it is enough to acquire basic skills and abilities, knowledge about the structure of a specific type of system, its functioning.
If the system is quite complex, it is recommended not to install it yourself. Otherwise, there is a high risk of connecting something wrong, as a result of which half or the entire structure will not work.
How the Lada Kalina stove works
The vehicle's heating system must work properly. It is not difficult to achieve uninterrupted operation of the stove if you know the structure of the Lada Kalina stove. The heater creates a comfortable stay in the car interior, creating visibility for the driver. The stove design provides for the use of small-class machine options. The production of Kalin cars began over ten years ago. The following options are included for the base model:
- Anti-lock braking system.
- Airbags.
- Electric power steering.
New Lada Kalina models were developed, which were already equipped with additional options:
- Electric door window lifts.
- Reliable heater.
- Heated seats.
- Interior air conditioning device.
Recommendations
When installing most heated seat systems, it is absolutely not necessary to remove the seats. The installation can be done this way. However, to ensure maximum comfort for the specialist, it is recommended to remove the seats. In addition, some models require the removal of seats, since the specific design does not allow them to be properly installed in any other way.
In general, installation is not a difficult process if you select an average, popular system model on the market. To carry out such work, it is enough to acquire basic skills and abilities, knowledge about the structure of a specific type of system, its functioning.
If the system is quite complex, it is recommended not to install it yourself. Otherwise, there is a high risk of connecting something wrong, as a result of which half or the entire structure will not work.