Specifications
|
|
| |
|
|
|
|
|
|
| The AES-128 block encryption algorithm used in the system reliably protects transmitted data even from professional hijackers. Even if you enter a car with a running engine through a broken window and start driving, the engine will automatically lock after 20 seconds. This protection system allows some insurance companies to provide significant discounts on car insurance to owners of cars on which this complex is installed. | |
|
|
|
Characteristics of the Scher-Khan Magicar 10 car alarm
| Name | Option |
| Radio signal protection | MAGIC CODE PRO 2 |
| Separate buttons for activating and deactivating security | Yes |
| The main and additional key fobs are synchronized with each other | Yes |
| Two-stage disarming | Yes |
| Transferring data to the key fob | Yes |
| Preventing third party devices from connecting | Yes |
| Panic Mode | Yes |
| Customizing buttons | Yes |
| The power unit starts automatically according to a timer | Yes |
| Installation on automatic transmission, manual transmission | Yes |
| Trigger within a specified temperature range | Yes |
| Remote trunk lid opening mode | Yes |
| SLAVE | Yes |
| Engine running protection | Yes |
| Network voltage control | Yes |
| Manufacturer's warranty | 60 months |
| Temperature Range | -85ºС to +50ºС |
| Turbo timer | Motor operation up to 4 min. |
| Starting with a sharp drop in voltage in the circuit | Yes |
| Delayed start of the power unit | Yes |
| Data projection onto LCD display | Yes |
| Battery status | Yes |
| Keychain communicator | 4-button with LCD display |
| Sound accompaniment of mechanical clicks | Yes |
| Power Saving Mode | Yes |
A detailed list of general characteristics is indicated in the previous article: “Car alarm Scher Khan Magicar 9”.
Other alarms of the Magicar family
Other Scher-Khan Magicar alarms have a tachometer input, for the operation of which it is necessary to learn the idle signal. On the Magicar 4 alarm, this is done using a button under the cover; on other models, training occurs while the Valet button is pressed.
Moreover, for Scher-Khan Magicar 5 you also need to correctly set the type of control and start duration with switches: switch DIP1 is set to the ON position (tachometer input), DIP2 sets the warm-up time to 15 minutes (OFF) or 25 minutes (ON) for gasoline engines. If the glow plug inputs are connected to the vehicle wiring, then 25 and 45 minutes are used respectively. Please note that neither the duration of operation nor the type of engine can be configured through the menu, everything is set by switches and the method of connecting the alarm.
A minimum of the following is available directly from the settings keyfob:
1-3 determines the minimum starter cranking time: 0.8 sec (1) or 1 sec (2). This function is only used if DIP1 switch is in the OFF position (generator start control).
2-1 sets autostart based on temperature sensor: disabled (1), enabled (2).
2-2 activates (2) or disables (1) periodic autorun every 2 hours.
The ability to set up autostart normally appeared only in Magicar 7. The entry codes to the programming menu have also changed - now you can enter menu 1 by pressing the combination 1+4 on the main key fob, and in menu 2 - 2+4. The programming of the tacho signal has been moved to the Valet button - with the engine running, it must be pressed sequentially for 2 and 4 seconds. Without correct idle speed programming, autostart with tacho control will not work! You cannot program the speed immediately as soon as the engine is started - first let it drop to minimum speed.
Autorun control functions:
Function 1-9 in value 2 turns on the preparation of the battery for autostart: in this case, the warning light is on for 15 seconds before turning on the starter.
Function 1-12 sets the engine warm-up time: 5 minutes (1), 15 (2), 25 (3), 45 (4)
Function 1-13 controls periodic start: off (1), every 8 hours (2), every 4 hours (3), every 2 hours (2)
Function 1-14 sets the maximum number of failed startup attempts: 5 (1), 7 (2), 16 (3) and unlimited (4). The latter option is highly not recommended, since if the engine malfunctions, the alarm will continue to attempt to start until the battery drops to zero.
Function 1-15 sets the operating mode of the emergency lights during autostart: flashing (1) or constantly on (2).
Function 1-16 determines the method of autostart reservation: automatically by handbrake (1), automatically by turning off the ignition (2), manually by button 2 (3). The optimal method is the first, the second still leads to an excessively late ignition interception, when the engine has time to stall.
Function 1-17 sets the method for ending the reservation (the moment when the engine stops after the reservation has started): when closing the doors (1), when closing the doors with auto-arming (2), after manually arming (3). As practice shows, it is best to use the third method of completion.
Function 1-20 limits timer starts to voltage at value 2.
Function 1-21 sets the temperature threshold for timed starts: no threshold (1), -15 degrees (2), -25 degrees (3), +60 degrees (4). Both of these functions will allow you to configure regular autostart, enabled by function 1-13, more flexibly: in the first case, it will occur only if the voltage on the battery is below the set one, in the second - if the temperature is less than the set one, except for option 4 - in this case the next start will be set aside until temperature rises above 60 degrees. However, in our climate this setting is irrelevant - it is needed so that the air conditioner has time to cool the interior, but in our country it is customary to use autostart to warm it up.
Function 2-12 sets the minimum starter rotation time when attempting to autostart from 0.6 seconds (1) to 2 seconds (4). A healthy motor does not need to set this setting higher than option 2.
Function 2-13 determines the maximum rotation time of the starter, if the engine operation is controlled by the generator, and not by the tacho signal, from 2 seconds (1) to 10 seconds (4). Aim to use the lowest setting if it allows the engine to start in winter.
Function 2-14 sets the spin time increment after a failed start attempt to 0.2 seconds (1), 0.4 seconds (2), or no increment (3). For example, you have set the starter crank time to 0.6 seconds, and the first attempt to start was unsuccessful. Then the second attempt in option 1 will be with a time of 0.8 seconds, and in option 2 - 1 second.
Function 2-15 sets the delay between turning on the ignition and starter from 4 seconds (1) to 15 seconds (4), depending on whether a gasoline or diesel engine is used.
If you do not use the ignition switch to start the engine, but the “Start-Stop” button, then you may have to set function 2-19 to value 4 (an additional impulse at the starter output at the end of autostart).
Function 2-21 sets the type of control over engine operation - by the generator light (1), by the tacho signal (2) or by the mains voltage (3). The best option is naturally 2.
Magicar 9, unlike previous analog alarms, received a built-in CAN module, but in terms of control, the autostart settings remained the same. At the same time, Magicar 11 already had its own table, although the settings options in many cases did not change:
- Autorun operating time is now set by function 1-7
- Periodic autostart is configured by function 1-10
- The limit on the number of engine starts is assigned to function 1-11, and the settings are “mirrored” from “no restrictions” (1) to 5 times (4)
- Start reservation is set in 1-12 as automatically by ignition when the doors are closed (1), manually by a button (2), by ignition without taking into account the state of the doors (3), automatically when the door is opened and the engine is running (4). Please note that the usual handbrake backup is not available in this alarm system!
- 1-13 sets the method for completing the reservation, there are only 2 options - with manual arming 91) and with auto-arming (2).
- 1-14 and 1-15 limit timer starts based on battery voltage and temperature. The setting values are similar to those used in Magicar 7.
- 1-18 indicates whether the engine must be turned off when disarming (value 2).
- 2-14 allows additional alarm channels to be used as auto-start outputs if configured to value 3.
- 2-22 and 2-23 determine the minimum and maximum rotation time of the starter, the options are similar to those described for Magicar 7.
- 2-25 sets the delay between turning on the ignition and starter.
- Function 2-29 is used on cars with a Start-Stop button, and this alarm can send either a single (2) or double (3) pulse to the starter output when autostart is completed.
Security system capabilities
Sherkhan car alarms are controlled via a secure 868 MHz radio channel, which ensures communication between the main module and key fobs at a distance of up to 2 kilometers. Models with GSM modules are controlled via a radio channel and the Internet. In the latter case, the distance of the car from the owner does not matter.
The alarms are compatible with modern K-Line and CAN buses, which allows them to be installed on the latest car models. The control module located in the cabin controls the door locks, ignition and fuel supply systems.
The alarm key fob is a multifunctional unit with 4 buttons and a display. Regardless of the device model, key fobs have the following basic functions:
- protection against interception of radio codes;
- synchronization of readings between devices;
- two-channel control;
- battery level indicator;
- battery charge icon;
- two-way signal strength indicator;
- programming alarm functions by pressing buttons.
How to disable the option for summer
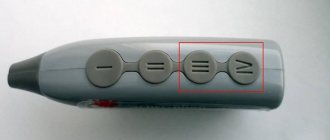
Many car owners ask how to disable the Sherkhan 5 autostart for a certain period of time, that is, turn it off for a month, two or more. In this case, it is necessary to remove any reservation for automatic start. To do this, you need to set function 1-16 to value 3. The action algorithm is as follows:
- Press buttons I and II simultaneously.
- Click on the IV button 16 times.
- After each press, make sure that the signal passes through, the siren sounds and the sound does not disappear.
- Wait for the siren to sound frequently (16 times), and then press III.
Make sure all doors are closed when performing this work. Otherwise, you will not be able to disable autorun on Sherkhan Magikar, and the FAIL error will appear.
Now you know how to disable autostart of Scher Khan Magicar remotely, by temperature or by a set timer. Please note that the algorithm of actions may differ slightly on different models, so for accurate data, refer to the manufacturer's instructions.
In the comments, share how you managed to disable autostart by time and temperature in the Sherkhan Magikar 7 car alarm, what difficulties arose, and what you had to do to resolve the issue.
Specifications
In addition to what is described above, the Magikar 3 model has the following list of options:
The main advantage of the model range is the special MAGIC CODE coding system, which changes the code every time you press a key on the key fob. The keychain is powered by one AAA element. All actions are accompanied by lighting and sound signals. Settings are made using 4 buttons.
- Scher-Khan Magicar processor module;
- main pager with LCD display;
- spare key fob without display;
- installation kit;
- shock sensor;
- signaling;
- call module from the car;
- antenna module;
- relay;
- Light-emitting diode.
Errors and their elimination
Common problems:
- The alarm does not respond to commands from the remote control. You should disassemble the key fob, clean it, and if necessary, re-solder the contacts. It is possible that the battery will need to be replaced.
- When the programming mode is turned on, the connection with the key fob is lost. It is recommended to dismantle the processor unit, clean its connectors and put it back.
- Lost communicator codes. It is necessary to re-enter the used key fobs into the system memory.
- Random activation of the call sensor. Perhaps you should reduce its sensitivity.
In the event of a major breakdown, repairs are carried out at a service center.
- Scher Khan instructions
- Magikar 10
- Magikar 5 installation instructions
- Scher Khan Magicar A
Alarm Sherkhan operating principle
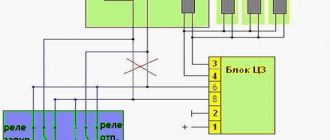
Functionally, the alarm system is divided into security and control blocks. The security unit is mounted in the car interior and responds to attempts of unauthorized entry into the cabin and starting the engine. To do this, it is equipped with shock and movement sensors and a channel for receiving data from the ECU and door opening sensors.
The alarm module is connected to the on-board computer, engine control unit and central locking by wires or via CAN and K-LINE buses (if available).
The control unit is presented in the form of a key fob and in some Sherkhan models it can be duplicated by an interior control module. The alarm key fob carries out radio exchange with the control unit. Commands are sent in encrypted form, which eliminates the possibility of their substitution and interception.
The engine started, but it doesn’t show on the key fob
If the car was started not from an additional key fob, but from the main one, and incorrect information is displayed on it, then you should look for an error made when installing the alarm system.
Check that each connector on the main module is connected correctly. If there is no malfunction, contact a specialist.
Author of the material: Dumchenkov Mikhail
Have questions about car repairs? Ask them in the consultation section, to do this, click on the link below.
auto mechanic
- New cars 2020
- New cars 2021
- Test drives
- Jeeps
- Crossovers
- Repair and service
Engine
- Chassis
- Electrical equipment
- Alarms
- Cigarette lighters
- Car Reviews
- Photo and video galleries
- News
- Tires
- Celebrity cars
2020 Daciaclubmd.ru. If you do not agree with any provision of this Disclaimer, do not use this Site. Please read Disclaimer and Privacy Policy before use.
User manual
The document that users need to study before using the Scher-Khan Logicar A car alarm is the operating instructions.
Designations of buttons and symbols on the key fob
To bring the communicator into working condition, you must install the battery. The correct battery polarity is indicated inside the battery compartment.
The key fob is equipped with 4 buttons. To trigger the alarm functions:
- single, short press - 0.5 seconds, long press - 2 seconds;
- pressing the key combination short and long.
The security mode is activated by briefly pressing key 1. The system will close the locks, block the starter and ignition system. The security mode can be canceled by briefly pressing button 2.
A short press of key 3 turns on the key fob screen backlight for 10 seconds. Button 4 enables checking the system status. Simultaneously activating keys 3 and 4 for 2 seconds will enable or disable the locking mode of the communicator control buttons.
The LCD display shows system status information in the form of icons and symbols. The antenna symbol appears on the display if the vehicle is within range of the communicator's transmitter. The battery image shows the charge level of the power supply, 4 letters Z - enable VALET mode. The digital indicator informs about time, temperature and voltage in the machine’s on-board network.
The speaker symbol informs about the start of the siren, the crossed out hammer - deactivates the shock sensor, and the image of a cell phone - activates the vibration alert.
The icons on the key fob displays are intuitive. The image of burning headlights indicates that the light alarm is turned on, and a cloud of exhaust gases indicates that the car’s engine is running.
Pager programming
Programming the Sherkhan Logicar A car alarm key fob allows you to save the codes of 3 communicators in the system memory. For this:
- You should disable the security mode and turn on the car ignition.
- Press and hold the call sensor key for 2 seconds. The hazard lights will flash 1 time.
- In a 5-second period, press the sensor button once. If PIN entry mode is not activated, the lights will blink twice. When the mode is turned on 1 time, then you need to enter the PIN, the system will turn the hazard lights on and off 2 times.
- The LED will light up, which confirms that the system is ready to record the communicator code.
- You need to press key 1 on the key fob once; the system allocates 5 seconds for this procedure. Then repeat this operation on key fobs 2 and 3. When recording the code, the lights will flash 1 time.
- After recording code 3 of the communicator, the lights will blink 2 times and the system will return to normal mode.
Operating modes
- When you open the doors or trunk of a car that has the security function turned on, the alarm mode will go off.
- When the communicator receives a danger signal that has not been deactivated by pressing keys 1 or 2, it enters reminder mode by emitting audible alarms.
- When you hold down key 1 of the key fob for 2 seconds, the “panic” mode will turn on when the engine is off or the JackStop mode otherwise. The siren will sound and the car doors will lock.
https://youtube.com/watch?v=0BemL-gbeX0
How to enable autorun
To enable autostart mode using a timer, the car must be armed, the time has been set on the communicator, and autostart has been configured. Actions that enable automatic startup mode on the communicator are to simultaneously briefly press keys 2 and 4. Timer will appear on the display.
Setting up Mobicar
In this family, Scher-Khan has finally gotten rid of a large number of previously known problems. These included an extremely inconvenient setup: now all functions are configured through the on-screen menu of the key fob, similar to what can be seen in StarLine systems.
To enter menu 1, you need to press and hold buttons 1 and 4 on the main key fob, then confirm entry by briefly pressing button 4. The first mode of this menu is setting the clock, switching between hours and minutes is done with button 3, increasing and decreasing with buttons 2 and 1 respectively. Pressing the 4th button will save the setting and switch to the next mode - autorun settings in the morning. Time management is similar here; next we will move on to setting the autostart time in the evenings. This feature (two independent autorun timers) appeared only in Mobicar, and, it should be noted, is very convenient.
Having set the evening start time, we go to the warm-up duration setting menu. It is set by buttons 1 and 2, button 4 again saves the result and moves it to the next item. Here you can set autostart based on temperature: use buttons 1 and 2 to change the threshold, button 3 turns temperature-based operation on or off. Next, we will move on to setting autostart by voltage, while the buttons work in the same way.
To enter menu 2, after pressing the combination 1+4 for the first time, press it again, and the inscription Pr1 on the screen will change to Pr2. To enter the menu, press 4. Here the settings are very similar in the way they are displayed to those used in StarLine. For example, the indication 01.03 means that function 1 has the value 3. Functions are scrolled through by briefly pressing button 4, changed by buttons 1 and 2. To save the settings of the active function, press 3; to save all functions and exit, long press 1 and 4.
The following functions are responsible for autorun in this menu:
Function 6 – autostart protective interval (1,2,3 and 4 hours). During the specified time, autostart after arming the car with a completed reservation will be impossible.
Function 7 – limitation of starts by timer (absent, 5 days or 7 days). Option 2 is convenient for a normal 5-day work week.
Function 10 – restriction of autostarts during the protection period. After the car is armed, an unlimited number of auto starts can occur (1), no more than 7, 14 or 30 (2,3,4).
Function 11 – reservation of auto start from the key fob (1), using the handbrake (2), if the handbrake is pulled when the driver’s door (2) is open.
Function 12 – completion of reservation upon arming (1) or when all doors are closed (2). Recommended option – 1.
How to install?
Step-by-step installation algorithm:
Mount the main unit inside the instrument panel. The block is attached to a plastic panel body or a metal load-bearing frame. Double-sided tape or plastic ties are used for fixation. There are no standard fastening points with self-tapping screws on the block. It is recommended to place the unit at a distance from the standard electronic components of the car, which may emit radio interference. Install the antenna. The location is usually the windshield of a car. The antenna elements must be located at a distance of at least 5 cm from metal parts of the body. The antenna unit is located vertically, thereby ensuring maximum communication range
The wire is laid under the headliner and along the front pillars, subject to safety precautions. The manufacturer allows the antenna to be placed secretly, under plastic panels
In this case, the signal level may decrease and the range may be reduced. It is not allowed to install the unit under metal panels that will shield the signal. Stick a status indicator diode on the windshield and lay a signal wire. The diode can be located in a hole made on the plastic elements of the instrument panel or the trim of the front pillars. It is possible to fix the diode in the hole with glue or sealant. Install a siren on the engine side of the engine shield. Lay signal wires from the siren connector to the main unit. When installing a non-standard siren, follow the connection instructions. Modern cars can be equipped with signal switches in the trunk and hood locks. In the absence of such devices, free-standing mechanical limit switches are used. Installation is carried out in a hole made on the body or on a separate bracket attached to the body. The limit switch rod should not interfere with loading cargo into the trunk or maintenance of components and assemblies. Place an impact sensor in the cabin. For installation, standard self-tapping screws, plastic ties or double-sided tape can be used. Install an additional sensor that is used to control interior volume. Check the wiring to the main unit and connect them in accordance with the wiring diagram.
How to install an alarm?
The alarm can be installed in a garage. You must first prepare a set of tools for installation and also disconnect the battery.
To install an anti-theft system you need to have:
- multimeter for measuring voltage and determining breaks (short circuits) in electrical circuits;
- Screwdriver Set;
- set of socket wrenches;
- soldering iron;
- wire stripper;
- mounting blades for disassembling the interior;
- black electrical tape;
- foam;
- double sided tape;
- plastic clamps for fastening wiring.
Step-by-step instruction
The installation procedure is as follows:
The microprocessor module is installed hidden in the vehicle interior. It can be located behind the instrument cluster, glove box or under the dashboard. It is advisable that in order to gain access to the device you have to disassemble the trim in the cabin, this will prevent the car from being stolen quickly. Double-sided tape or plastic ties are used to secure it. The transceiver module is mounted in the upper corner of the windshield or rear window
It is important that the distance from the antenna to metal objects is at least 5 cm, this will avoid interference. Before installation, the glass surface must be cleaned
If the installation is carried out in winter, then its temperature can be at least 10 degrees Celsius. The wire from the antenna to the microprocessor module is laid under the decorative trim of the interior; during installation, care must be taken to ensure that the cable is not pinched. The LED indicator is mounted in the corner of the front glass. First, its surface must be cleaned and degreased. You can embed the LED indicator into the dashboard, then you must first make a hole in it to install the light bulb. The siren is located under the hood of the car, in a place that is maximally protected from external influences from under the bottom of the car. Do not install the siren near heating units and moving parts. It is recommended to place the device's horn down to prevent moisture from forming inside. The hood limit switch is mounted on a metal surface that is as close to the body as possible. There should be no accumulation of moisture at the installation site. When the hood is locked, the sensor is protected by a rubber seal. The shock sensor is fixed in the car using two bolts. During installation, it must be taken into account that the consumer must have access to the controller to change the sensitivity parameter. The sensor is equipped with two regulators. The first determines the sensitivity of the warning zone, and the second - the alarm zone. For fixation, it is better to choose the central part of the body so that the device detects physical impacts from all sides of the body. If additional controllers are used, their installation is carried out taking into account the manufacturer’s recommendations. For example, the engine temperature sensor must be installed in the cooling system line. After installing all the elements, they are connected to the control unit. The wires are laid under the decorative lining of the car interior.
User manual
The operating instructions for the 3rd generation of Magikar security systems contain complete information on setting up the system, linking the key fob, programming options, avoiding breakdowns and their possible causes. Programming of functions occurs by a combination of 4 keys. The process of returning to factory settings is described.
It should be remembered that programming is performed exclusively from the main pager with a screen. A complete user manual for Khan Magicar 3 in Russian is included with the device. You can configure the system yourself, following the instructions, or at a service center for a fee.
Read with this
- How to set up starline e90 alarm key fob
- Everything about the Sherkhan Magikar 9 car alarm with installation and operating instructions for downloading
- Instructions for use of car alarm tomahawk tw-9030
- Characteristics of the Starline A4 car alarm and instructions for its installation and use
- How to attach a new Pandora keychain
- Car alarm Sherkhan Magikar 5
- Do-it-yourself programming and setting up the tomahawk 9010 key fob
- What to do if your car alarm key fob is lost or broken
- How to turn off the alarm on a completely VAZ car
- Basic information about installing alarms
How to disable autorun
Many Sherkhan alarms have an automatic start mode, activated remotely, by time or temperature in the cabin. To start the engine of a car with the Magikar 5 security system, press button II of the remote control and hold it for two seconds. The system goes into security mode, the doors close and the engine starts.
After starting, information appears on the screen about the time remaining until the motor stops operating in automatic mode. This time can be 5, 15, 25 and 45 minutes. But sometimes the question arises of how to disable autostart on the Sherkhan Magikar 5 alarm system remotely or according to certain parameters. In this case, you need to know the manufacturer's recommendations.
Silence autorun
The easiest way is to disable autostart on the Sherkhan Majikar alarm system remotely. If the engine was previously started successfully, take the following steps:
- Take the main security system key fob.
- Press button II on the remote control and hold it for two seconds.
- The security system remains operational, but the engine stalls.
When the engine stops automatically, the siren sounds twice if the sound has not been turned off. The alarm system sounds the same number of times. The flashing image of smoke from the exhaust pipe disappears on the key fob LCD monitor display.
In addition, the system should automatically disable autorun when the time set in the Sherkhan Magikar settings is reached. The car owner can set periods of 5, 15, 25 or 45 minutes.
Note that turning off automatic start in remote mode is identical for many models, including Magicar 5, 7 and others.
By time
The Magikar security system has an option to enable automatic start based on time parameters. In this case, you can enable and disable autostart of Scher Khan Magicar 5 by simultaneously pressing buttons II and IV of the key fob.
The fact of turning an option on and off is checked by the presence of the TIMER mark on the screen.
Depending on the settings, four timer motor start modes are available:
- launch every day at a predetermined time;
- periodic engine start every 8 hours;
- launch every four hours;
- start every two hours.
Confirmation that you managed to disable timed autostart of Sherkhan Magikar 7 is the appearance of two alarm signals. In addition, the light indication lights up twice, and Timer appears on the display.
By temperature
Alternatively, you can set a delay to start the engine when a certain temperature in the cabin is reached. Temperature indicators can take the following values - -15, -25, +60 degrees Celsius. In Sherkhan Magikar, this option has four meanings:
- Factory setting. In this case, the timer start does not work.
- Delaying the start until the temperature drops below -15 degrees Celsius.
- Delay until temperature drops below -25 degrees Celsius.
- Turns on when the temperature reaches +60 degrees Celsius.