How to Install a Radio on Priora 2
set the radio
in Zhiguli
priority
Introduction
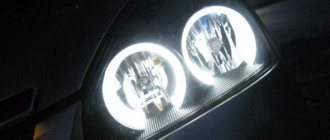
Lada Prior . The location of the famous "tens" has been improved. Modern design and new configuration details have made this economical Russian car quite popular among car owners. But, despite this, every Priora owner strives to modify his car to his own taste, to make it more comfortable and elegant. How to install fog lights on a Lada Grant. Often lovers of clean and high-quality acoustics change their standard audio player to a more modern version. Installing a radio on Lada Priora has some features that can be found in this article.
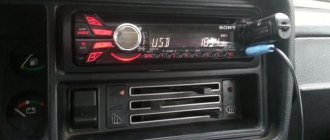
Modern car players are quite functional and varied not only in external design, but also in configuration, installation and connection methods. I changed 1 din to stock radio 2, stock 2 din radio works as usual. When choosing a car player, priority should be taken into account all the features of its size, the ability to connect connectors and the quality of parts.
Features of the Lada Prior radio installation
As a rule, the radio installation has priority
includes several types of audio players:
Media player 2 DIN for LADA Priora
These designations indicate the dimensions of the mounting hole for the radio, which correspond to the dimensions 180x50x160 mm on 1 DIN and 180x100x160 mm on 2 DIN. Optional install
A more modern version of the 2 DIN radio, the motorist will have to perform the function of sawing through the partitions of the car's front console to widen the opening for the player. In some cases, adjusting the size may require cutting or purchasing a suitable adapter frame for the console, which is much more difficult than installing a 1 DIN.
However, if you decide to install a standard 2 DIN system, it is best to trust the installation to an experienced specialist, otherwise there is a risk of damaging both the console itself and the interior of the car.
It should also be noted that 2 DIN tape recorders have a wide range of functions:
- long service life thanks to impact-resistant housing;
- paired amplifiers increase signal reception a couple of times;
- the ability to switch the frequency of the radio signal by all car passengers through the Music Zone system;
- built-in radio navigation function;
- built-in USB connector allows you to connect external devices to view and play files;
- the presence of a bass amplifier for music for high-quality sound.
Built-in USB port and amplifier outputs
Do-it-yourself radio installation in Lada Prior
In the first case, we are considering the installation of a DIN 1 audio player, which does not provide configuration for the shape and characteristics of the plastic base of the console. Before installation, turn off the vehicle by pulling out the negative terminal of the battery.
The installation process of a standard audio player is divided into several stages in the following order:
Diary Lada Prior 2. Entry 16. Remove the center console (beard)
Subscribe to All About the Last Day.
Setting the radio to Priority 2 and setting the front 16 channels
Installation
one-way
radio
in
up to 2
and
16 front speaker settings
- 1. Preparing the hole for installation. To do this, remove the plastic cover that covers the niche provided by the manufacturer for installing the audio player;
- 2. Determination of connectors for connection. How to install fog lights on a grant | The hole has several connectors for installing an audio player: for connecting gray power and for coffee-colored speakers;
- 3. Connect the player to the automatic connectors. When matching the audio player and device connectors according to ISO, you must connect via a circuit diagram or via an adapter;
- 4. Install the radio in the normal hole. Remove the magnetic frame and install the body in the usual opening of the car console. Install the radio on the Lada Priora. If you want to install more on your computer. As. Clicking correctly will produce a small click;
- 5. Activate the player by pressing the reset button.
Installation of a DIN 2 audio player takes longer due to the formation of the appropriate hole size on the Priora console. The installation process is similar to the 1 DIN mounting system, the connection is made according to the same principle.
Standard firmware Lada radio priority
Modern technologies are rapidly developing, and automotive devices are also improving. how to install a rear view camera on a Granta; I bought the camera on Ebay. The standard firmware of the Lada radio Priora allows car owners to complement the player's capabilities by adding additional functions that they do not have in the standard software. The updated radio interface can be complemented by a convenient touch keyboard, fresh software and new versions of the player, with the ability to play all audio and video formats.
The VAZ 2170 audio player is equipped with an SD card with a capacity of at least 4 GB, formatted in FAT.
Firmware for Lada radio 2170 is quite simple:
- 1. You need to find a suitable program online and save it on your PC. As a rule, motorists share such programs on thematic forums;
- 2. Save the downloaded files to a memory card;
- 3. Installing a radio in Priora restyling I don’t know how to install it. How to install a rear view camera on a Grant | Insert the SD card with the required information into the provided radio;
- 4. Reboot the player by clicking the “Reset” button, after which the update program will automatically start. Thus, the firmware is coming to an end, as evidenced by the scale on the radio monitor;
- 5. After the firmware is completed, remove the memory card and restart the player, then use the updated interface.
Do-it-yourself installation of a radio in a Lada Priora
In the first case, we consider the installation of a 1 DIN type audio player, which does not involve changing the shape and parameters of the plastic base of the console. Before installation, turn off the power to the vehicle by disconnecting the negative terminal of the battery.
It is recommended to divide the installation process of a standard audio player into several stages in the following sequence:
- 1. Preparing the hole for installation. To do this, remove the plastic cover covering the niche provided by the manufacturer for installing the audio player;
- 2. Determination of connectors for connection. In the hole for installing the audio player there are several sockets: for power connections in gray and for speakers in brown;
- 3. Connecting the player to car connectors. If the connectors of the audio player and the machine comply with the ISO standard, it is necessary to make the connection according to the diagram or through an adapter;
- 4. Installing the radio in the standard hole. Remove the magnetic frame and install the housing into the standard hole in the car console. When locked correctly, there will be a slight click;
- 5. Activate the player by pressing the “Reset” button.
Connection diagram
The factory connection diagram does not provide for the supply of positive power through the contact plates of the ignition switch (red cable). To ensure correct operation of the device, it is necessary to remove an additional cable from the circuit, which is energized only when the ignition is turned on. The line must be protected by a fuse rated at least 15 A (for example, a cigarette lighter circuit).
An additional signal, ensuring the safety of the settings when the car is stationary, is supplied using a wire with a yellow insulator. The cable is routed to a circuit connected to the positive terminal of the battery. There is also a ground connection in the power circuit. The power and speaker cables are routed into the instrument panel; to connect the head unit, you will need an ISO standard adapter.
Connectors for the standard radio and MMC Lada
All devices have the same ISO and mini-ISO connectors on the back.
The amplifier can have two groups of inputs:
- linear
- high level input
We make the connection according to any of the schemes proposed below.
Audio, video and photo
The radio supports audio formats: MP3, WMA and WAV. While a tune is playing, the display shows information about the album, artist, and cover art (if any). You can adjust the shades of sound using the equalizer (there are 6 pre-programmed settings for Jazz, Rock, Voice, etc.). The sound quality is not bad, quite clear, without audible cuts in the highs or lows.
MMS supports only one video format: WMV with a resolution of 320*240px. To play video files you will have to use a converter, for example, Xilisoft Video Converter Ultimate. It will not be possible to play a video without conversion, for example, in 720p resolution, the picture will slow down, and the sound will lag behind the video, due to the insufficiently powerful processor.
Review of MMC Lada Granta (luxury) and Lada Kalina 2 (standard)
Review of MMC Lada Kalina 2 (luxury) and Lada Priora (luxury)
The radio is capable of opening photos, supported formats: JPEG, .JPG, .JPE, .BMP, GIF, .PNG. For example, a photo with a resolution of 1400x800px and a size of 1MB will open in about 1 second, and a photo of 1978x3456px and a size of 7MB will take as much as 9 seconds.
It is worth noting that after purchasing a car, the antenna comes as a gift. You will have to install it yourself.
Why bluetooth doesn't work
Most often, failure occurs due to the fault of Sony smartphones. We have already looked at how to connect bluetooth to the Lada Vesta, so it’s worth trying the pairing again.
Connection may not be possible when the Bluetooth function in Vesta is not activated in the radio. Press the button to accept the call, the system begins to function. If this does not resolve the problem, it is best to contact your dealer. Also, this problem may appear after trying to connect several phones. There may be other reasons why Bluetooth does not work on Vesta, including a factory defect.
Firmware for Lada Priora radio
Modern technologies are rapidly moving forward, also improving car gadgets. Firmware for the standard Lada Priora radio allows car enthusiasts to expand the capabilities of the player by adding additional functions that the standard software does not have. The updated radio interface can be supplemented with a convenient touch keyboard, fresh programs and new versions of players with the ability to play all audio and video formats.
Radio set from Priora 2
The firmware of the VAZ 2170 audio player system is carried out using an SD card with a capacity of at least 4 GB, formatted in the FAT system.
Firmware for the Lada 2170 radio is quite simple:
- 1. You need to find a suitable program on the Internet and save it to your PC. As a rule, such programs are shared by car enthusiasts on thematic forums;
- 2. Write downloaded files to a memory card;
- 3. Insert the SD card with the necessary information into the provided slot on the radio;
- 4. Restart the player by pressing the “Reset” button, after which the update program will automatically start. Thus, the firmware goes through to completion, as evidenced by the scale on the radio monitor;
- 5. When the firmware is completed, you should remove the memory card and reboot the player, after which you can use the updated interface.
Tips for installing a radio in Lada Priora
In order to avoid unforeseen difficulties during the installation of the radio in the Lada Priora, it is recommended to use the advice of experienced car enthusiasts:
- 1. Before installing the radio, you need to thoroughly study the connection diagram for media devices. If the player's connectors are connected incorrectly, there is a high probability of failure of some vehicle systems;
- 2. There are many models of radios from different manufacturers. Some of them have individual connectors with an additional adapter included for the ISO standard. This fact should be taken into account when choosing an audio device for the Lada Priora, since one of the connection options in this situation would be cutting the wires and directly soldering them to the car’s wiring;
- 3. When directly connecting the standard radio, you can use special terminals;
- 4. The connection diagram for the audio player via ISO will remain the same when replacing the radio with a new one.
Do not twist or wrap electrical tape to connect wires directly. This type of insulation is dangerous when operating a car in winter, since at low temperatures the adhesive-based tape is deformed and destroyed, which will lead to a short-circuit in the car's wires.
We will talk about how to install a Clarion radio of double height instead of two pockets in the center console of a car.
Connecting a 2 DIN radio to a standard place in the car
How to connect a 2 DIN radio with aliexpress in a car
DIN stands for "Deutsche Industriele Norme" - or "German Industrial Standards". The standard dimensions of a radio tape recorder installed in the car's standard socket. These standards are used by all manufacturers of cars and car radios (or almost all), at least all Chinese radios supplied to us from aliexpress, all of them are assembled according to 1 DIN standards, and more often - 2 DIN. By the way, 1 DIN is the size of the radio, the width x height of which is 180x50mm. 2 DIN - 180x100mm, with the installation depth of all DINs being 160mm. There is also a very rarely used standard for radio dimensions 1.5 DIN - 180x75mm. But finding such a radio is very rare, so today we will consider the usual size of a multimedia player - 2 DIN.
So, in order for us to connect such a radio, if we previously had a 1 DIN radio in the car, we will have to remove the old radio and install the ears on which the radio is attached under the dashboard from the new radio (these are most often included with the radio, but always please specify). In addition to the ears, we will also need a frame sized 2 DIN, which will no longer be included with the radio. It must be purchased separately for each vehicle. It is very advisable to treat the places of fastening and contact of the plastic of such a frame with an anti-creaking composition, otherwise not very pleasant squeaks will be produced in the cabin; they will not appear immediately, but over time.
So, with the installation of the radio, everything is more or less clear (for those who are not very clear, watch the video of installing the 2 din radio below). Now we need to look at the connection diagrams for the 2 din radio, and also figure out its pinout.
Connection diagrams for 2 DIN radio
Most Chinese 2 din radios from Aliexpress are connected to the car via an ISO - Euro connector. This is the most universal connector and the easiest to connect to almost any car. And the pinout is quite logical and simple.
Pinout of ISO - Euro connector of Chinese 2 din radio from aliexpress (example - Podofo - 7018B). Similar radios with an ISO connector will have the same pinout.
Designation of wires of a Chinese 2 din radio
But there are other connectors often used on Chinese radios. I suggest you familiarize yourself with their pinout and subsequent connection
Pinout of 2 din radio from China
The meaning of the 2 din connectors of the radio
Meaning of 2 din radio wires
Connecting tulips 2 din radio
You can read more about the pinout of the ISO-Euro connector and connecting Podofo radios and similar ones on the pages of our website.
Video - examples of connecting 2 DIN radios
Connection diagrams are, of course, good, but it’s much more clear to see how someone has already gone before you by connecting a 2-din radio to a standard place and made a fairly sensible video about it. So, I suggest you familiarize yourself with the most outstanding works of connecting radio tape recorders that are only available in the YouTube collection.
Connecting a 2 din radio using the example of a Lada Priora
Connecting a 2 din radio in a Kia Rio or Hyundai Solaris
Connecting a 2 din radio in Renault Logan or Sandero
Connecting a 2 din radio in a Toyota Corolla 120
From the videos it follows that there is nothing particularly complicated, except for partial disassembly of the car’s dashboard, connecting a 2 din radio to its standard location is no different. You just need to buy everything you need, understand the connection diagram and pinout of the radio, as well as the wires, and slowly connect everything. This process will not present any problems for any more or less handy person.
How to connect a camera, phone and steering wheel buttons to a 2 DIN radio
The issues of connecting steering wheel control buttons, a rear view camera and synchronizing a phone with it to a Chinese 2 din radio are so extensive that one article is not enough to discuss these topics. Therefore, we decided to break these topics down into the following articles:
Customer Reviews
I repair my car and my wife’s car at VirazhAvto, they do it efficiently, excellent attitude, I’ve been looking for such a service for a long time. Sometimes they ask me: “is there a normal service, where can I go?”, now I recommend VirazhAvto.
I bought a used Grand Vitara and made myself an anti-corrosion trim. I go in for warranty service once a year. The anticorrosive material holds up and there is no corrosion. I recommend this company to everyone.
My car is 2008. I did anticorrosive and anti-noise tests in 2015. I noticed the anti-noise effect immediately. It’s too early to judge by anticorrosion, but when they did the TEO, they put it on a lift - all the parts were processed, there were no chips and there was no rust. I can recommend
On the way I saw a signal about a low battery charge. I put the battery on charge, and after three hours the discharge lamp came on again. I contacted this company, after a quick check, it turned out that the voltage regulator had failed. I bought it at the nearest store for 260 rubles. Installed in 10 minutes. Thank you.
I was driving to work, and during acceleration there was a nasty whistle coming from under the hood. I contacted the service. The master, without opening the hood, said that the timing belt was poorly tensioned. They did the tightening in 5 minutes. They offered to undergo diagnostics, which showed that the generator was fine, but the wire that goes to ground needed to be changed. The installation was done right away.
New car. I drove for 2 weeks, problems with the starter - low revolutions. The battery was at fault. She turned out to be fine, the new BOSCH. The main thing is that when I’m driving along the highway everything is fine, when I’m stuck in traffic jams, the battery “dies” instantly. We carried out diagnostics at the Virazh-Auto service, it turned out that the factory had installed a defective generator, whose armature was crooked and touched the stator, hence the low charge current. I installed a new part, I will take it to the dealer, the car is under warranty. Thanks to the guys for quickly finding out the cause of the breakdown and carrying out repairs.
I bought the car a long time ago, but problems with noise appeared recently and without hesitation I installed sound insulation. I was pleased with the result.
3 years ago I bought myself an old model Ford and discovered a problem with sound insulation. I endured it for a year, but could not stand it and made myself an anti-noise. It’s been two years now and no problems with noise. The sound insulation is excellent, I recommend it.
I went to check the injector, I didn’t like the performance of the injectors. The guys identified the problem and fixed it inexpensively. Thank you.
The masters once installed an injector in my car, and in the end I barely made it to this VirazhAvto service. Everything was quickly fixed for me. I didn't pay much. Thanks guys. Real pros.
I wanted to check the car for damage. I decided to order diagnostics for the entire car. The workers did it well. No problems were identified and I left with peace of mind. Thanks for the help.
Installation of foreign-made climate systems
Lada Priora air conditioner "August" is one of the most inexpensive options. If you want to buy a higher quality device, then you can opt for the Hull, Panasonic or Frost systems. In practice, the latest model is characterized by good compatibility with the Priora heating system, due to which the air flow filtration will be of better quality. As for the installation scheme, it is practically no different (the author of the video is Auto World).
But Frost also has its drawbacks: it happens that the installation gets very hot, does not cool the air well, and generally does not cope well with its assigned functions. But even if the unit works well, it will take longer to cool the interior. This is because the compressor itself is not particularly powerful. But despite the disadvantages, Frost also has advantages. When the air conditioning is turned on, it will generally not affect the functionality of the vehicle.
It should also be noted that the air conditioning units of this manufacturer were tested in African countries, and this says a lot. In particular, during testing, the installation cooled the interior well, while the engine of cars of various brands did not overheat. On sale you can find several variants of Frost condensers, which differ from each other only in the installation method. When installing the device, you will need to remove the heating system damper, but this will allow you to install an air filter, which is no less important.
In any case, when purchasing, you should focus on your preferences, as well as your budget. If the device gets very hot, you need to pay attention to diagnosing all its components and components. As a rule, this problem is caused by the need to replace the radiator. In addition, during operation, one should not forget about refueling the system, as well as its periodic cleaning. We have already written in more detail about how to clean the air conditioner on your own using improvised means; you will find information about this here.