The performance of the braking system is influenced by many factors. The secondary ones include the quality of tires, weight distribution, driving style and suspension settings, and the main ones include the type of brakes, pressure in the brake line, etc. As always, components wear out over time, and this applies to calipers. First of all, uneven wear of the pads and disc is observed, which is why the pistons begin to put pressure on only one side. And if you don’t repair the caliper in time with your own hands or at a car service center, it may simply jam at the most crucial moment.
Purpose of the caliper
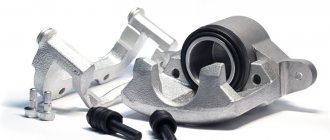
This mechanism of the braking system must provide sufficient force to slow down or even stop the car. It is transmitted to the pistons, and they, in turn, turn on the brake pads. Moreover, the pads must move strictly parallel to the disc - only then can they clamp the disc with the necessary force, ensuring the process of slowing the vehicle.
However, when starting to repair brake calipers with your own hands, you need to understand that strong friction causes heating of both the caliper and the pads. In addition, the temperature of the brake fluid increases. For this reason, manufacturers of such spare parts use high-strength materials that not only have a high degree of heat transfer, but are also very resistant to temperature fluctuations.
Why is it better to carry out repairs in a specialized company?
When repairing a brake caliper yourself, you may encounter unexpected problems. Sometimes the piston jams so much that it is difficult to remove it yourself, and a suitable tool may not be at hand. The piston must be changed carefully so as not to damage the inner surface of the caliper and the piston itself. If you are not careful, brake fluid may leak and air may enter the system.
You can save yourself from these problems if you contact a company that specializes in diagnosing, repairing and rebuilding brake calipers. The presence of the necessary equipment and work experience guarantees fast and high-quality repair of calipers. In addition, during diagnostics, specialists will assess the general condition of the brake system, identify possible problems and eliminate them.
Why can a caliper fail?
The list of reasons due to which a given node can no longer perform the task assigned to it is quite long. However, the main enemy for calipers is corrosion, which occurs due to the penetration of water and dirt - it is they that render the working cylinders and pistons unusable. However, even with serviceable anthers, condensation accumulates in the mechanism. After all, during heavy braking, the discs can heat up to 500-600 °C in order to cool down later. And the number of heating/cooling cycles is in the thousands. As a result, due to moisture, the edges of the pistons and cylinders begin to actively corrode, and this leads to the need to apply more force to the brake pedal.
In addition, do-it-yourself caliper repair may be required for the following reasons:
low quality brake fluid, which contains too much water, which provokes metal corrosion;
oxidation of anthers due to the use of material unsuitable for these purposes to lubricate the guides;
violation of the tightness of the anthers.
The problem of tight movement of the brake piston of the working cylinder only progresses over time, and the car’s deceleration system begins to either fail completely or work every once in a while. Sometimes, to solve this problem, it is enough to inject rust remover and the “right” lubricant into the cylinder, or simply lubricate the caliper guide bolts. However, it is not always possible to get by with little blood.
How to replace a caliper piston with your own hands
To change the brake caliper piston yourself, follow the instructions:
- Removing the caliper piston. Remove the wheel, use a hex wrench to remove the bottom of the caliper and lift it up. Press the brake pedal until the piston comes out, but not all the way. Otherwise, brake fluid will spill out and air will enter the system. Pinch the brake hose and remove the piston. During operation, monitor the brake fluid level in the reservoir.
- Installing the caliper piston . Before installing the piston, thoroughly wipe all elements from dust, lubricate the piston and boot. Then the most important thing is to press the piston into the cylinder evenly, without distortion.
It is often recommended to clean small rust on the piston yourself. But ask yourself: is there a guarantee that a piston repaired by yourself will ensure reliable operation of the brake system? Not sure? Then you need to replace the piston with a new one, or even better, order repair of the brake caliper piston from specialists.
When to start repairs?
Of course, a variety of elements can be faulty in the brake system. However, each mechanism or part has individual signs of problems - knowing them, you can identify the problematic component.
The main reason that you need to repair the caliper yourself is a “soured” piston. Moreover, this problem most often occurs on cars with high mileage or cars whose owners practice an aggressive driving style. An indirect manifestation of corrosion on the part is the stalling of the drive wheels, or even complete failure of the brake system when the pedal is pressed.
The second most common problem is damage to the fitting - this is evidenced by the leakage of brake fluid - and a violation of the seal of the boot.
Causes and symptoms of brake caliper piston failure
Poor sealing
If the O-ring is damaged, brake fluid may leak. As a result, braking efficiency drops sharply - when you press the brake pedal, resistance is felt, but the car does not stop, or does not stop quickly enough.
Signs of such a breakdown: a decrease in the level of brake fluid in the reservoir and its traces on the wheel or disk. The repair consists of replacing the seals.
Piston jamming
Moisture and dirt may enter the cylinder. This occurs as a result of a rupture of the brake cylinder boot. The piston becomes rusty and jams. This malfunction is also easy to determine yourself: when driving, you hear a squeaking noise in the area of the brake pads, the car slows down and skids to the side. Check the heating of the brake pads of each wheel by hand. The wheel pads where the piston is stuck will be hot due to the fact that the piston does not move them back.
Replace or restore?
If the piston jams in the working cylinder, you won’t be able to get rid of it by purchasing a repair kit, which usually only includes boots with cuffs and sealing rings. After all, it is necessary to restore the surface of the cylinder, and the piston must be replaced altogether. How expensive it will be to repair rear calipers yourself depends on the design features of the brakes, the model of the car and the degree of neglect of the problem. However, you will definitely have to purchase a new piston or look for a used one, and in extreme cases, buy a new unit. Its price fluctuates in a very different range: for mass-produced cars, a caliper costs 4-5 thousand rubles, and for premium foreign cars or rare models the price can reach up to 12-13 thousand rubles.
Therefore, the most expensive option is rarely chosen, and car owners usually buy used cars - after all, they cost 5 or even 10 times cheaper. As for caliper repair, it is even more profitable, since we get an almost new unit. After all, almost everything changes - guides, pistons, cuffs, etc., only the brake cylinder body restored by sandblasting remains old. However, in any case, repairs should begin with a visual inspection of the mechanism.
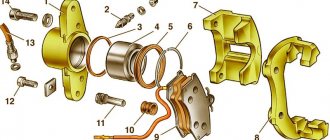
Caliper repair
- The housing in which the piston (cylinder) is mounted.
- Bypass valve.
- Sealing ring.
- Piston (cylinder).
- Cylinder boot.
- Retaining ring.
- Frame.
- Pressure bar.
- Pads.
- Guide boot.
- Guides.
- 14. Fastening bolt.
- Brake hose.
To repair calipers we will need the following materials:
- Caliper piston lubricant
- Caliper Guide Lubricant
- Guide block lubricant
- Brake cleaner or any cleaning agent
- Brake Caliper Repair Kit
- Copper brake hose O-rings. If new ones are not found, and the old ones are not very compressed, then you can go over them with a file and grind off the protrusions. But it’s better, of course, to have new ones in stock.
- If it turns out that the piston or guides of your caliper have large holes and pockets of corrosion, then you will need to purchase them as well.
- Possibly brake fluid for topping up
The kit includes two guide boots, a piston boot, a cuff and a cap for the bleeder fitting.
To repair the caliper with your own hands, we will need the following tools:
- metal brush
- medical syringe
- spanners. In my case, 10 and 12 mm
- clean rags
- a good screwdriver or a small tool
- two small packages
- soft wire
- preferably an assistant. We don’t need it for work, but cleaning the ram with clean hands and bringing beer at the right time will be just right. Also, at the very end, he will help you press the brake pedal a couple of times to bleed the brakes to make sure there is no air in the system.
Visual inspection
First you need to make sure that the piston is in good condition: with light pressure, it should be freely recessed into the cylinder body. In addition, it should not have rust or a lot of dirt. Next, we inspect the functionality of the caliper guides, the integrity of the boot, and move on to the pads - it is unacceptable if the difference in their thickness is visible to the naked eye.
Since the piston returns to its original position using a cuff - it not only seals, but also acts as a spring - you need to make sure of its integrity. However, this is not all, since during its operation the cuff is deformed, and over time it can reduce its springing properties. To check this element, it is enough to hang the wheel and, when pressing or releasing the brake pedal, make sure that the wheel rotates freely.
And most importantly: under no circumstances should there be any signs of overheating on the disks, as evidenced by the purple color of the metal!
Why repairs need to start with the caliper guides
These parts, popularly called “soldiers,” fail more often than any other caliper parts. They should be completely intact and move back and forth without any effort. This is not to mention the fact that the guides must be completely removable. Moreover, even the slightest traces of rust on them or difficulty moving is a clear signal about the need for repairs. Depending on the situation, the “soldiers” change or restore their functionality.
To repair the caliper guides, you will need the universal composition “VD-40” or some other suitable composition, which needs to be used to clean the seats of these parts and anthers. Evidence that dirt and other deposits have been removed is a light foam instead of a dark foam. Next, you need to lubricate the bolts themselves - it is permissible to use even obsolete, but well-known lithol - and, having inserted them into the holes, walk back and forth several times.
If the guides are damaged or cracked, or the boot is torn, install new ones. Moreover, they are part of special repair kits, the prices of which are clearly not exorbitant.
Regarding the purchase of spare parts
It happens that at first glance, the driver does not face the question of how to repair the caliper himself: there is only beauty all around - the pads seem to be normal, the piston, discs, guides, etc. are also in perfect order. However, the brakes are a no-brainer, and they even jam! And when you start to figure it out, it turns out that the car mechanic simply did not clean the pad guides when carrying out maintenance on the car, which included replacing the friction linings. Because of the small “soldiers”, a serious problem arose: mud deposits lead to the need to create pressure on the piston above normal.
When replacing discs, a very interesting situation also arises - sometimes when braking, accentuated impacts are felt, and when disassembling the caliper, it turns out that the discs are warped. What are these – bad spare parts? No, it's all about the car owner who did the repairs himself and bought the wrong parts. The fact is that there are so-called ventilated disks, in which the air channels are located at a certain angle. Therefore, the left disk is always different from the right one. And if you buy two right-hand disks or two left-hand ones and install them on the car, then sooner or later a breakdown of one of these parts will happen. Its cause will be elementary overheating during sudden braking - after all, due to the incorrect location of the heat removal channels, the cooling provided by the designers does not occur.
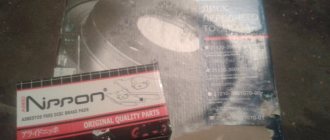
To save the brake disc...
Very often, the brake pad wears unevenly due to the fact that the lower guide becomes corroded. And all because it is on it that water with sand and other sediments flows. As a result, only the upper part of the pad is pressed against the disc, and over time this leads to the same uneven wear. And when part of the friction lining wears off, the effect of metal-on-metal friction occurs. That is, the pad begins to cut the disc. Moreover, according to the rules of technical operation, it is useless to bore it - it is 100% replaceable. Therefore, regularly cleaning and lubricating the caliper from dirt is perhaps the only way not to end up with a tidy sum, which costs both the spare part itself and the cost of the work. Moreover, it does not matter at all whether it is a rear or front brake mechanism.
Set for pressing/screwing in caliper pistons
Hi all! In today’s review, I want to share with you my impressions of a tool for servicing car brakes, or, to be more precise, for pressing/screwing in pistons when replacing brake pads. It just so happens that I have to periodically participate in such procedures. And over time, using improvised means such as a pry bar (for pressing) or a grinder key (for screwing in) became boring. Firstly, although the result is the same, it is inconvenient. Secondly, if you are tinkering with the brakes alone, then pressing the piston with a pry bar is quite problematic. In general, something had to be done about it. Therefore, I decided to acquire the appropriate tool. Aliexpress is full of different sets, differing primarily in the number of tools included in them. I decided not to waste time on trifles and purchase a full version that allows me to service calipers with two pistons.
It took the seller about a week to send the order after payment. The parcel was sent with a full track; anyone can view information about its journey from China to Belarus here.
At the post office they gave me a decent-looking box with a plastic suitcase inside. Exactly as you can see in the pictures in the ad. I would like to say that since the moment I received it, the set has already been tested several times, so this review is written with an eye to the experience of use. Because of this, the tool does not look like new. So, the set consists of 18 tools:
Here we have two spindles with left and right threads, one thrust plate, one adapter plate for pushing in the piston and 14 adapter plates for screwing in. Each of the adapter plates is identified by a number or letter stamped on its surface. If you believe the data in the ad, as well as other information from the Internet, then this kit is suitable for servicing the brakes of the following cars:
0 - 63 mm General Motors; 2 - 51 mm Citroen XM, Xantia ua; 3 - 55 mm Alfa Romeo, Audi, Austin, BMW, Ford, Honda, Jaguar, Mercedes-Benz, Mitsubishi, Nissan, Rover, Toyota, Vw; 4 - 32 mm Alfa Romeo 164 2.0, Ford, Mazda, Saab 9000, Subaru; 5 – 36 mm Adapter mit 3/8″ innenvierkant; 6 - 42 mm Nissan Prima, VW Golf IV; 7 - 42 mm Audi 80, 90, 100, Ford Sierra ABS, Scorpio AB85, Honda Prelude, Nissan Silva 1.8 Turbo, Rover 8000, Saab 9000, Subaru L+Z, VW Golf, Passat; 8 - 47.5 mm General Motors; 9 - 54 mm General Motors. F - Opel Astra; A - Renault; M - Ford Mondeo; N - Saab; E - Cerfiro; K - Citroen.
All elements are fixed in special “pockets”, nothing falls out.
As for the manufacturing quality of the tool included in the set, there are no complaints. At the time of receipt, everything was heavily covered with some kind of smelly grease, which had to be removed. The metal is thick, during operation nothing “slipped off” or bent. The threads on the spindles are the same as on the first day. The only thing that could be a complaint is the coverage. I still don’t understand what it is, but I can’t boast of its durability. After the first use they started to wear off. This is clearly visible in the photo below, especially noticeable on the thrust plate. Otherwise, everything is very good.
Each adapter plate has 2 holes at its base, while there are two protrusions on the spindle head. Using this simple method they are attached to each other. The connection is reliable, nothing falls off if you don’t shake it, and it doesn’t spin if you handle it carefully. If you drop the tool assembled for work or carelessly throw it down, the plate will inevitably come off.
To fix the spindle in the support bracket, a thrust plate is used, which bears the main load. It simply slides onto the spindle from above. Everything ingenious is simple. This is what the tool looks like, ready for use.
View from above:
The car presented in the review was a 2006 Peugeot 607, and to be more precise, its rear brake caliper (its piston is screwed in, not pressed in). In order for it to be screwed in, there are special slots in the piston.
Having selected the adapter pad of the required size and secured the spindle in the caliper, we begin to slowly turn it. Depending on the purpose pursued and the direction of the thread, we use a spindle with a right-hand or left-hand thread.
There is no need to strain at this time, and in order to get the desired result (that is, completely press the piston into the caliper) it takes about 2 minutes. During operation, nothing slips out, falls out, or scrolls. One person can do it without any problems at all. In general, the tool works and does it very well. With its help, the above mentioned Peugeot, Kia Sportage 2011 and Mazda 6 2009 were serviced. There were no problems with any of the cars. I am sure it is compatible with all passenger cars.
To sum up everything that has been written here, I can say that I was pleased with the purchase. I was 100% satisfied with the set. Of course, if you have one car, then there is no point in buying such a suitcase; it’s cheaper to go to a service station. But if you have to do such things quite often, then it’s worth considering the purchase option, since the kit really makes the process of replacing brake pads easier.
That's probably all. Thank you for your attention and your time.
How to remove a brake caliper without a guide bracket
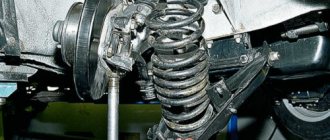
Dismantling calipers on Russian cars follows a standard procedure. We will not take foreign cars into account due to the diversity of their design features. So, it is logical that this procedure is best carried out using a lift; in the absence of one, a jack will do. When the desired wheel is hung, the step-by-step actions are as follows.
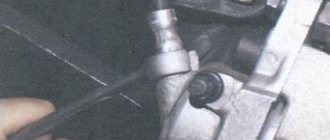
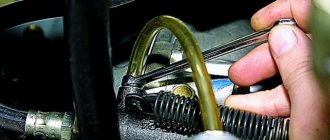
1. Using a tubular wrench, unscrew the bolt securing the bracket for the line through which the brake fluid is supplied. To prevent the removed part from interfering in the future, it is advisable to place it away from the wheel.
2. Unscrew the bolt holding the brake hose. Usually, after this, brake fluid begins to leak, which can be prevented. For these purposes, you need to have fasteners on hand - usually a bolt of the appropriate size and thread.
3. Remove the brake pads, which will allow you to work in more comfortable conditions.
All that remains is to unscrew the brake caliper mounting bolts and remove it.
Caliper repair and maintenance
In any caliper, with or without a bracket, the performance of the piston is first checked - it should move normally. If so, the next step should be the aforementioned caliper removal, removing the brake pads and disconnecting the brake fluid line. Since the entire structure of this unit is movable due to a guide bolt that moves along a bushing with a rubber gasket, the gasket should be checked for elasticity and tightness. The condition of the bolt and sleeve is no less important. If it is in doubt - there are traces of acidification, increased mechanical wear, etc. - these parts are replaced with new ones.
Often the hole where the rubber gasket is inserted has a build-up of hardened dust. This causes the gasket to be compressed and prevent the caliper from moving along the guide bolts. In such cases, a mandatory procedure is to clean the hole from deposits. However, the use of a round file for these purposes is contraindicated for two reasons: firstly, this tool is ineffective; secondly, its use often leads to the appearance of potholes in which even more dirt accumulates. The best option is a drill with an attachment of the required diameter.
The next step is to apply a special lubricant to the inner surface of the caliper housing bore. In addition, the cylindrical rubber gasket, bushing and guide bolt also need lubrication. And you don’t need to be afraid to apply too much, because anyway, the excess lubricant will later be forced out by the parts.
The piston is subject to mandatory lubrication, including preventive lubrication. To do this, first remove the gasket-boot ring using a simple flat-head screwdriver. Next, the piston is pressed in, and the resulting cavity is cleaned and filled with lubricant. The boot also needs to be cleaned, but it is more advisable to replace it, put on the piston and secure it with a ring. Thanks to this, the piston is less susceptible to corrosion and runs more smoothly, and the boot will not harden when high temperatures occur.
To provide increased protection of the caliper surface from oxidation, it is painted with anti-corrosion paint from cans. However, before this procedure, the metal is thoroughly cleaned of dirt and rust - in the latter case, you will need a metal brush. As practice shows, one can of paint is enough for three passes for each of the four calipers.
If there is a squeaking sound when braking a car, this means that some points of the caliper are poorly lubricated or the lubricant has completely burned out. To avoid discomfort, each time you replace the pads, apply lubricant to the following points - the non-working surface of the caliper, the two guide bolts and the piston. And there is no need to be afraid of doing something wrong: even a novice car driver, with minimal instruction, is quite capable of carrying out preventive and repair work on this mechanism.