| Manufacturer | Zenith |
| operating system | Android 9.1 |
| Console left | Sensory |
| Platform | Samsung ARM Cortex A9 |
| USB inputs | Eat |
| Number of Cores | 4 |
| CPU clock speed | 1600 MHz |
| Display | Sensory |
| RAM capacity | 1 GB |
| Built-in memory capacity | 16 GB |
| Form factor | 2DIN |
| Display options | 7 inches, color, capacitive, resolution, 1024 x 600 pixels |
| WIFI connection | Eat |
| Microphone | Built-in |
| Bluetooth hands-free support | Eat |
| Play Bluetooth Music | Eat |
| Built-in GPS receiver | Navigation software support |
| Menu and navigation language | Russian |
| OBD2 scanner application support | Eat |
| Possibility of Internet access, display of traffic jams | Eat |
| Built-in browser | Eat |
| Google applications, Play Market | Eat |
| Clock, calendar | Eat |
| Built-in FM/AM tuner | Eat |
| Phonebook support with on-screen dialing function | Eat |
| Convenient Russified graphical interface | Eat |
| Calculator | Eat |
| Connection to connectors | Pin to pin |
| Support steering wheel button control | Yes (key1-key2) |
| Button backlight color | identical to standard |
| Compatibility with on-board systems | identical to factory |
| Plastic color | identical to factory |
| RCA outputs | 4.1 outputs. Rear, front, amplifier |
| Equalizer | Eat |
| Video format support | DVD, 720-1080P MKV,AVI,MP4,RMVB,AVI,DIVX ,WMV,MOV etc. |
| Audio format support | MP3, Lossless, APE, FLAC, etc. |
| Apple device support | Eat |
| AUX input | Yes. Audio and video |
| Miracast support | yes, support for duplicating the screen of a mobile device onto the radio screen |
| Possibility of connecting additional monitors, external A/V signal source | Eat |
| DUAL ZONE function | yes, the ability to play navigation on the radio and listen to radio or music files at the same time |
| Connecting a rear view camera | There is automatic switching when reversing. |
| Connecting a front view camera | Eat |
| Video recorder support | Eat |
| Audio (sound processor) | (Good sound quality, equalizer and separate settings for subwoofer and cuts) support for all music formats) |
| Separate subwoofer output | Eat |
| Amplifier | STM TDA-7851L |
| Working temperature | from -40 C to +60 C |
| Max. output power | 4x45w |
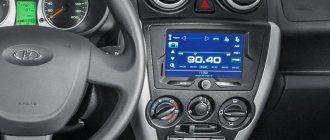
The standard radio for Lada Kalina 2 is an important element of the car in the form of a single control center that combines several devices for different purposes to ensure the comfort of the driver and passengers.
Technical characteristics and advantage of GI
- The device runs on an easy-to-learn platform - OS Android;
- The capacitive sensor recognizes a slight touch on the display;
- 4-core Cortex TX A9 processor with a clock frequency of 1600Mhz;
- Support rear view camera with parking lines, the image will be displayed on the screen with a high level of resolution;
- 2 USB inputs make it possible to use a 3G modem and media files simultaneously;
- ability to interact with mobile devices via Bluetooh;
- Due to the presence of a Wi-Fi access point, you can connect the GU to the Internet
- multi-band equalizer with the ability to customize sound;
- OBD scanner support for engine diagnostics;
- outputting images from the video recorder to the display of the radio;
- supports almost all known audio and video playback formats;
- allows you to fully use the potential of the Google Play Market brand store, which has tens of thousands of applications available for download (popular navigation services, social networks, and a variety of games)
- by choosing Android for Lada Kalina 2, you get a full-fledged multimedia complex with wide functionality, expanding the level of information support for the driver, and making any trip more comfortable and safe;
- the car radio functions stably in hot and cold weather, and the responsive sensor continues to respond to light touches;
- The Lada Kalina 2 standard radio is supplied in a complete kit, which includes everything necessary for installation.
You can buy a Lada Kalina 2 head unit on our website Autotiptop.ru when ordering a radio, a rear view camera is a gift.
Our company’s specialists install the popular Navitel navigation system with a set of detailed maps for Russia, Ukraine and Belarus. You can use them to navigate your way using a GPS antenna, even if there is no Internet signal.
The following radios can be installed in a car of this model:
- the radio may be absent altogether;
- there may be a standard 2 DIN radio with a small monitor for medium configurations;
- a 2 DIN radio with a large display can be installed, which is meant for luxury trim levels;
- the owner can install an alternative 1 DIN radio;
- the owner can install an alternative 2 DIN radio.
So, if you decide to install a large alternative radio of 2 DIN size on your Lada Kalina 2 (VAZ 2192, 2194), then out of ignorance you may encounter a small problem, which, however, is very easily solved.
The fact is that the manufacturer AVTOVAZ is now actively promoting the use of standard radios, or rather the purchase of cars equipped with standard radios. This is simply profitable for the Volzhsky Automobile Plant. But not everyone decides to buy Kalina in the top configuration or simply prefer alternative radios with better sound.
In connection with what was described above, the panel without a radio is not entirely suitable for installing a 2 DIN radio. Therefore, for a more beautiful and high-quality installation, you will need a 2 DIN adapter frame for the Lada Kalina 2 panel (VAZ 2192, 2194).
Buying a 2 DIN adapter frame for the panel Lada Kalina 2 (VAZ 2192, 2194) will not be difficult, just as it will not be difficult to install it on the car. Installation of the transition frame is carried out in simple steps, and the result will look just great. The material used to make the transition frame is high-quality plastic, specially selected for use on the dashboard of Lada Kalina 2.
The same framework exists for Lada Priora, Grant and other Lada cars of the latest generation.
If you have any other questions regarding the 2 DIN adapter frame for the Lada Kalina 2 panel, then contact us for answers in any convenient way. Happy tuning! And cool music.
- 570 rub.
- Description
- Reviews (5)
- Question answer
2DIN transition frame Lada Kalina-2 for installing a 2DIN radio in the standard console trim of the Luxury configuration.
Frame internal opening size:
Before ordering a frame, we recommend that you make sure that the dimensions of the frame match the dimensions of the radio you plan to install.
Please also note that the manufacturer of this frame positions the product as a second-class product; the frame may have some imperfections, for example, sand, bur, etc.
Nuances of installing an audio system
Dismantling of the standard audio system is completed
Without knowing all the intricacies of connecting the radio, it will be impossible to carry out the installation correctly, as a result this will lead to rapid discharge of the battery.
Connect the radio in parallel sequence with the red and yellow wires. This connection allows the system to be turned on and off only using a button on the panel of the device itself. Sometimes the radio circuit is specially designed so that the amplifier is powered in standby mode. Such a system consumes more energy, so the battery drains quickly.
What is the correct installation of a radio? To begin with, you should highlight 4 main wires, each of which has its own color and performs a specific function. The black wire goes to ground, the yellow one provides power to the memory and the audio system itself, the red one provides a signal to turn on the MMC, and the blue one turns on the antenna and other possible devices.
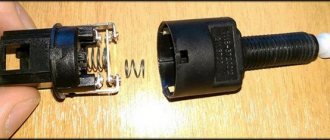
Before connecting, professionals recommend assembling a simple circuit that will allow you to connect the radio through the ignition, due to which the battery will be charged much longer. When working with wires and circuits, you will need to pinout the connector. This will make the circuit easier to work with and understand.
The circuit is assembled in the following order:
- two diodes are soldered onto the board - VD1 and VD2;
- the red wire is soldered to the VD1 anode;
- another red wire is soldered to the cathode of VD1 and VD2;
- both blue wires are connected to the VD2 anode.
The joints can be protected with special cambrics - this will avoid breakdowns.
Before connecting the circuit, you will have to remove the radio and the slide; it is not necessary to remove the console.
All wires must be connected in the correct order:
- wire No. 1 is connected to the contact from the rear window heating button;
- The 2nd wire is connected to the multimedia system;
- wire No. 3 is soldered to blue, which is responsible for turning on the antenna;
- The 4th wire is soldered to the blue antenna wire.
The previously assembled board can be secured inside the torpedo with a fixed tie. When connecting all contacts, only the soldering method, insulated with heat shrink, is used. Screwing of wires is excluded. Before starting work, be sure to disconnect the battery.
With this connection, the radio will turn on only when the ignition is turned on, but if it is turned off, it will continue to work until the driver turns it off. Restarting is possible when the car is started again.
Bottom line
Not every minimum configuration of a car today will please you with the presence of a standard radio. If, nevertheless, such a device is present in the database, it is far from a fact that it can please you with its informative interface and sound quality. If your version of the car has a push-button radio, then, as we found out from the article, installing a more modern radio, as well as the subsequent connection of the radio, is not a difficult matter, the main thing is to approach everything correctly.
The LADA Granta model also did not acquire the role of an exception in this list. After all, the trend of a modern car suggests the owner’s ability to carry out exciting measures to improve and tune his “iron horse,” and you shouldn’t be upset, because a push-button radio is easily replaced with a modern one.
https://youtube.com/watch?v=xSo74lsbkEM
Stages of dismantling the Kalina radio
Car owners do not always install a radio in an empty place. Often, before installing a new audio system, you have to dismantle the standard one. Many drivers are not satisfied with its quality and characteristics. In addition, according to reviews from car owners, the standard radio very quickly begins to “freeze”, “slow down” and “glitch”. That is why the owner of a Lada Kalina car first has to remove the existing audio system, and only then install a new one, chosen independently.
Stages of removing the original Kalina radio:
- dismantle the top removable panel;
- remove the plastic frame;
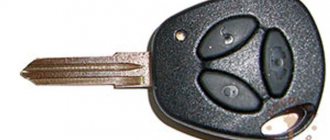
- using the keys included with the standard radio, remove the system from the tunnel: insert the keys into the sides of the radio and pull it towards you;
- disconnect the connectors with wires and the antenna.
You can install the radio with the help of specialists in a specialized center. But it’s realistic to do everything yourself, because there’s nothing complicated about it. The procedure takes no more than two hours, it all depends on skill and experience.
Car enthusiasts can give their stock radio another chance by tuning it. Reflashing the software settings will make the interface more convenient, the performance and service life of the device will increase.
What is MMC Kalina 2?
Depending on the selected vehicle configuration, the consumer receives MMC Kalina 2 with various options. At the time of choosing the necessary equipment, the future owner must carefully study this issue. It is possible to install a 2 din radio with or without a CD drive, touch screen. In the last few years, car owners have given preference to models with touch control mode.
Connecting external devices
In order not to overload the Lada with unnecessary wires and inputs, the connection between the radio and an external device occurs via the Bluetooth protocol. It is enough to set the necessary settings once for the system to remember them.
If you wish, you can download music from external media to the internal memory of the radio or listen directly from a flash drive or phone. If the second is selected, then the sound comes from the speakers installed in the car or wireless headphones. When it comes to connecting memory cards, they must be formatted in a certain way - FAT16/FAT32. The connection connector is located on the back side.
Repair and warranty service are as follows. If the installation of the radio in Kalina was carried out correctly, then once a year it is necessary to do a preventive examination at a service center.
If the service period has passed, then everything can be done at home. All wires must be carefully disconnected. Using a screwdriver, loosen the fastenings and remove the radio. Then it is delivered to the workshop, where the failed element is replaced.
Having mastered the production of the Lada Granta in the liftback body, VAZ began supplying a standard radio (not touchscreen) in the Norma+ car configurations. Let us immediately note that the radio tape recorders intended for Kalina-2 and Granta look the same, but their mounting is different, so these devices are not interchangeable. Looking ahead, let's say that a review made by the owner of a car with a similar radio is presented on video. Now let’s talk about what exactly VAZ is offering today to owners of Kalin and Grant in the Norma+ configuration.
Content
Flashing process
The most popular among motorists is the firmware of the Granta head unit. This has no effect on the sound, but adds some features that the standard interface does not have. For example, a convenient touch keyboard appears, called up from a number of programs, and the ability to access the Internet. In order to reflash the media system, you will need an SD card using FAT formatting; you can use the same card, but formatted in exFAT.
https://youtube.com/watch?v=AM02w_hDBaA
First you need to download the firmware, having first carefully searched for it on the Internet. It’s easier to find it on thematic auto forums. After downloading, copy the necessary files to the root directory of the card, having previously written them to a flash drive. Then we install the card in the slot on the radio and reboot it. Once the reboot status bar is full, you can use the expanded interface. It's worth noting that to return to features such as radio and Bluetooth, you need to remove the SD card with the alternative menu and reboot the system again.
Also on car forums you can find craftsmen experimenting with firmware that does not remove the radio and some other modes from the menu. There is information that they have somehow learned to read and decrypt data from a KAN bus suitable for the MMC. The firmware may also require screen calibration before you can work with the alternate menu. Follow the instructions and everything will be quick and easy.
Choosing the right radio size
We carry out installation either independently or by contacting specialists at the service center. In the second case, the service is paid.
By default, all VAZ and Lada models are equipped with a 1-DIN radio. The opening dimensions correspond to: 180 x 50 mm. This is an old standardization that has been in force since the times of the USSR. Modern audio modules can be purchased complete with a pre-installed LCD display. The size of the opening must comply with the standard: 180 x 100 mm, that is, doubled in height. Size marking: 2-DIN.
To install the radio in the Granta liftback, cut out the top pocket, remove the plastic, and install the assembled module. For a beginner, the process will seem somewhat complicated, so strictly follow the instructions.