Replacing the driveshaft crosspiece on a VAZ 2101 with your own hands
You can guess that the driveshaft crosspiece needs to be replaced by the characteristic knocking and vibration coming from outside when the car is moving at a certain speed. The cause of problems that arise is most often an increase in play in the connection of the gear flange with the main gear. Its appearance can be caused by heavy loads when driving over rough terrain or excessive axle loads.
If the backlash is not eliminated initially, over time it can turn into severe runout.
It should also be noted that the driveshaft crosspiece is subject to constant exposure to dust, dirt, and water, since it is located close to the road surface.
Diagnostics of faults does not require serious knowledge or professional equipment. In addition, based on its results, it will become clear whether the driveshaft crosspiece needs to be replaced or can be dispensed with.
Diagnostics of malfunctions of the VAZ 2101 driveshaft
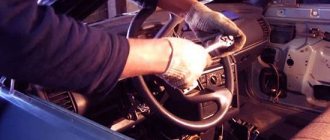
First of all, you need to install the car on a viewing hole or lift. Hold the shaft with one hand and fix the drive gear flange with the other. Holding the connection with both hands, try to turn it (as if twisting them in opposite directions). If you succeed, or if play becomes obvious, you can conclude that the crosspiece is badly worn and needs to be replaced. Delayed repairs in this case will only worsen the situation (the outboard bearing will perform its functions worse, and this will lead to even more serious breakdowns and greater financial costs).
Basic faults
Any component or mechanism sooner or later wears out and requires complete or partial replacement (repair). The most common driveshaft malfunctions:
- wear of the suspension device bearing;
- wear of the rubber cushion;
- wear of crosspieces.
The latter malfunction occurs for various reasons. The most likely of them:
- Aggressive driving style.
- Poor quality of crosspieces.
- Unsatisfactory maintenance of crosspieces, which consists of timely lubrication, if provided for by the design. If they are maintenance-free, they fail earlier due to a lack of lubrication.
- Bad roads.
- Constant driving through deep puddles.
The signal to replace these parts is increased noise while driving, vibration and extraneous sounds emanating from under the car.
Worth checking out:
- Replacing the VAZ 2106 driveshaft;
- Replacing the tie rod end of a VAZ 2114 without contacting a car service;
- Recommendations for replacing the VAZ 2115 steering rack yourself.
the replacement of the crosspiece to a service station specialist or do it yourself at home. Next, we will consider the actions of the car owner who chooses the 2nd option.
Node device
Before you begin dismantling it yourself, you need to at least in general understand the structure of the entire unit, then repairs can be done according to all the rules. Cardan shaft device:
- Front part (short). Through an elastic coupling, which softens jerks and shocks when changing gears, it is connected to the input shaft of the gearbox (gearbox).
- The back is longer. It is connected to the rear axle gearbox using a flange.
To the eternal question, how many crosspieces are there on this car, there is a very clear answer: two.
Structurally, everything is done exactly this way due to the fact that the gearbox and the rear axle gearbox are not located in the same axis, that is, they are offset relative to each other. From this it is absolutely clear that the driveshaft cannot be solid, since this is structurally impossible.
The design also provides a suspension device - an additional support consisting of a rubber cushion enclosed in a steel cage and a bearing in the center of the structure.
This is the brief structure of this node.
Also check out
- Self-adjustment of VAZ 2110 headlights at home
- Dismantling the cylinder head on a VAZ 2109. Algorithm for replacing the cylinder head gasket yourself
- How to independently modify the VAZ 2107 stove by installing a VAZ 2108 “snail”
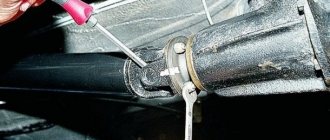
- Unscrew the fastening nuts where the rear axle shank connects to the cardan. It is better to immediately put marks in order to avoid possible future beating or vibration of an inaccurately installed cardan.
Replacing the driveshaft crosspiece on a VAZ 2101 with your own hands
- Using pliers, dismantle the cardan shaft crosspiece and remove the retaining ring.
Replacing the driveshaft crosspiece on a VAZ 2101 with your own hands
Replacing the driveshaft crosspiece on a VAZ 2101 with your own hands
- Unfold the cardan so that the cross hangs. Use a hammer and a mandrel to knock out her cup.
Replacing the driveshaft crosspiece on a VAZ 2101 with your own hands
- Clean the eyes from dirt and corrosion, and take care of the grooves for the locking wheels. Only after this can you proceed to replacing the cross.
Information on how to replace the silent blocks of the VAZ front suspension can be found here
How to remove the cross with your own hands
To properly repair the crosspiece, you must have a set of tools and parts available:
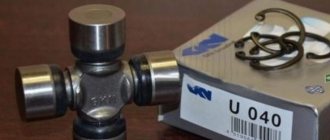
- new universal joint;
- retaining rings;
- suspension type bearing;
- new bolts and nuts (they are needed because often during dismantling the old ones fail or are even cut off due to the impossibility of unscrewing);
- socket and wrenches for 12, 13, 27;
- hammer;
- attachment made of aluminum or copper;
- shaped screwdriver;
- pliers for removing retaining rings.
As a rule, an inspection hole is required to carry out the work, since lifting the car on a jack is often not enough.
Dismantling: method one
So, replacing the crosspiece on a VAZ 2104 begins:
- the first thing to do is remove the cardan;
- Using a 13mm wrench, unscrew the bolts that secure the suspension bearing (as you know, the cardan is attached to the cross beam of the car);
- we unscrew those fasteners that connect the cardan to the tail part of the rear axle (this operation will require the use of a center punch, which needs to be marked so as not to confuse anything during assembly);
- remove the crosspiece (for this we use pre-prepared pliers, with which we open the locking ring);
- We turn the cardan so that the cross is in a hanging position;
- we knock out the cup of the cross (we use a hammer or you can use a thin metal rod);
- turn the cardan;
- remove the cup of the cross;
- knock out the next one in the same way.
Attention: It is worth noting that before replacing the crosspiece, you need to carefully prepare the universal joint eyes. For this purpose, they are cleaned of dirt and rust. Similar cleaning is carried out with the grooves of the retaining rings.
Dismantling: method two
Begin:
- we lift the car onto the inspection hole;
- remove the parking brake cable spring;
- Marks are applied to the joints of the cardan shaft and gearbox;
- unscrew the four self-locking nuts, holding the cardan from turning with a screwdriver;
- remove one end of the propeller shaft;
- mark the position of the cardan and the EF flange;
- we find four locking tendrils on the clip, near the EF and bend them;
- we move the clip forward together with the seal;
- take the key to 13;
- use it to unscrew the two nuts securing the safety bar;
- remove the safety bar;
- remove the plate of the outboard bearing from the studs, holding the cardan and unscrewing the nuts securing these connections with a 13mm wrench (usually the plate is secured through rubber washers);
- remove the cardan from the splines;
- take it out;
- Using a center punch or chisel, we mark the relative positions of the parts so that the balancing is not disturbed;
- mark the location of the forks and shafts;
- we remove the retaining rings with a special tool;
- take a special puller and install it on the fork of the cross;
- press out the needle bearing, which should automatically fall into the puller cup.
Attention: It should be remembered that the bearing will only extend to a third of its height.
- press out the opposite bearing in the same way as the first one;
- knock out the bearings completely, pressing the screwdriver against the edge of the bearing housing;
- we remove the cross from the cardan fork;
- We place a special puller, which was used to press out the bearing, on the crosspiece;
- press out another pair of bearings;
- We put seals and plastic plugs on the crosspiece;
- take Fiol and lubricate the crosspiece bearings with it thoroughly.
We can say that this completes the dismantling process. Now you need to correctly install the cross in place. This video will help those who have good visual memory to do everything correctly.
Installation of a new cross
We begin installing the new or repaired cross into place. So:
- insert the cross into the fork;
- take a puller and spacer;
- we press the bearing into the fork (this must be done so that it goes in much deeper than the groove under the retaining ring);
- insert the retaining ring;
- on the opposite side of the fork, bearing number two is pressed in so that the first rests on the retaining ring;
- fix the retaining ring of the second bearing;
- drive the retaining ring to the end using a hammer and bit;
- take a feeler gauge and measure the gap that is between the bearing and the retaining ring;
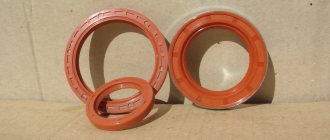
Attention: It should be noted that the gap should be no less than 0.01 and no more than 0.04 mm. As for the retaining rings, they come in five sizes and different colors.
- unpainted retaining rings have a thickness of 1.50 mm;
- brown – 1.52 mm;
- blue – 1.56;
- black – 1.59;
- yellow – 1.62.
The photo below shows locking rings of different sizes:
Outboard bearing repair
Often it is not enough to replace the crosspiece and you have to change the suspension bearing as well. Let's look at the example below on how to do it yourself correctly:
- remove the rear cardan as required by the instructions;
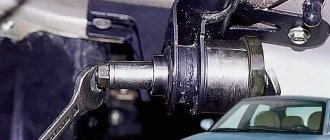
- take the head at 27;
- We unscrew the nut of the front cardan fork with it (this should not be done all the way!);
- take a puller;
- we tighten the bolt with it, creating a preload (in this case, it may happen that the fork does not move and then it will be necessary to help it move with hammer blows);
- Unscrew the outboard bearing mounting bolts using a 13mm wrench;
- knock out the bearing from the shaft;
- We collect everything in reverse order.
The step-by-step instructions described above will help motorists gain the necessary skills in their work. But not only. Working with your own hands is a good way to save money. After all, today the price for car repair services is quite high and not everyone can afford it, especially if you can repair domestic cars, such as the VAZ 2104, on your own.
Installation of a new driveshaft crosspiece VAZ 2101
- Remove both cups from the cross.
- Install the cross into the eyes.
- Slowly put on the cup (while making sure that the needles from the cup do not fall apart).
Replacing the driveshaft crosspiece on a VAZ 2101 with your own hands
- Squeeze the cup until a groove is formed for the retaining ring (a soft metal socket is useful here).
- Install the locking ring, rotate the cardan, moving the cross towards the cup, and put it on.
- Compress the cup and install the retaining ring.
At this point, the replacement of the VAZ 2101 crosspiece can be considered successfully completed.
Choosing a universal joint for VAZ 2105
I once had an argument with a mechanic. He argued that crosspieces should not have an oil nipple, since it provides an extra hole for dirt to enter. The hinge quickly becomes clogged and fails. I insisted that without a grease can there would be no way to lubricate the crosspiece - it was somewhat offensive, since before that I had found an almost new screw syringe for lubrication in my grandfather’s garage. “Why, if each part has its own resource,” my opponent answered, “if the lubricant runs out, change the part, especially since it is inexpensive. It is better to pay attention to the seals (O-rings). If they dry out, new lubricant will not save.” Indeed, it is so.
This is interesting: Maintenance of Chevrolet Aveo: operating instructions
When purchasing new crosspieces for the VAZ 2105, you should be guided by the following points.
- CCs should not be too expensive, since they have to be changed quite often.
- Spare retaining rings must be included with the CC. On sale you can find kits without rings, consisting only of the cross itself and a rubber seal.
- For the VAZ 2105, old and new crosspieces are available. It is not recommended to install new reinforced crosspieces on old-style cardan forks - this will reduce the rigidity of the joints. “Sevens” produced after 1990 are equipped with modern driveshaft forks. On such cars you can safely install reinforced joints with additional stiffening ribs on the cups, an increased number of bearing needles (one more than in a conventional joint) and improved characteristics of the seals.
Reinforced crosspieces can be installed on VAZ 2105 produced after 1990.
Among the manufacturers of crosspieces, the following companies have proven themselves to be the best:
- GKN (Germany);
GKN crosspieces are considered the most reliable - VolgaAvtoProm LLC;
Crosspieces produced by VolgaAvtoProm LLC are of good quality at a low price - JSC AVTOVAZ.
AVTOVAZ installs crosspieces of its own production on its cars
The price of the crosspiece and the cost of replacing it at the service
The estimated cost of replacing one crosspiece at a service is about 500-600 rubles. Replacing two crosspieces with removing the driveshaft costs about 1,500 rubles.
The cost of one cross is about 250-300 rubles . There are both domestically produced and imported crosspieces on sale (China, Germany, the Netherlands).
When purchasing a crosspiece, you should inspect it for manufacturing defects. All working surfaces must be perfect, without any chips or nicks; all 4 plugs of the cross must have seals.
The seals must also be perfect. If all these requirements are met, the crosspiece will last a very long time.
And so – let’s see how to distinguish a fake:
1. Price. A factory driveshaft for this car cannot cost less than 3,300 rubles (information as of December 10, 2011). Whatever the discount, sale, sale at cost, etc. the seller would not justify a lower price - a factory cardan cannot cost less than this price, since even in wholesale offices (suppliers) it costs more than the indicated price.
2. Packaging. The new factory driveshaft should be in the packaging. This is a two-layer cardboard box, with information about the part itself and its manufacturer printed on it.
You CANNOT buy a cardan without this box!!! You don't buy a TV without a box???
The box has the following inscriptions
Manufacturer data:
3. Factory label. At the moment (for about 2-3 years to this day), the manufacturer of these cardan shafts applies two sticker labels to each cardan shaft.
The first is the Article tag - indicating the manufacturer, his address, name of the product, date of manufacture, quality control stamp.
We look for the presence of labels on the fake (refurbished) cardan:
On it we see one article sticker made on green paper from an office supply store. There is no quality control sticker.
Now let’s look at the contents of the article sticker on the factory cardan:
The second is a sticker with SMS verification of the authenticity of the product.
Each sticker has its own verification code under a protective coating. You can easily check the authenticity of the product by entering the verification code in the appropriate form on the website
For example, you can check the authenticity of one of our cardans by entering on the website: its verification number 99446 43143 08764 in the appropriate form.
And compare it with the contents of the article sticker on the fake cardan:
4. Needle-impact marking of the product’s production date. Please note that the production date on the label and this marking are the same.
Now let's see how a parody of this marking is made on a fake cardan:
This marking is applied in the area marked with a red rectangle
5. Drive shaft model
Currently, the plant produces only one model of driveshaft for the classic Zhiguli, under the designation VAZ 2105-2200012
If you come across a cardan on sale with the designation VAZ 2101 or something else, this is not a factory cardan.
Of course, if scammers have learned to “restore” used cardan shafts, then they will write the desired name on the fake labels, but there is a sure way to distinguish the propeller shaft of the VAZ 2101 model from the VAZ 2105 - this is the shape of the radius of the spline shaft flange.
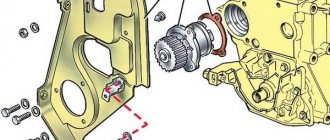
In this diagram, the driveshaft of the VAZ 2105:
In the following diagram you see the driveshaft of the VAZ 2101
As you can see, there is a clear difference in the design of the area circled in red. This is one of the most noticeable differences.
So, if you come across a new driveshaft for sale with a splined flange radius shape as in the second example, - this is a 100% restored driveshaft, since the plant has not produced driveshafts of this name and design for a long time, and even more so it looks funny on such cardan shafts have a label with the name VAZ 2105 and the latest production date (year of manufacture 2011).
From experience, the most commonly found on sale are restored cardan shafts of the VAZ 2101 model (in this case, you can no longer trust the VAZ 2105 information on the tag). Since for more than 30 years, VAZ classics were produced with these particular cardan shafts, and in terms of the quantity produced, they significantly exceed the design of the VAZ 2105 cardan shaft.
Of course, this is not a 100% guarantee that by purchasing a driveshaft with an “honest” VAZ 2105 design (as in the first diagram), you are insured against purchasing a counterfeit, since shafts of this design also fail and are restored and put on sale - this is only one of the ways to identify an obvious fake.
6. Painting
The cardans are painted as an assembly - local (local) non-painting is allowed in hard-to-reach places for painting - behind the crosspieces:
The crosspieces themselves are often almost not painted over on the inside and completely painted over on the outside (cups)
Partial dusting of the flange part of the cardan with paint is allowed (occurs)
We look at the coloring of the fake cardan, it is also painted as an assembly, BUT using a completely different technology - by dipping into a bath of paint - the crosspiece is painted over:
7. Spline connection boot cage
The first sign that you need to pay attention to when thoroughly inspecting the cardan is the method of rolling the protective boot of the spline joint.
On a factory cardan, this procedure (rolling) is carried out using a machine method; the clip legs are rolled evenly, with the correct radius (completely repeating the radius of the counter groove on the cardan flange) without traces of impacts or deformation.
The race itself is pressed tightly, does not rotate on the cardan flange, it will not fall out of its place and will not rattle while moving, as often happens on restored cardan shafts.
On a fake cardan, this clip is, firstly, weakly crimped (it can be easily turned with your fingers), and secondly, the legs are deformed from impacts when crimping with improvised means (a chisel).
Now let’s look at this clip on the restored cardan:
The “clumsy” work is immediately visible
8. Measurements
The next check is carried out using a caliper. You just need to measure the diameter and thickness of the flange (the one that is attached to the gearbox flange).
The essence of the question: On fake cardans (as well as on fake gearboxes), the diameter of the flange and its thickness in 99% of cases are smaller than on factory products.
Reason: These parts (like all the others) when restoring units are not replaced with new ones - but the old ones are restored. Restoration means making it marketable.
These parts on the restored cardan always have traces of nicks (dents) as a result of repeated repairs of this cardan by its previous owner (possibly your grandfather :)), as well as traces of corrosion. These defects in presentation must be removed (otherwise even a naive buyer will not believe that the cardan is new).
And this is done by simply turning this part on a lathe. As a result, the dimensions of the part are far from the nominal value (always smaller).
So, just measure these dimensions on the cardan being sold (before purchasing it) and compare it with the nominal ones, and it will become clear to you which cardan they are trying to sell you.
So let's start taking measurements (please take into account the possible measurement error and tolerance in the manufacturing accuracy of the manufacturer - we will conventionally take it as 0.1 mm )
First measurement - outer diameter of the flange 87.5 mm
The second measurement is the diameter of the centering cone of the flange – 57 mm
The third measurement is the thickness of the flange flange (at the location of the cardan bolt) 5.3 mm
The fourth measurement is the height of the centering belt 2.4 mm
So we have four numbers: 87,5 — 57 – 5,3 – 2,4 .
If you measured other numbers on the cardan you are selling (for example, 86.5 - 56 - 4.5 - 2.0) - then rest assured, this is a restored cardan.
Measurements of a fake cardan:
First measurement - outer diameter of the flange 85.97 mm
The second measurement is the diameter of the centering cone of the flange - 55.4 mm
There is no need to take any further measurements. This cardan, even if it were balanced, is NOT SUITABLE for use.
Here we should step back a little from the topic and pay attention to the cynicism of the “manufacturers” of remanufactured cardans. Placing a priority on giving a product a marketable appearance by finishing the flange, they initially introduce an imbalance into their products. Even if the restored cardan was so successfully assembled that it does not have an imbalance (which is incredible), or even if they have a balancing machine on which they balance their products (which is doubly incredible) - this cardan (possibly not having an imbalance) after installation on a car will be a source of vibration, since machined centering diameter of the flange (measurement No. 2 - 57 mm ) to a smaller size (let's say 56 mm) will not allow the cardan to be installed (attached to the gearbox flange) accurately (coaxially) - the cardan will fit offset and this is already will cause severe vibration on the vehicle. We should also not forget the high requirements for turning equipment (precision machines) on which such products are processed. The slightest runout of the lathe leads to inaccuracy in the dimensions of the manufactured part and, as a result, to runout. It is unlikely that these restoration works will be carried out using high-precision equipment.
That is, these products are not suitable for use by default.
9. Spline connection
The cardan coupling should move in the splines (lengthening and shortening the cardan) easily, without excessive force or biting - with the effort of one hand.
If the coupling on the splines on the cardan you are purchasing cannot be moved by hand, and moreover, there is no play at all in the spline connection (there should be some - not much - but there should be)
- then 99% (especially in combination with other signs described above) indicates that the cardan has been restored, and the splines were simply tapped with a hammer (and overdone) - to create the appearance of a tight (not worn) spline connection.
A little later we will post a photo of the splines “restored” with a hammer.
10. Color of metal (not painted parts) cardan
We look at the color of the unpainted part of the flange on the factory universal joint:
We see the natural color of steel
Now look at the color of this part on the restored cardan:
We see the unnatural color of the steel treated with chemicals (to remove dirt and rust), since it is not possible to “refresh” this place mechanically (by turning) to give it a marketable appearance.
Well, it’s enough to show basic attentiveness and take a closer look at the details of the cardan and in most cases you will see on the restored cardan such defects as peeling of rubber on the outboard bearing support, and traces of sanding under painting:
The driveshaft serves to transmit force from the gearbox to the rear axle at different angles.
When the vehicle is unloaded, the bridge is lower than the position of the gearbox; moreover, when driving over uneven road surfaces, the bridge moves up and down, and the driveshaft moves along with it.
To transmit force at different angles, the driveshaft contains two joints called driveshaft spiders.
Installation
So:
- We insert the VAZ 2105 starter into the seat.
- Then secure it with three mounting bolts.
- Then you should reinstall the starter shield.
- Now the next step is to connect all the necessary wires back to the solenoid relay.
- Next, reinstall the braces (on an injection-powered car) or install the air filter housing (on a carburetor car).
- Connect the negative terminal back to the battery and you can try to start your favorite car.
Brief conclusion. Repairing a starter yourself is not a difficult task, but it is quite economical. The price of spare parts plus the price for work by craftsmen at the nearest service station is already good money. And so you will only have to spend money on spare parts. We hope this article helped you. Take care of your car, have it repaired on time, and when you really need it, it will serve you faithfully!
The starter relay engages the drive gear with the flywheel, activating the main unit. The VAZ 2105 starter relay is activated in a similar way. The mechanism is fixed with 3 bolts. The body of this unit and its cover are secured with 2 bolts.