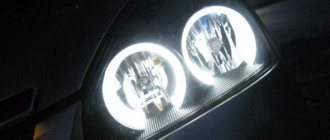
Additional lighting is a fairly popular tuning option. Moreover, you can do this yourself, using a standard set of tools and available consumables.
Illumination is mainly done purely for aesthetic reasons. But there is also some practicality here. The only question is how exactly the system will be implemented.
To implement the idea with your own hands, you will need basic skills in working with electricity. If you follow the instructions and recommendations, very soon your car will sparkle with new colors. And in the literal sense of the word.
Backlight options
Motorists perceive the concept of footwell lighting in a car somewhat differently.
Basically we are talking about the following options:
- Turn on the car lights when the door is opened. That is, the system is mounted at the bottom of the door, and the light is directed to the ground. The practicality of such a solution is minimal. Although some automakers install such lighting from the factory, displaying the logo of the car brand.
- Lighting in the feet. There is no need to open or close the door anymore. The light is directed towards the pedal assembly area. Looks impressive. This way you can see what is happening under your feet. This helps a beginner to better navigate the pedals in the dark.
Objectively, it is the second option that is more practical and preferable than illumination when opening a car door. But no one is stopping you from making sure that when you open the doors in the car, the asphalt lighting turns on, displaying the car company logo or some other image there. But the lighting of the legs is not only visually impressive, but also practical in certain situations.
The lighting system is implemented in different ways. You can choose a different color, even provide a color music effect. But when moving, it will certainly be distracting. Therefore, it is more correct to make the necessary lighting so that it helps during trips and makes it easier to change the position of your feet on the pedals.
Bumper air intakes and radiator grille
This type of lighting is the most difficult to install, since it is very difficult to hide the light source from the eyes and at the same time achieve uniform light. But if this can be done, then such auto lighting
it looks simply stunning. With such tuning, it is necessary to remember that not only the grille will be illuminated, but also the entire space behind it. So, everything behind the bars must be nice and neat, otherwise nothing good will come of that tuning.
READ How to check mileage on Priora
What is required for work
To make your own footlights in your car, you will need to first prepare a certain set of tools and some consumables.
To implement the simplest, but at the same time original project, it is enough to assemble a set consisting of:
- light source;
- wires about 5 meters long;
- heat shrink tube;
- glue;
- pliers;
- soldering iron;
- screwdrivers;
- sharp knife, etc.
That is, you need a standard set of tools.
You can complicate your task somewhat, but make the glow more universal. For this purpose, a brightness control controller, a control panel, and a switch are additionally used. This will allow you to adjust the settings, turn on the backlight as needed and at the brightness that suits you.
As for the light source, the footlights installed in the car interior can be made of 2 types of tapes:
- Neon ribbons. They look very impressive, beautiful and expensive. The light is objectively more pleasant. But for most motorists this is not a fundamental difference. Neon strips are much more expensive. To install them you will need to use an ignition unit. And this involves interfering with the vehicle’s electrical system.
- LED strips. The most practical and versatile option. There are no installation difficulties. The ribbons themselves are affordable and come in a wide range of colors.
Backlighting in a car: if it’s not prohibited, then it’s allowed
Clause 3.1. The traffic rules prohibit the operation of a vehicle if “the number, type, color, location and mode of operation of external lighting devices do not comply with the design requirements of the vehicle.” But you want, oh how you want to give your car some personality traits, including through the play of light and shadow. Meanwhile, you can engage in lighting design without coming into conflict with the law. Changing the interior lighting is not prohibited by traffic regulations, and today we will tell you how you can illuminate a familiar interior.
Installation procedure
Before installing diode footlights in a car with your own hands, you need to choose a place for convenient and correct placement of the lighting strip.
The following areas can potentially be used for this:
- perimeter at the bottom of the front seat;
- under the car dashboard;
- under the glove compartment (glove compartment), etc.
Here you should build on your own imagination and the design features of a particular car.
According to the rules and for reasons of comfort, the lighting should be directed strictly to the floor.
Some car enthusiasts do not take this point into account and install the tape on the side, on the floor covering itself. But in this case, the lighting can interfere, dazzle the eyes, etc. Remember, this is lighting specifically for the feet, and therefore it should be located in the cabin so as to illuminate this particular area, and not direct streams of light into the eyes.
Installing LED footwell lights in your car yourself is not at all difficult. Here you need to perform the following procedures:
- clearly define the places where the tape will be located;
- cut the LED strip into the required lengths;
- a wire is soldered to the edges of the tape;
- Next, the tape is tested by connecting to a power source;
- if the light comes on, you can continue working;
- the soldering area is insulated using heat-shrinkable tubing for this purpose;
- In order for the tube to fit well into place, it should be heated with a soldering iron or just a lighter;
- Having finished with the insulation, the prepared tape is mounted at selected points in the cabin;
- double-sided tape, glue or silicone ties are suitable for fixation;
- By analogy, the tape is installed in all parts of the cabin where it needs to be done.
The LED strip can only be cut in certain places where appropriate marks are provided.
Objectively, the most questions arise regarding how to make the connection correctly.
DIY crafts for car enthusiasts
Hi all! I fulfilled one of my long-time wishes) I got a free 5 meters of RGB strip with a controller and remote control, so I decided to have backlighting! And the most important thing is that everything should be according to Feng Shui - with smooth ignition and smooth decay. There is an idea - we are looking at implementation options on the Internet, I found many connection diagrams, but only one with a control minus will work for us.
Schematic diagram of smooth ignition with a control minus. In Layout I made a compact signet and LUT the whole thing)
Board in Layout
Finished signet Next, I cut the tape: 3 sections for the front, 2 sections for the rear passengers.
RGB tape with a protective silicone coating. I used a wire from a good USB extension cable as wiring. The tape was made modular with a USB connection for the tape at the front and the tape at the back, in case the LED section burns out or the rear passenger footwell lights simply turn off. Serial connection: ignition controller > tape controller > 3 section tape > 3 section tape > front and rear USB connection > 2 section tape > 2 section tape.
It would be necessary to cut off the excess length of the wire... For the mounting frame, I took a regular cable channel 1 cm wide and glued tapes, securing the connections of the cable and tape with ties.
my irreplaceable clothespins))) To select the time of ignition and decay of the tape, you can experiment with the resistance and capacitance of the capacitor.
Well, then the most difficult part begins - installation. Remove the protective shield on the right side of the front passenger's feet. In the braid we are looking for a thick black wire - a common minus, a black and blue wire - a control minus, and an orange and blue wire - a permanent plus.
collective farmers) We check the tape for performance and begin to lay the tape. We attach the front one to the spacer under the dashboard and under the steering column...
... and throw the end into the central tunnel in the area of the cup holders. Many people attach the lighting for the rear passengers directly to the air duct, but I figured that everyone would kick it there and attached it to the bottom of the front seats, running the wiring into the holes under the carpet where the wiring for the airbags runs.
To get there you need acrobatic abilities)))
It doesn’t look bad at all. I thought for a long time about how to make the IR receiver accessible in order to leave the ability to change the color of the backlight and came up with the idea) We hide the tape controller itself under the right air duct.
Ideas come unexpectedly. And we attach the IR receiver to some wiring with a regular clamp as shown in the photo.
Intrigue... Well, then we put the board in place and... VOILA!
Simply PERFECT) Thank you all for your attention! Until new entries...
Popular;
- Smooth LED ignition circuit
- We make heating of the fuel filter with our own hands
- Checking the remote control
- A simple scheme for illuminating car handles
- Making PWM for LEDs with your own hands
- Do-it-yourself LEDs for Lada Priora stacks
- Simple DIY secrets
- DIY 3D fog lights
Connection
There are several suitable options for how to make the lighting in your car yourself to ensure an original glow in your legs.
Each motorist will decide for himself how it will be more convenient and easier for him to connect the LED footlights in the car. But there are 3 main options:
- to the lighting of the interior itself;
- through the cigarette lighter;
- from dimensions.
The choice depends on the format in which the driver wants to see the backlight. After all, each scheme provides its own version of when and how the glow will be activated.