Articles
Wired remote control for radio
A wired remote control for a radio is not only simple, but also convenient. With its help, controlling the car radio becomes accessible and does not take much time. Its main advantage compared to the remote control is that it will not get lost. Although if you accidentally damage the wire, the wired remote control for the car radio will stop functioning. Let's look at the operation of remote controls using the example of Pioneer car radios.
Push-button auto audio control
While driving a car, it is not always convenient to use a push-button radio to search for a specific audio recording, radio wave, or to adjust the volume. It is safer to use standard radio control buttons on the steering wheel. This function is installed in car dealerships as an additional feature or as part of a premium kit for new vehicles. The standard devices of a middle-class car (for example, a Chevrolet Lacetti) have limited capabilities.
Sometimes car owners prefer to replace the standard audio system with a new multifunctional one. Then the signal from the buttons on the steering wheel does not reach the installed radio, and the driver has to contact the installation center.
To create a relationship between auto control and audio technology, a steering controller is used, which changes the signal from the button on the steering wheel into a signal for reading by the radio. To connect it, the car has all the necessary wiring. Steering adapters are suitable for almost all radios that have an infrared port and/or mini-jack output.
Modules for multifunction steering wheel:
- Resistive. The measured resistance values are recorded in the module's memory, resulting in control of the steering buttons above the radio.
- Supporting CAN buses. This adapter converts only digital signals into those that are received by the installed non-standard audio system.
Preparing to connect steering wheel buttons to a non-original radio
To correctly connect a non-standard head unit with buttons on the steering wheel, you will need a special adapter, which is called an adapter for connecting buttons on the steering wheel.
On sale you can find both separate models of adapters that are suitable only for certain brands of cars, and universal adapters.
Among universal devices, the programmable adapter from the ACV (Accessories for Vehicles Hi-Tech) brand is very popular.
The universal adapter for controlling a non-original radio using standard buttons on the steering wheel of the SWI-X1 series from ACV is suitable for cars of almost all popular brands (Hyundai, Kia, Toyota, Honda, Nissan, Chevrolet, Ford, Mazda, Mitsubishi, Suzuki, etc.) that have Multifunction steering wheel resistive type buttons.
Externally, the adapter looks like a small module with multi-colored wires brought out for connection to the wires of the radio block.
ACV SWI-X1 is programmed for car radios and head units of all popular brands (Pioneer, Alpine, Sony, Panasonic, JVC, Kenwood, Prologi, etc.), which come with a remote control.
Programming is carried out directly from the remote control of the head unit.
SWI-X1 allows you to retain all the functionality of the multifunction steering wheel buttons, and also expands the capabilities - programming two functions per button (short/long press).
So, after purchasing a universal adapter for the steering wheel buttons, we can begin installation.
Independent connection of the multifunction steering wheel
The service of connecting steering wheel radio controls at auto centers requires certain financial costs and the involvement of experienced specialists with knowledge in the field of auto electrics.
But you can connect the remote control and buttons on the steering wheel yourself. So how to connect steering wheel controls to the radio?
Let's consider the algorithm for reinstalling the radio control on the steering wheel when buying a new radio using the example of a Chevrolet Lacetti car. The work will take 1-1.5 hours with all the steps.
Cool car radio control panel DOXINGYE
Price: from 993.63 rub. (check price and discount)
Seller's reliability: excellent!
Delivery within Russia: free!
Customer reviews:
Review #1: Works very well with Android. Sound volume + and -, quick mute, pause, switch tracks, and when the camera is on, all buttons work perfectly. Thanks to the seller. Delivery 30 days to Russia North-West.
Review #2: The remote control is cool. The button works. I like it. It's a pity that there is no answer to the call. I didn’t measure the Bluetooth range, but I think the standard is 5-10 meters. It fits perfectly on the steering wheel. I'm happy and can recommend it.
Review #3: I bought it as a gift for my father. Everything is fine, dad was happy. All functions are supported, but I had to install a normal player. Respect and respect to the seller. I gave you a Chinese coin, it was nice.
Instructions for reinstalling the standard remote control
- The radio control panel is removed from the steering wheel by removing the bolts.
- The connector is removed from it.
- The remote control is disassembled by unscrewing three screws.
- Resistors of certain values are soldered onto the remote control board using a soldering iron.
- The ribs in the control panel cover are trimmed and we assemble it back.
- One wire from the mini-jack is soldered into the central input, the second into the side one. The wires are insulated with electrical tape.
- In the car, the connector from the radio is trimmed, stripped, connected to the mini-jack terminals and also insulated.
- The mini-jack is connected to the radio through a connector in the rear wall of the equipment case.
- The connector is inserted into the remote control, which is then put back by screwing two bolts.
- We turn on the radios and check the results to see if the radio control on the steering wheel works.
Universal car radio control panel Zeepin (2 pcs)
Price: from 1060.86 rub. (check price and discount)
Seller's reliability: excellent!
Delivery within Russia: free!
Customer reviews:
Review #1: Everything arrived quickly, everything is fine. The seller is great, there are no complaints and there cannot be any, until I connected it, I took it on the Vesta fret. Everything fits and works. I recommend the seller, delivery 11 days, I myself am shocked by the fast delivery.
Review #2: The product arrived quickly. Everything is exactly as in the description. The quality of the buttons is good. The remotes came with batteries. Installation took literally 30 minutes. Everything is working. I recommend the seller and his product. Everything is great.
Instructions for installing the steering wheel remote control with a compatible car radio
- The glove compartment is removed.
- The heater cables are disconnected.
- The beard is removed from the panel.
- The radio is taken out, from which three wires come out - black, brown-yellow and brown-orange.
- In the connector from the radio in the left corner (yellow-green chip) there are two wires from the control panel on the steering wheel.
- Two wires from the remote control and black and brown-yellow wires from the radio are connected.
- The radio, beard and glove compartment are put in place.
Installation and connection instructions for Chevrolet steering wheel controls
- A control panel with a mount and a steering wheel contact group with the ability to connect the remote control itself are purchased.
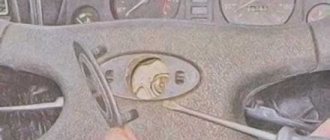
- Removing the steering wheel:
- On the right side of the steering wheel, remove the plug for the hole in the screws intended for fastening the airbag module;
- The screws for fixing the block are unscrewed;
- The connector is disconnected and removed from the block;
- Unscrew the two screws securing the airbag module;
- The module is removed;
- The pad holder opens;
- The connector is disconnected and the airbag module is removed;
- The connector from the audio signal is disconnected;
- Use a wrench to loosen the steering wheel nut, then unscrew it completely;
- The steering wheel is removed.
- The steering group is being installed or replaced.
- The airbag is removed.
- In the extended steering group there are three wires installed - for the signal and two for the radio control panel.
- The wires from the steering wheel group are connected to the wires from the radio (there are also three of them).
- The remote control, airbag and steering wheel are put in place.
- Installation and programming of the car radio control adapter on the steering wheel:
- The central panel (beard) is removed;
- The radio is removed;
- The black wire from the yellow-green steering control chip is connected to the black wire of the adapter;
- The blue wire of the yellow-green chip with the green wire from the control module (not with the blue one);
- The red wire of the adapter is connected to the red power wire from the radio;
- To connect to the audio system, use a mini-jack or infrared port;
- The adapter is secured with clamps under the radio;
- The functionality of the buttons on the steering wheel is checked.
- The radio is installed and the panel is assembled.
- Checking programming and connection.
Following all the points of the algorithm, every car enthusiast will be able to install the control panel on the steering wheel with his own hands, reinstall it in connection with the purchase of a compatible audio system, as well as install and connect the radio control on the steering wheel. Thus, the driver will save money and some time.
Principle of operation
Almost all radios from this company have the following components:
- Removable front panel. As a result, the likelihood that the device will be stolen is significantly reduced;
- In addition, the front panel contains all the necessary elements that allow you to control it.
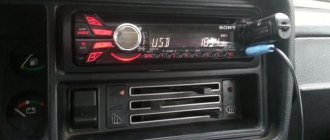
Car radios with wired remote control
Note. Among them are a volume control, a display, and connectors for connecting external media. The backlighting of the buttons is red, the backlighting of the display and USB connector is white.
Radio operation
The radio contains 4 frequency bands FM and AM. You can add 6 stations to each of them. They are switched using the buttons:
- Disp button Thanks to its presence, you can easily change the information visible on the display;
- In radio mode, you can find not only the nearest stations, but also distinguish them by genre. The search itself occurs by switching arrows in different modes (step-by-step or scanning mode);
Wired remote control for car radio
- In the function menu, you can save stations that will be stored in the device’s memory. Typically, a search occurs for those stations that have the strongest signal;
- It is possible to receive only regional/local radio stations;
- There is also an option for receiving traffic reports, a function for optimal frequency search, and news reception;
- In addition, it is possible to switch manual search to automatic, and vice versa.
One of the options for installing a wired remote control for car radios
Player operation
Here are the main points:
- Musical compositions do not start from the very beginning, but are played from the place where they were stopped;
- The car radio is equipped with a file manager. With it you can see a clear structure of files and folders;
- The Disp button changes the data displayed on the device display. To switch between songs, just press the LEFT and RIGHT buttons. Holding them down will activate rewind;
Wired car radio remote controls
- There are also buttons (1,2,3,4,5,6) that perform their specific meaning. For example, using the UP and DOWN arrows, which are replaced by the numbers 1 and 2, you can move from one folder to another. In the player menu there is only an option to enhance playback.
Functional menu of radio tape recorders
Convenient wired remote controls for car radios
The “Menu” item allows you to:
- change the device language;
- set the clock;
- turn on/off display of AUX device;
- turn on energy saving mode.
The AUDIO settings menu allows you to:
- Adjust all speakers included in the sound system;
- Choose one of the installed ones or configure the five-band equalizer yourself;
- Set up tone compensation mode or disable it;
- Set the turn-on phase of the speakers;
- Select its frequency cut and adjust its values;
- Clarify the values of the lower frequencies;
- Adjust the crossover mode (see Calculating the crossover for acoustics on your own);
- Set individual sound strength for each signal source.
Wired remote control for car radio
On the rear panel there is a place for connecting the power cable, a fuse, a socket for connecting a radio antenna, 4 line outputs, and a connector for connecting a remote control.
Note: you can also use the remote control from another radio, but in this case you need to resolder the adapters.
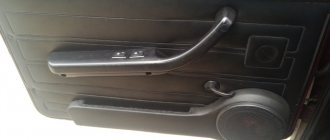
As a rule, the remote control is installed on the steering wheel of the car to make it easier to control the radio. There are also remote controls that can be used to switch tracks while at some distance from the player.