Every motorist knows that a generator is a fairly important element in the design of any car, thanks to which it is possible to set the engine in motion and provide all vehicle systems with the necessary energy.
The Russian-made Niva car in modifications 21214, 2121, 21213 are vehicles that almost every second car enthusiast in Russia has encountered.
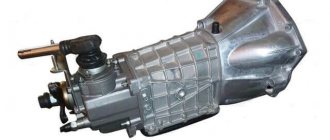
Despite the release of several models, the contents of the Niva are practically no different. Thus, manufacturers used units with article numbers 9412.3701, 371.3701 as a generator in cars.
Generator repair
- The voltage regulator has burned out.
- The diode bridge has failed.
- Break or short circuit in the windings.
Replacing worn out removable brushes.
This is a consumable item that is checked at every maintenance. To remove the old brushes and install new ones, the entire assembly must be disassembled.
Mechanics can be easily “treated” if you have basic plumbing experience. No special tools required. A regular set of wrenches and screwdrivers. Damaged bearings can be removed using a drift or a special puller.
Disconnect the voltage regulator and diode bridge board. Ring the diodes and connecting buses with a tester. Faulty radio components can usually be seen without measurement. Their repair is impossible, only replacement. Inspect the rotor current collector tracks. The copper surface must be free of oxide deposits, cracks and other damage.
If necessary, you can clean it with fine sandpaper. Connect the tester to the stator and rotor windings and check them for open circuit or short circuit. There is no need to replace the generator; the windings are easily restored. After eliminating the damage, reassemble the housing without damaging the internal parts. Reinstall the assembly, tighten the drive belt, and crank the crankshaft without starting the engine.
Moving the generator upstairs in Niva VAZ-21213
Installing the VAZ 2110 dashboard on a Lada 4×4 (VAZ 2121, 2131)
In order to move the generator upward on the Niva, it is necessary to make a special bracket. It is made of metal, the thickness of which should not be less than 4 millimeters. Its width and length are about 80 millimeters. In order to assemble this device, you will definitely need some other spare parts from domestically produced cars. Namely:
- adjustment bar;
- belt 6РК1290;
- crankshaft pulley suitable for VAZ-2110.
You will also need an upper adjustment bar, which can be borrowed from the good old Volga. To begin with, it should be cut in place, and then drill a new place for future fasteners.
A fan is mainly installed on the pump pulley from the Volga, and the generator itself is located at the top left. The cylinder head is attached on top of it thanks to an M8 bolt, while standard studs and a bolt are most often used on top. In order for the resulting bracket to hold well, it is best to secure it with another additional nut.
But there is also a second option for moving the generator on the Niva to the top. In this case, you should use a belt whose size is 1375 millimeters. You will have to perform much fewer actions, but you simply cannot do without working with an angle grinder. This tool will be necessary to reduce the plane of the head, which is located near the M8 bolt.
In addition, you will definitely need new studs and bolts for the front cover. By the way, this method is perfect for moving the generator up to the VAZ-21214.
It is very noteworthy that if you are the owner of a VAZ-21213 car, but you have no desire to perform the above actions yourself, but have a sense of saving, you can buy a ready-made set of spare parts. Finding it is quite easy, since it is sold in almost all stores that sell spare parts for the Niva. Or you can resort to an even simpler method, but, unfortunately, it will entail large financial costs. In accordance with this method, your car is driven to a specialized service station, where real professionals will do all the work for you.
Chevrolet Niva Kopar-Mobil › Logbook › Generator from Priora 115A on Chevrolet NIVU
Preparations for the cop season are in full swing.
It's no secret that a standard 80A generator is not enough. I’ll immediately explain for those who like to joke that the plant is not fools... On a regular (with regular music) VAZ 2110 there is also an 80A generator, it’s basically enough, electrically, the Chevrolet NIVA is similar to the VAZ 2110, only on the NIVA there are double fans that consume 40A, and the starting current is even greater. So in the summer there is a very heavy load on the generator and battery. In addition, my car has air conditioning, which means that in the summer the consumption will be even greater. So, in my opinion, a 100-115A generator is needed in the fields even in the poorest configuration.
I didn’t bother and just bought a new generator KZATE 115A from Priora. I already have installation experience, you can read HERE
I also bought an excitement chip, and a new belt and rollers.
Now again I will give a small explanation. It seems that in 2021, KZATE began producing a 120A Niva generator; its difference from the Priorovsky 115A generator is only in the number of rivulets on the pulley. On the Priorovsky there are 6 of them, and on the Nivovsky there are 5. And slightly different voltage regulators (which is why additional 5a appear) otherwise the generators are completely identical. But I couldn’t find a real Nivovsky, leftist everywhere. But Priorovsky had no problems, that’s why he took it.
The main criteria that prove that this is a leftist: - often sold without boxes - if there is no passport in the box, or it is obviously fake - very poor quality of processing of the case, and windings - characteristically shiny bolts, like on Chinese products - so as not to be misleading, I’ll say right away, that even on crafts there is laser engraving on the body - the inscription on the nameplate is easily erased - bad printing of the nameplate - on the Nivovsky 120ana nameplate there should be the inscription EAC (when this generator was developed, the plant already applied this marking)
Also on the KZATE website there are performance graphs of generators. Having studied the chart, it is clear that even at XX there is already a good return.
Now regarding the installation. If the car does not have air conditioning, then everything is very simple, and is done through the top. If the car has air conditioning, then you will first have to remove the air conditioning belt through the bottom. The belt should be pressed as close as possible to the engine, and 2 rivets to the generator remain free
Does a Chevrolet Niva have an 80 amp generator?
Is it worth installing a diesel engine on a Lada 4×4 (VAZ 2121, 2131)
Or is it still better to take a more powerful one - 100 amperes? I recently thought about this question, because either my gene has become quite worn out and can no longer produce the required voltage. That’s why my battery is almost always dead, so I almost have to immediately turn off the appliances, the stove, etc. In general, if the gene is bad, then you can’t even listen to music in nature for a couple of hours, the battery will die. And if the time has come to change it, then maybe immediately take a more powerful one?
I recently changed the alternator belt, there was a whole story about how it broke and I got home with grief in half. Be sure to read it, I think it will be useful to many. And take a second spare with you))
Also useful information for Shevik owners - cars before September 2003 have a lower-mounted generator, this is not a hum, when overcoming deep puddles and fords it usually floods and this situation is not a fountain, you understand. It’s not for nothing that many car enthusiasts carry genes that are much higher, both in Nivas and Cheviks.
But since September 2003, Sheviks have come with an overhead generator, this is already an excellent solution. The gene is located at the top right if you are facing the open hood. When overcoming puddles, it will be much more difficult to fill it than the lower ones.
So I started thinking, maybe I’ll install a more powerful generator, because I plan to install a trunk and, of course, a chandelier; I think 4 lamps from hella will fit in quite well. Plus I will also install a winch, and it also drains the battery pretty badly. And if the gene is weak, then when fighting off-road, we can get a situation where we are skidding in the dark, the chandelier is turned on, the engine is boiling - both fans are threshing at full strength, we are pulling with a winch - will the gene be enough for 80 amperes? Such energy consumption, of course, will not happen often, but when it happens, it’s better to be safe, isn’t it?
On the other hand, wouldn’t a 100 ampere battery drain the battery? After all, the battery is new and it would be wrong if it only lasts a year or two. As I read again on the forums, a more powerful gene shortens the life of the battery.
I read the reviews of Shnivovodov - the majority say that betting on a hundred is a good thing, but only when it is actually needed, in the sense of needing a gene of increased power. Because the staff is quite enough if it works as it should. But if the car has a winch and additional light, then it is better to install a 100-amp generator. We'll keep thinking ))
Who thinks what, share your thoughts in the comments.
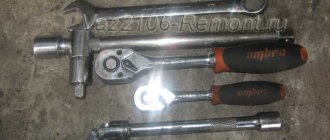
Tools:
There seemed to be a service in the area where we worked. I'll give the car back and go to the office while they fix it. The charge was just enough to get to the box.
The last meters were walked by hand. The electrician came out and said in a menacing, confident voice that everything was full today and he couldn’t do it. But the problem was solved immediately by itself.
My property was already in a box and I couldn’t leave on my own. But the comrade who was supposed to come has not yet appeared. In general, they quickly diagnosed me that the diode bridge had burned out.
The auto parts were a block away from the service station. An hour later I was back on the wheels. Hooray!
Parts and consumables:
The diode bridge burned out photo from the network. When overcoming puddles, it will be much more difficult to fill it than the lower ones. So I started thinking, maybe I’ll install a more powerful generator, because I plan to install a trunk and, of course, a chandelier; I think 4 lamps from hella will fit in quite well.
Plus I will also install a winch, and it also drains the battery pretty badly.
And if the gene is weak, then when fighting off-road, we can get a situation where we are skidding in the dark, the chandelier is turned on, the engine is boiling - both fans are threshing at full strength, we are pulling with a winch - will the gene be enough for 80 amperes? Such energy consumption, of course, will not happen often, but when it happens, it’s better to be safe, isn’t it?
Nuances of moving a generator
Which springs are better to put on Lada 4×4
The disadvantage of domestic Niva SUVs is the location of the generator unit - at the bottom of the engine compartment. It constantly gets contaminated when driving off-road, and coolant constantly drips. The problem is solved by moving the generator upstairs (the author of the video is SARTANETS).
To transfer, you will need a set of keys, a bracket, mounting bolts, and a V-belt. You can make a generator transfer bracket with your own hands according to the drawing below.
Drawing of a homemade bracket
Sequence of actions during transfer:
- We dismantle the propeller, pump and remove the belt.
- By unscrewing the standard bracket, you can remove the generator.
- We cut off the bead around the side of the cylinder head and on the cylinder block.
- Then you should unscrew the two bolts and two studs.
- Next, the assembly is installed on a new bracket and final assembly is performed.
Thus, moving the generator unit upstairs is not difficult.
Generator check
See also: Checking the generator with a multimeter
| Start the engine, let it run for a few minutes, then, pressing the gas pedal, bring the crankshaft speed to 3000 rpm. Turn on the high beam headlights, heated rear window, and heater fan. Measure the voltage at the battery terminals, which should be above 13.2 V for generator 9412.3701 and 13.6 V for generator 371.3701. If this is not the case, the voltage regulator with the brush assembly, the generator windings are faulty (open or shorted) or the contact rings of the field winding are oxidized. To ensure that the voltage regulator is working properly, turn off all consumers except the high beam headlights and measure the voltage again. It should be between 13.2–14.7 V for the 9412.3701 generator and 13.6–14.6 V for the 371.3701 generator. The removed generator voltage regulator 9412.3701 can be checked by connecting a lamp (1–5 W, 12 V) between the brushes, and a power source to the “D+” and “ground” terminals (DC only, “minus” to ground!) , initially with a voltage of 12 V, and then 15–16 V. In the first case, the lamp should be on, in the second - not. If the lamp lights up in both cases, there is a breakdown in the regulator; if it doesn’t light up, there is a break or broken contact between the brushes and the regulator terminals. In both cases the regulator should be replaced. To check the generator regulator 371.3701, the current source should be connected to terminals “B” and “C” (“plus”) and “ground” (“minus”). To check the valves of the rectifier unit, disconnect the wires from the battery, generator and from the voltage regulator terminal(s). Connect the “plus” of the battery through a lamp (1–5 W, 12 V) to the “B+” terminal of the generator 9412.3701 (to terminal “30” of the generator 371.3701), and the “minus” to its body. If the lamp is on, then there is a short circuit in both the block of “positive” and the block of “negative” valves. To check the short circuit in the “positive” valves, connect the “plus” battery through a lamp to the “B+” terminal of the generator 9412.3701 (with the “30” terminal of the 371.3701 generator), and the “minus” - to the terminal of one of the phase windings of the stator. If the lamp is on, one or more positive valves are broken. To check the short circuit in the “negative” valves, connect the “plus” of the battery through a lamp to the terminal of one of the phase windings of the stator, and the “minus” to the generator housing. If the lamp is on, one or more negative valves are broken or the stator windings are shorted to the generator housing. To prevent short-circuiting of the windings, remove the generator from the car and, having disconnected the windings from the voltage regulator and rectifier unit, check their short circuit to ground with a lamp or ohmmeter. The generator valves can also be checked with an ohmmeter without connecting the battery and test lamp. The short circuit of additional diodes can be checked by connecting the “plus” of the battery through a lamp to terminal “D” of the generator 9412.3701 (to terminal “61” of the generator 371.3701), and the “minus” - to the terminal of one of the phase windings of the stator (to one of the mounting bolts of the rectifier block ). If the lamp is on, one or more additional diodes are broken. A break in the main valves is determined by a sharp decrease in the output current (voltage drop under load). However, it can also be caused by an open or shorted circuit in the generator windings. A break in the additional valves can be determined by the low voltage on plug “D” of the generator 9412.3701 or plug “61” of the generator 371.3701 (below 14 V) at low and medium speed of the generator rotor. The serviceability of each diode (main or additional) can only be determined with a removed rectifier unit using an ohmmeter or a test lamp. If the rectifier unit fails, it is recommended to replace it as an assembly. It is possible to replace individual valves, but the main valves will require repressing them in the holder - an operation that requires care and skill. The stator and rotor windings are checked with a special flaw detector or electronic oscilloscope - according to the shape of the voltage curves. |
Video
Transferring the generator to the top 21214 drawing
Niva is an excellent domestic SUV that can compete with modern jeeps. VAZ 21214 received a durable body, a powerful power plant and a reliable suspension. Like any car it has its drawbacks. These include the location of the generator - the unit is installed in the lower part of the body. When testing for strength in forest and mountainous areas, dirt, sand, and water get into it. Another unpleasant point is that coolant constantly drips onto the unit. The problem can be solved by moving the generator upstairs.
After reading this article, you will learn:
- What is needed to move the generator upstairs. How does the process work for cars with and without power steering? Is it worth buying a new unit for VAZ 21214.
Study this drawing carefully. The author decided to make a bracket for moving the generator with his own hands. The part is made of metal, the thickness of which should be 4 mm, and the width and length should be 80 mm. To assemble the bracket, you will need parts from other domestic cars:
- Belt 6РК1290; Adjustment bar; Crankshaft pulley from tens.
Photo, details of the manufactured bracket 21214:
As you can see in the photo, the standard fan is installed on a pump pulley from GAZ 3110, we also take a crankshaft pin from 2110 and a 6RK1290 brand belt. The generator should be located on the top left side. It must be attached to the top using an M8 cylinder head bolt; at the front, a standard bolt and studs are used. For fixation, the bracket must be secured with an additional lock nut.
This generator transfer drawing differs from the first one in that it uses a belt with a size of 1375 mm. There are fewer steps here, but you will have to work with a grinder - you need to reduce the plane on the head located in the area of the M8 bolt.
The front cover will need new bolts and studs. This drawing of a bracket for mounting a generator is also suitable for other models, for example, for 21213.
The drawing suggests moving the generator to the place of the hydraulic booster. To do this, you need to make a bracket and install it next to the power steering. You need to select washers for the bracket ears in advance.
This option uses a belt with a size of 1220 mm
It is important that the angle of its wedge must be exactly 40 degrees. An excellent solution would be to buy a belt with ZIL 157
The return hose has a center length of 1115 millimeters, and the high-pressure pressure hoses are 1450 mm. Check all dimensions carefully, remember the saying: measure 7 times, cut once, there is no need for mistakes here. There is no standard hole for these hoses in the right casing, so you will have to take it and cut it yourself.
The bracket itself for moving the device upstairs is made according to this drawing:
The pump must be turned upside down so that the generator is completely seated. The result of the transfer looks like this:
If you don’t have much experience in carrying out such upgrades, then you can buy a ready-made kit. It will include a new bracket for the Niva and the necessary fastenings. Reviews from motorists indicate that the cost of this simple part is too high.
Should I install a more powerful current generation unit?
We have already described above why the unit wears out quickly. An excellent solution is to install a new generator. Another common reason is the installation of off-site equipment that consumes a lot of electricity. The current strength of a standard unit is not always enough, so you should think about installing a more powerful generator.
The model depends on the year of manufacture of the car and engine. For example, the first Nivas with a 1.6 power plant have a device with a remote regulator, which was used in the “classics”. In more modern machines the regulator is already built-in.
If you want to buy an aftermarket unit, it would be wise to get a 2003 model year Chevrolet. The selection must be made according to the catalog numbers and parameters that are present in this table:
If you can modify the fastenings yourself, then the list of available gHepaTopoBs can expand significantly. Craftsmen even install devices from foreign cars.
In any case, you should strive to modernize and improve your car. And this applies not only to electricity. The Niva is a reliable SUV, but it lags far behind its foreign competitors in terms of comfort. You can move on to this issue immediately after improving the technical component of the car.
Generators for VAZ 2114
The generator initially built into the 2114 is low-power, and if it also breaks down and you decide to purchase a new one, the question arises: which generator is better to install on the VAZ 2114? It is important here that the unit is more powerful, but there is no need to change the fastenings.
- The most successful replacement option for a VAZ 2014 is a generator from a Priora or Kalina with air conditioning. This installation has a power of 115 A, which is 35 A more than the characteristics of the units.
Installing these generators for 2014 usually does not cause problems, however, it will be necessary to replace the pulley, but it only costs about a hundred rubles and is not difficult to find.
- The Eldix brand generator also has a power of 115 A and works well. The disadvantage is that it is almost impossible to find spare parts, and even if there is a minor breakdown, you will have to replace the entire generator instead of repairing it.
Please note that a lack of charging voltage can occur simply due to oxidation of the battery terminals; keep an eye on them by cleaning them regularly.
Additional Description
Alternating current generator 9412.3701 with a built-in rectifier unit and voltage regulator, designed to work as a source of electrical energy in parallel with the battery in the electrical equipment system of VAZ-2123 cars (manufactured before October 2003, with a lower engine), VAZ -21214, operating at ambient temperatures from minus 40 °C to plus 45 °C and humidity 90%. The generator is intended for supply to the domestic market and for export to countries of all climatic zones.
| Rated voltage, V: | 14 |
| Maximum rectified current, A: | 80 |
| Weight, kg: | 4,9 |
| Power, kWt: | 1120 |
| Shaft rotation speed without load, rpm: | 1200 |
| Shaft rotation frequency, rpm / at current, A: | 6000/80 |
| Length, mm: | 180 |
| Diameter, mm: | 131 |
| Applicability: | car VAZ-2123 (manufactured before October 2003, with a lower engine), car VAZ-21214 |
Information used: OJSC "ZiT"
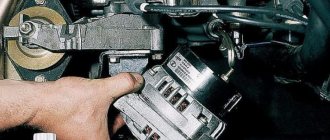
Guide to removing and connecting the generator
To remove the unit, you need to prepare a set of tools: keys “10” and “19”, ratchets with heads, a hammer and a small extension.
The process consists of the following steps:
- First of all, remove the negative terminal from the battery.
- Next, you need to remove the engine protection and the right mudguard.
- Then, using a hammer, carefully knock out the mounting bolt and remove it.
- At the next stage, you need to disconnect all the wires going to the generator: the plug and the wires secured with a nut.
- Then the fastening on which the belt tensioner is located is unscrewed.
- By removing the belt, the assembly can be dismantled through the hole that was formed after removing the protection.
- After replacement or repair, install the unit in reverse order.
Electrical connection diagram
Price issue
The VAZ 21214 generator has good repairability, which allows you to significantly save money if worn or broken parts are replaced in a timely manner.
If you change the complete unit, the cost of replacement will be as follows:
- generator 21214 – 3125 rub.;
- lower mount – 133 RUR;
- fastening bolt - 53 rub.;
- tension bar - 55 rub.;
- relay RS-527 – 57 rub.
Total: 3423 rub.
Loading …
Alternator belt tension VAZ 21214 injector
We check the belt tension by its deflection between the pulleys of the units. 1. With normal belt tension, its deflection under a force of 98N (10 kgf) should be 10–15 mm between the pump pulleys and the generator
2
. . or 12–17 mm between the pump and crankshaft pulleys. We adjust the belt tension by shifting the generator (with its fastening nuts loosened): from the engine to increase the tension or to the engine to decrease the tension.3. To replace the belt, loosen the nut securing the generator to the tension bar with the “17” head on the carburetor engine.4. . or a “13” head - on an injection engine. We move the generator towards the cylinder block to loosen the belt tension.5. We move the generator, acting on it with a screwdriver as a lever in the slot of the tension bar:
on a carburetor engine;
6. on a VAZ-21214 engine.
Install the belt in reverse order. Turn the crankshaft clockwise two turns and check the belt tension. Excessive belt tension causes increased loads on the generator and pump bearings.
The original alternator belt on a VAZ 2121 can serve the driver for about 100 thousand kilometers on domestic roads, such messages came from many owners of the people's favorite. But it is not always possible to find an original alternator belt on the automobile market; the problem is that sellers tend to deceive gullible customers and the service life of the basement belt can be reduced by 2-3 times. Today we will tell you how to replace the alternator belt on a Niva with your own hands in a garage.
When you already have a new alternator belt in your hands, you need to prepare a 17-mm open-end wrench and a convenient place for repairs. As people say, I'll leave this video here.
Video. DIY alternator and drive belt replacement
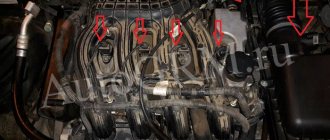
1. The image shows how to properly loosen the alternator belt tensioner nut.
2. When the nut is slightly loosened, you need to move the car's alternator to the side to have good access to the belt. The arrow in which direction you need to move the generator is shown in the photo.
3. Remove the belt from the pump pulley, see the image for more details.
4. The alternator belt has been completely removed, now you can begin installing a new one.
The cost of a new belt is about 100 rubles. We carry out the installation in the reverse order, also do not forget about tensioning the alternator belt, you can watch the video above about this operation.
Insufficient tension on the alternator belt can also lead to its failure. If the belt slips, its full effectiveness is not used. And as we know, this particular part is the connecting link between the generator and the battery, which transfers energy from one unit to another. In simple words, if the belt is not fully used, the battery charge drops.
If you suddenly hear an incomprehensible whistle coming from under the hood of your vehicle, you should know that water has gotten onto the stretched alternator belt. This means that you need to replace it and tighten it well. To do this, you will need a 17mm ratchet wrench and a 19mm socket wrench.
How to tighten the VAZ 2121 alternator belt
1. Open the hood and unscrew the nut that secures the generator and tensioner plate.
2. Do not loosen the fastening nut too much.
3. Now you can tighten the belt. This is done like this: grab the tensioner nut with your hand and move the generator down. If you move it up, the belt, on the contrary, will loosen.
4. When the correct position is found, tighten the tensioner nut. 5. Tighten the bottom bolt and start the engine. If you hear extraneous noises or see that the belt is slipping, you need to repeat the procedure.
6. Testing must be carried out with the maximum number of electrical appliances turned on. 7. If in this case the battery produces at least 13 Volts, then everything is done correctly.
Many drivers overdo it and tighten the belt too much, forgetting that this can lead to bad consequences. Among them are belt stretching and, as a result, slippage and bearing wear.
Pay close attention to your car and pay attention to extraneous sounds. Let's remember that in the previous article we talked about
Which generator is better to put on a VAZ 2110
VAZ 2110 factories install KATEK generators with a current of 80 A. The service life is 140,000 km, which is approximately 10 years of vehicle operation. Answering the question of which generator is better to install on the VAZ 2110, experts recommend products from Russian manufacturers.
What to consider when choosing
- Russian manufacturer or foreign? Of course, first of all, Russian manufacturers are preferable. If only because it is easier to find spare parts in the event of a minor breakdown. If you purchase a generator for a VAZ 2010 from a not so popular company, it may be difficult to find spare parts, and they will not cost you so much.
- Current strength. Factory models for VAZ 2010 - 3771 or 94.3701 - are designed for 80 A, this current is enough, even if there are additional devices that consume it. More powerful ones - 120 A - are installed in the presence of powerful acoustics, no harm is done to the battery, and you will provide all energy consumers with uninterrupted current.
- It is better to purchase a generator if there is a warranty on it. There may well be a defective product, and the warranty will provide the opportunity to replace it with a new one.
Generator Manufacturers
It is best for 2010 to purchase a standard generator from KATEK or KZATEtm Samara plant, and about 50% of owners do just that, according to statistics. They are reliable, cope perfectly with their functions, creating the necessary tension.
Among the foreign-made generators, we can recommend Bosch, Delphi and Denso, which are also reliable and popular.
Removal and installation of the generator of the injection engine Niva 2121, VAZ 2131, Lada 4x4
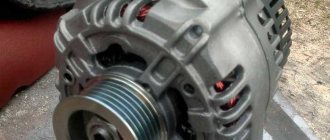
Generator device Niva 2121, Niva 2131, do-it-yourself repair
Disconnect the negative cable from the battery. Remove the oil pan protection plate and the right mudguard of the Niva 2131 engine (see Removing the oil pan protection plate and injection engine mudguards).
We disconnect the wire from terminal “D” of the generator. Having moved the rubber boot, use a “10” wrench to unscrew the nut securing the wires to terminal “B”......and remove them.
Remove the VAZ 2131 coolant pump drive belt (see Adjusting the tension and replacing the coolant pump drive belt).
Using the “13” socket, unscrew the nut of the bolt securing the generator to the tension bar.
Using a 13mm wrench, unscrew the nut of the bolt from the lower mounting of the generator to the bracket on the cylinder block and remove the bolt. We take the generator out of the engine compartment downwards.
Having unclenched the three protrusions of the casing,......remove it. Using a Phillips screwdriver, unscrew the two screws......and remove the voltage regulator with the brush holder. Disconnect the wire and remove the voltage regulator with the brush holder. Using a "10" wrench, unscrew the nut,...
Generator belt
on NIVA
VAZ
21214
with power steering is changed after removing
the belt
from the power steering
Replacing the NIVA VAZ 21214 power steering belt. Tensioning the NIVA power steering belt
Change the belt
Niva power steering
5 minutes. The pump bearing and seal will fail faster if... ...remove the sleeve and wire of the capacitor. Having unscrewed the screw with a Phillips screwdriver,......remove the capacitor. Using a Phillips screwdriver, unscrew the screw securing the rectifier unit and the three screws securing the ends of the stator windings. Insulating washers are put on the screws securing the ends of the stator windings Niva 2121. Remove the ends of the stator windings...... and remove the rectifier block. Using a 21-span wrench, unscrew the pulley mounting nut, holding the rotor with a 8-point hexagon. Remove the washer and parts of the pulley. Remove the washer from the rotor shaft. Use a Phillips screwdriver to unscrew the four screws holding the covers together. Using a sharp scriber or paint, we mark the relative positions of the covers and the stator for subsequent assembly.
Using a screwdriver, we disconnect the front cover with the stator and the back cover with the rotor.
Using a screwdriver, pry up the stator of the VAZ 2131.
. we take it out of the front cover. Using a drift that rests strictly on the end of the rotor shaft (so as not to damage the plastic sleeve located under the slip rings), ...... we knock out the rotor with the bearing from the rear cover. Using a puller, we press the bearing from the rotor shaft of the Niva 2121 generator. We press in the new bearing onto the shaft with a suitable piece of pipe, applying force to the inner ring.
Using a tester, we check the stator and rotor windings of the Niva 2131 generator for an open circuit or short circuit to the housing.
Is it possible to change the generator to a more powerful one?
Here is my method of installing a generator from 2110 to 213 Niva. The following parts will be required: 1. Lower mounting bracket for generator 21214 2. Mounting bolt for generator 2110 assembly 3. Tension bar 21214 4. Bolt M8x1.25x75 5. Nut M8 for generator bolt 2110 6. Washer 8X24 - 5 pcs. 7. Collapsible generator pulley 2101 8. Generator 2110, Priora, etc. with a seat diameter for a pulley of 15 mm. 9. Rear shock absorber spacer bushing 2101 10. Bushing for lower generator mounting 2110
So. There is a generator from Priora, the same one on the 2110-12, which I got for free.
Remove the pulley under the semi-V belt. There are two holes on the front of the generator housing; you need to insert M6 bolts into them and thereby lock the rotor. I have a generator with a pulley diameter of 15 mm. The pulley from 2101 fits perfectly on the shaft; its hole is also 15. (I also tried on pulley 21214, but its hole diameter is 17 mm.) To install, you only need to trim the thrust bushing. And the fan and the second thrust bushing will not be needed. I additionally welded the pulley halves, but in principle this is not necessary.
The steel bushing needs to be knocked out of the new lower mount 21214; it will be replaced with 2110.
We unscrew the old generator, the old tension bar and the lower bracket of the generator. And we fasten the bottom bracket from 21214. I also had to buy one additional bolt since the old bracket had two bolts.
Then we try on the generator, but turning it upside down. So that the upper ear is below. We set the belt to be level and measure the distances between the front ear of the bracket and the ear of the generator and, accordingly, between the ear of the generator and the rear ear of the bracket. I got 6 mm at the front, 21 at the back. I put 3 8x24 washers in front, each 2 mm thick. I made a spacer back. To do this, I sawed off a 2101 piece from the spacer sleeve of the rear shock absorber and inserted a steel bushing for the lower mounting of the generator 2110 into it, it fits there perfectly! Here in the photo is just the manufactured bushing and the bushing for the lower mounting of the generator.
Next, we simply screw on the generator.
The generator turns out to be upside down and the bottom mount is on top. To secure it from above, just use an M8x1.25x75 bolt, two 8x24 washers and a nut from the bottom bolt of the generator 2110.
The belt used is standard. The only thing I encountered later was the generator’s unwillingness to start. It started working only at 3000 rpm. As it turned out experimentally, if 12V was applied to the contact of the battery charging lamp, the generator immediately started working. Unlike the old Nivsky, the new one does not have a self-excitation system. The voltage to this contact comes from the dashboard and is reduced to 3.2V by three 160 Ohm resistors each connected in parallel. I unsoldered them, after which the generator starts at 1500 rpm. Apparently the gear ratios of the pulleys also have an effect.
A) Belt break.
Carefully examine the presence of a belt on the water pump and generator pulleys. To return it to its destination, you will need socket wrenches 17 or 13, depending on the year of manufacture of the car, as well as a strong flat-head screwdriver.
Loosen the nuts securing the tension bar and slide it to the side towards the cylinder block.
Put a belt on your professionalism landing place.
After installation is complete, adjust the tension, controlling the deflection when pressing with a huge finger on the clearance of the belt between the generator and pump pulleys - 10-15 mm, pump and crankshaft - 12-17 mm. Failure to comply with this requirement may result in the belt slipping with subsequent damage and rupture.
Capacitor
Also, the generator of the VAZ 21214 car has a capacitor with a capacity of 2.2 μF. It is installed in the current rectification unit. Its intended purpose is to ensure the stability of the vehicle's electrical circuit, protecting it from voltage surges. Such surges can occur due to the fault of the ignition system during its unstable operation. In addition, the capacitor helps ensure stability in the reception of pulses from sensor valves, both positive and negative. When the circuit closes (when the ignition is turned on), voltage is applied to the generator excitation winding. The whole process is carried out by passing current through a series of resistors with an output to the indicator lamp. At first it will glow. But, after the startup procedure, the indicator will stop lighting, since now the power will be supplied from diodes located in the current rectification unit. If, however, the indicator does not stop lighting, this is a sign of a malfunction of the device or one of its components.
The generator of the VAZ 21214 car has one weak point. If the battery is connected incorrectly (if the polarity is reversed), breakdown of the diodes may occur.
In addition, you should remember that you should not disconnect the battery from the circuit while the generator is running. This can cause a surge in voltage in the circuit, as a result of which some of its components may simply become unusable.
Battery charging lamp VAZ 21214
After replacing the alternator belt, charging stopped
, as a result, the battery died and the controller stopped working. The location where the charging relay is located near the field is determined by the age of the car. Thus, a remote relay can be found on the right fender liner of a car with a classic engine compartment layout; more modern modifications of generators are equipped with a launch vehicle combined with a brush assembly.
The element is not repaired, but replaced completely. To assess the condition, you will need power supplies of 12-14 V, followed by replacement with 16-22 V, and also an incandescent lamp of 1-3 W. According to the diagram drawing, apply current to the voltage regulator in series. If the first test is characterized by the operation of the lamp, and the second - by the absence of glow, then the LV is working.
If there is a break, the lamp will not light up at all; if there is a breakdown, it will glow constantly. In addition, weak charging, as well as its absolute absence, is often explained by abrasion of the brushes (residual height less than 5 mm) and slip rings of the generator. If the first part is changed along with the brush holder, then the second is restored by grinding, grooving or removing the remains of the old rings and pressing in new ones. It is recommended to supplement the disassembly of the unit with a total cleaning.
Niva Chevrolet - which generator is better - 80 ampere or amp? Advantages and disadvantages
Voltage sag. Niva Chevrolet.
The lamp should not be lit; if it lights up, it means there is a short circuit.
Chevrolet Niva Niva67 › Logbook › Generator A on a Chevrolet Niva. As I felt, I ordered KZATE...
The operation of the generator is controlled by a warning lamp in the instrument cluster.
A brightly lit lamp or glowing at full intensity indicates a malfunction.
I drove another kilometer and, according to the voltage readings in the network, it became absolutely clear that there was no charge, I was driving “on batteries,” and I urgently needed to decide where to go.
Signs of a generator malfunction
During the operation of any car, unpleasant situations often arise in the form of failure of one or another element. Niva is no exception, and most often the generator suffers.
If the generator seems to be faulty, it is recommended to check its functionality using a multimeter. To do this, you will need to start the engine and check the voltage at the battery terminals. The standard value that a multimeter should read is 13.6 V.
If the readings during measurement are higher, it means that a break or short circuit in the windings has occurred in the structure. The same can be said about the case when the voltage is below the specified number. This procedure is carried out regardless of the engine: injector or carburetor.
In modern cars, breakdowns of the electrical system are one of the most common. A large number of electronics requires particularly careful monitoring of the operation and condition of the generator and battery, because their failure can immobilize the car. The most common signs of a generator malfunction are:
- battery indicator light on the instrument panel;
- unstable operation of the battery (its boiling over or undercharging);
- different intensity of headlights;
- extraneous sounds from the generator.
If you notice incorrect operation of the car, then perhaps the battery charging current from the generator is insufficient.
Don’t write off a non-working generator: find out if there are repair kits and spare parts. Replace them if possible. If you cannot carry out repair work yourself, then take the generator to a workshop. Many craftsmen will be able to restore the unit at no extra cost and in the shortest possible time.
However, some breakdowns require the purchase of a new device that generates electricity. For example, a failing bearing that is soldered into the generator housing cannot be restored or replaced in most cases.
Remember that failure of this unit can be caused not only by wear and corrosion, but also by poor quality of elements and components; excessive load; external influence of salts, liquids, temperatures.
Lada Priora - generator replacement
The Priora requires a powerful generator; the car has a lot of electronics and a weak installation cannot cope with it.
A generator labeled 5102.3771 is recommended for the Priora, providing a power of 80 A; on luxury versions with even more electronics, a 115 A device is installed. Then which generator is better to install on the Priora?
Car owners recommend a unit produced by KZATEtm Samara plant under number 9402.3701-14, producing 115 A.
There is no need to modify it during installation, you just need to find the connector, because there are differences from the standard one. You can use a plug from a VAZ-2108 from the limit switch for turning on the reversing lights, which costs only 20 rubles.