The operation of the stove on the classic Niva traditionally causes complaints from most owners of this car. A frankly weak but noisy fan and poor design of the air ducts do not warm the interior properly. In addition, the operation of the heater is affected by the operation of the VAZ 2121, 2131 in difficult road conditions. The stove radiator, air ducts become clogged, and the pipes are destroyed. Therefore, understanding the operating principles of the heater and the ability to repair it with your own hands become an important task for the Niva driver.
Radiator of the Niva stove
The heater radiator of VAZ 2121, 2131 is not a critical vehicle component. But in cold weather, driving a car with a faulty heater is unlikely to be a pleasure. In addition to the sheer coldness in the cabin, the windows may fog up, which leads to poor visibility, and this is a matter of safety for the driver, passengers and other road users.
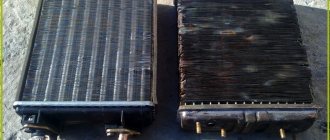
Structurally, the radiator is a heat exchanger, or more simply put, a battery, whose task is to heat the air passing through its grille. Externally, it looks the same as a similar unit on other cars.
The same type of heater radiator is used for “Niva” and “classic” VAZs
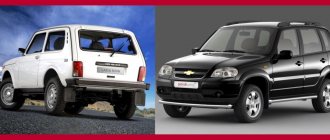
The Chevrolet Niva radiator is not suitable for the VAZ-2121, 2131 family. This should be taken into account when selecting spare parts in the store.
Radiator location
The heater radiator on the Niva is located under the dashboard behind the center console between the driver and right passenger seats. This is the standard location for the heater in most cars. Compared to many other car models, access to the radiator in the Niva is quite simple. This will take about 10–15 minutes for a semi-skilled specialist.
Radiator design and functions
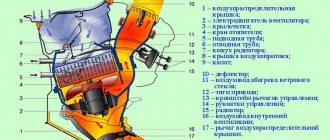
The stove radiator is a unit in which heat is transferred from the heated liquid to the surrounding air. It consists of two horizontal rows of tubes intersecting with vertical metal plates (ribs). On the sides, the structure is limited by panels that provide the functions of tanks. The incoming and outgoing pipes of the cooling circuit are connected to one of the tanks.
There are two unconnected cavities inside the tank. Antifreeze enters through the inlet pipe into the cavity connected to the upper row of tubes. On the other side of the radiator there is a return tank, through which antifreeze flows into the second row of tubes and moves in the opposite direction to the second cavity of the tank and the outgoing pipe. After leaving the radiator, the antifreeze enters the main cooling system of the car. Antifreeze circulating in the tubes ensures heating of the entire grille, thanks to which heat transfer from the radiator reaches maximum effect.
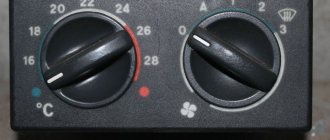
The radiator is installed in the instrument panel console in a plastic casing and sealed around the perimeter with foam tape. Air heating depends on the degree of opening of the valve that regulates the flow of liquid through the radiator. The valve is installed at the radiator inlet and is controlled by the upper lever on the center console.
Cold air comes from the external environment, passing through a hot radiator, heats up and enters the car interior
The main and only function of the heater radiator is to heat the air flow entering the cabin through the air ducts.
Radiators are made of aluminum or copper. The aluminum product does not hold temperature well. A copper radiator works more efficiently, but is more expensive. The advantages of a copper radiator include its maintainability: the ability to seal cracks in the tubes.
To watch online, click on the video ⤵
Replacing the heater motor Niva Urban More details
I am removing the heater motor on a Lada 4×4 (Niva) with air conditioning. More details
REPLACEMENT OF HEATER MOTOR FOR LADA 4X4 URBAN UNDER WARRANTY #23 More details
Installing a motor from a VAZ 2108 stove on a field. A collapsible version of the casing. More details
Niva Urban replacement of the heater motor (stove). More details
Repair of VAZ-2131 heater motor Read more
Replacing the Chevy Niva heater motor, it’s not like using a swear word. More details
How the stove works in the NEW LADA 4x4 2021. More details
Dismantling the NIVA URBAN interior, replacing the windshield, replacing the heater motor Read more
Modified heater for Niva, with a new model 2110 engine. More details
Removing the glove compartment and heater motor Niva Chevrolet. More details
We are changing the stove motor in the field! Let's use viburnum! More details
Replacing the stove motor in Niva VAZ-21214 Read more
Replacing the radiator of the Niva Urban stove with air conditioning Read more
Replacing the heater motor on a Priora. (how to remove the heater motor) Read more
Modernization of the Niva stove heater. More details
Nive Urban heater repair Read more
Niva. Stove. Let's make it quieter. For 100 rubles. More details
A small subtlety in installing the heater motor on the Chevrolet Niva Read more
Source
Typical radiator malfunctions
There are two main radiator malfunctions:
- Clogged grille and radiator tubes.
- Radiator leakage.
Since the Niva is often operated in difficult road conditions, the likelihood of contamination of the grille from dusty outside air is very high. Clogging of the cells reduces the heat transfer area of the radiator, and as a result leads to a decrease in the heat released from the air ducts into the passenger compartment. In such cases, the stove radiator is dismantled and washed under high pressure.
Clogged radiator tubes are also common. If the outlet pipe is barely warm or cold, then the radiator tubes are clogged. This happens for various reasons, including the entry of foreign objects into the cooling line during repair work. In such cases, the tubes themselves are also washed. To do this, it is not necessary to remove the heater radiator. It is enough to separate the radiator pipes from the cooling system and supply water under pressure into one of the radiator pipes.
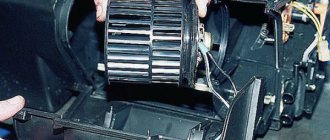
Removing and replacing and installing the heater fan on the Niva VAZ-21213 and VAZ-21214
Dear friends, today we will tell you how to independently remove and install the electric motor of the stove fan on the Niva VAZ-21213 and VAZ-21214. The procedure is quite simple; we only need two screwdrivers, a Phillips screwdriver and a flathead screwdriver with a thin blade. The reason for removing and replacing the heater motor may be its squealing due to wear on the bushings. Often even new heater motors suffer from this problem, so when replacing the heater motor, we recommend that you install a bearing motor. To get to the motor we need to remove the lower part of the stove body, and to get to it we need to remove the shelf, the radio panel and the decor on the tunnel.
In general, let's get started, and start by removing the storage shelf under the glove compartment, pick up a Phillips screwdriver and unscrew the following screws:
We move the shelf to the side. Then we move on to the decorative trim on the tunnel, it is also held in place by screws, they are located in this way, see the photo below:
Carefully remove the chips from the cigarette lighter, put the tunnel decor aside, we don’t need it for now. Now let's move on to the tape recorder panel. To begin, use a flat screwdriver to pry up the buttons one by one:
Carefully remove the terminals from them and move all the buttons to the side. We recommend labeling the terminals, this will speed up the assembly process and help avoid mistakes!
Gently pull the plastic nozzles of the stove levers towards you, they will come out with force:
Now again we take the Phillips screwdriver in our hands and unscrew the fastenings of the radio panel to the dashboard on both sides:
Then use a flat screwdriver to pry the panel from above and carefully remove
Now we have access to the stove body. But first, we unscrew the rotation relay to remove the minus chip of the heater fan from it:
Now we are interested in the metal latches of the stove, here they are in the photo, there are only 4 of them, two on each side:
They can be removed either by hand or by prying them with a screwdriver. Be careful, they are springy and can fly away in an unknown direction, to the land of lost things
It is also held on by two metal latches; it is more convenient to pry them off with a screwdriver:
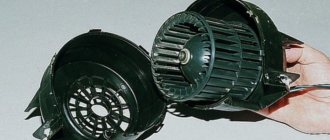
After this, disconnect the motor wiring and remove it from the stove body
We remind you that the heater motor is essentially irreparable and if it “squealed” then the bushings are damaged and then only a replacement is needed. Ideally, straight to the bearing. When assembling and installing, do not forget to put rubber spacers on the motor, otherwise vibration will occur. We perform assembly in reverse order. So you have learned how to independently remove and install the heater motor on the Niva VAZ-21213 and VAZ-21214. Good luck to everyone on the roads and fewer breakdowns.
Removing the radiator of the VAZ-2121 stove
The procedure for removing the heater radiator on a VAZ Niva does not require any special skills or abilities. It is important to prepare the necessary materials and tools in advance. Most instructions for repairing car heaters contain a recommendation to drain the coolant before starting work. In practice, many car enthusiasts limit themselves to draining only that part of the antifreeze that is located in the radiator itself and the nearby pipes of the cooling system.
Preparing tools
To replace the radiator, you will need the following tools:
- pliers;
- slotted screwdriver;
- Phillips screwdriver;
- a set of markers for identifying wires;
- spanner set to “7”;
- socket wrench set to “10”;
- socket wrench set to “7”;
- socket wrench set to "10".
Procedure for dismantling the radiator
All operations must be performed in the following sequence:
- Unscrew the left self-tapping screw securing the storage shelf.
The self-tapping screw is unscrewed with a Phillips screwdriver
The right side of the shelf is attached to the upholstery
The central part of the shelf is unscrewed from the front panel
The right edge of the shelf moves down freely
There is a special spike on the left side of the shelf
The lower part of the panel is also fixed with a self-tapping screw
The process is shown on the right side, the left side is similar
The panel is moved to the side
The wire blocks are detached to remove the entire radio panel
After disconnecting the wires, the panel can be easily removed
Loosening the clamp is shown using the example of the lower pipe; a similar operation is performed with the upper
The screws are unscrewed with a socket wrench with a “7” head
The removed seal allows you to remove the radiator pipes from the engine compartment
The fastening nut is unscrewed with a “7” key
The rod is removed from the crane lever
The rod is disconnected from the fan casing
The staples are pryed off with a slotted screwdriver
The casing with the fan is moved to the side
After removing the fan, the radiator is carefully removed from its compartment
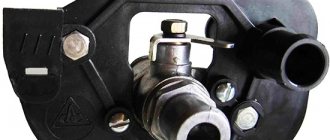
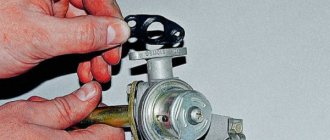
The tap and pipes are turned off with a key to “10”
The removed tap is checked for leaks
The bottom nut often falls out and gets lost
Disconnect the outgoing pipe.
The two fastening nuts are unscrewed with a “10” wrench
After dismantling, you should carefully inspect the radiator for blockages in the grille and leaks from the tubes. Based on the results of the inspection, a decision is made on the possibility of repair or installation of a new radiator.
Video: installing a radiator
The process of replacing the heater radiator on a classic Niva has been studied far and wide by many car owners. In fact, the procedure is similar to the entire family of AvtoVAZ classics. However, caution and safety precautions should be observed when working. After completing the repair, before driving on public roads, you must make sure that all components and mechanisms of the vehicle are operating normally. Only then should you begin daily use of the machine.
When starting to tune a VAZ 2131 Niva, every SUV owner must choose one of two options. The first method is budget-friendly; it involves minor modifications to the engine and increased interior comfort. The second option is more expensive, it is aimed at upgrading the suspension of the Lada 2131 4x4 for off-road driving. Let's look at what both methods of improving the VAZ are, and what they give us in the end.
Additional interior heater in VAZ-2131.
The material for this article was ready a long time ago, 2 years ago, but somehow everyone didn’t get around to posting it. This also had its advantages. Firstly, the stove passed the test during this time and proved to be a reliable and efficient device; the rear passengers were always warm. Secondly, the article did not get into the Niva FAK, otherwise it would have been just as brazenly stolen by the presenter of this FAK, like all my other 45 articles. The additional stove is very similar in design to the standard stove. It has a radiator, an electric motor with an impeller, and a three-position switch to turn on and change the rotation speed of the electric motor.
The stove is installed on the tunnel between the front and rear seats. For this:
Remove the decorative trim of the tunnel, the gearbox and gearbox trim, and the shelf under the glove box.
Screw the stove body to the tunnel with self-tapping screws.
Check that the impeller does not touch the edge of the housing during rotation. If necessary, adjust the entire structure in place.
In our case, it took a very long time to cut and file some places at the base of the stove.
Disconnect the hoses in the engine compartment and the upper pipe in the cabin from the standard stove
From the upper metal pipe, cut a piece of tube 6-7 cm long.
Change the gasket on the heater radiator and install the two pieces in place. Connect the hoses of the additional heater to them.
Lay both hoses along the floor and connect them to the additional stove.
Connect the electrical wiring according to the diagram as indicated in the instructions.
Using a funnel and any suitable piece of hose, pour antifreeze into the upper pipe until it flows from the lower pipe of the standard stove.
Connect the hose in the engine compartment to the lower pipe of the standard heater.
Install the casing of the additional stove and secure it with self-tapping screws
Start the engine and warm it up. Check the functionality of the entire heating system.
Comments from Stealth:
1. Prerequisites for installation - after several trips outside the city at temperatures below 20 degrees, it was noticed: in front - it is warm and even hot, you have to “cover” the standard stove, in the back - passengers’ “legs are cramping from the cold” (I quote my child).
2. The corresponding advantages are warmth. There is no problem with folding the front seats down on long trips.
3. Disadvantages:
Add. stove = extra inconvenience for the 3rd passenger in the back, not fundamental, but still... But it was obvious right away, so the choice was conscious.
It’s the same in the summer, when you don’t need a stove. The middle seat is not comfortable for women in skirts to sit :)))
Not everything is simple with a complete replacement of the coolant with a fundamentally different one, one that cannot be mixed with the previous one. Pressure flushing of the main and auxiliary lines is required. Well, an extra two liters of antifreeze.
4. Tips after 2 years of use:
With the overall complete set, it would be good to use the hoses a little longer (only 5-10 cm) - they would fit better in the place where the standard heater is supplied to the tap.
You can insert a plumbing ball valve into the additional line, that is, make a separate ON/OFF for passengers.
The stove was found on the Internet and purchased in Togliatti for $100 with shipping through a conductor. The money was transferred through Western Union. “They” sent it the same day, I received it the next day.
03.12.04.
Author: Volodyushka
Photo: Stealth
If you want to install a sports camshaft, please contact us.