Grant stove radiator
The location of the heater radiator on the Grant is not convenient for replacing it. To remove the radiator without damaging it, you will have to dismantle the dashboard, which can take a lot of time and labor due to a trivial problem that can be solved in an hour in other cars.
The radiator is located under the dashboard in its central part at the driver’s feet. Its pipes are hidden behind the decorative side panel trim. This location of the radiator makes it a little difficult to access it when replacing it, but if you use the correct replacement instructions, then removing and installing the radiator yourself will not be difficult.
Heater radiator: responsible for heating the interior
It’s hard to imagine a modern car without a standard set of devices and options, thanks to which driving the vehicle becomes as convenient as possible, and staying in the cabin is comfortable and safe. The functions of maintaining a favorable temperature regime in the car are assigned to the heating, air conditioning and ventilation system, which, depending on the situation, can heat, ventilate or cool the air in the cabin. At the same time, one of the key components of the heating system is the stove, which includes a radiator that acts as a heat exchanger. The air entering the car interior is heated by the radiator, and it is heated by the liquid that cools the engine.
"Lada Granta" is equipped with a large number of options, thanks to which driving the vehicle becomes quite convenient
How does the Lada Granta heating system work?
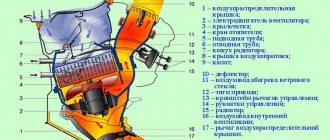
Structurally, the Lada Granta heating system consists of:
- an air duct directing the flow to the left deflector (deflector is a device for enhancing traction);
- heat exchanger covers;
- seal;
- stove radiator;
- air duct to glass;
- stove body;
- central air duct;
- an air duct directing the flow to the right deflector;
- recirculation shutter rods;
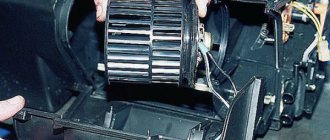
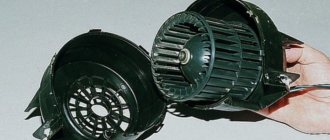
- fan shell;
- directly from the fan;
- a resistor that regulates the operation of the fan;
- main air duct;
- distribution valve rods;
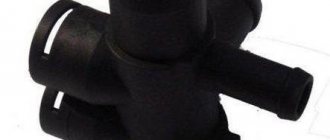
- regulating device;
- a device that directs air to the feet of passengers;
- thermostat shutter rods.
The structure of the Lada Granta heating system allows you to carry out repairs on your own
How does the heating system work?
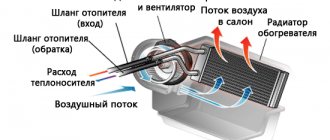
The heating and ventilation system in Lada Granta is a supply and exhaust system . What does this mean? Air from outside penetrates into the cabin through a special device in the form of an air intake box placed in front of the windshield. The amount of air coming from outside is regulated by a special recirculation damper. The recirculation system provided in the Lada Grant allows for better heating of the air in the cabin in winter and faster cooling in summer (if air conditioning is available). However, you should not abuse the recirculation mode, since this will introduce stale air into the car. It is convenient to use recirculation to protect against foreign odors from the street entering the cabin, but only for a short time. The principle of recirculation is to block the access of air from outside and repeatedly pass internal air flows through the heating or cooling element.
Next, an air filter 7 appears on the path of air flows, which serves as a barrier for dust and dirt particles. Do not forget to change the filter element in accordance with the schedule recommended by the manufacturer. The air, cleared of mechanical particles, is picked up by fan 11, driven by engine 12, and pumped into the car interior.
This is interesting: Why a car is removed from warranty
After this, the air stream passes through the air conditioner evaporator 13 (if provided in the package), under which there is a drainage hole 14 for draining the condensate. Depending on the position of the damper 15, which regulates the temperature, the air moves to the heater radiator or bypasses the heat exchanger. If the damper directs the jet to the radiator, then heated air enters the cabin, the flows of which can be distributed as necessary onto the windshield and side windows or under the feet of passengers.
Heating and ventilation system "Lada Grants" - supply and exhaust
The exhaust occurs through special openings in the rear of the body, which can be found under the trunk lining. For normal operation of the hood, these openings should not be blocked by cargo carried in the trunk. Among other things, a closed hood can cause windows to fog up.
Operation of the Lada Granta stove radiator
There is a heater directly under the windshield; after passing through it, air flows are directed to different parts of the cabin. Judging by the reviews of the owners, the stove installed on the Lada Granta works more efficiently than the heaters of other VAZ models, for example, Lada Kalina .
The radiator leaked, the sealant was filled in - the leak stopped, and the stove also stopped heating. The service center said that I shouldn’t have done this: the stove radiator was clogged. Replacing a stove costs approximately 4–5 thousand rubles. + oven. Refused, no money. A friend advised me to change the expansion tank cap. And so they did. Cool, the oven works great!
Nikolai
https://avto-granta.ru/remont-i-obsluzhivanie-lady-granty/pechka-na-lada-granta
The heater of the Lada Granta car has a plastic housing
How to identify a clogged radiator
Checking the radiator is a fairly simple task that anyone can do. To do this, you need to check the circulation of fluid through the radiator. If the circulation is normal, then both radiator tubes will be hot, but if the inlet tube is hot and the outlet tube is cold, this indicates that the radiator is clogged from the inside.
A clogged radiator can be washed or, at best, replaced with a new one.
Removing the heater core
We remove the heater radiator for replacement if a coolant leak is detected through the radiator.
Remove the instrument panel (see “Removing the instrument panel”). Using a Phillips screwdriver, unscrew the two self-tapping screws securing the radiator cap.
Remove the radiator cap and seal (shown by the arrow) from the radiator pipes.
Remove the radiator from the heater housing. Install the heater radiator in reverse order.
Lada Granta has become a really popular car. And, in many ways, this happened thanks to the affordable price and good components. For example, the stove installed on the Lada Granta is quite good, as it warms up the interior to the required level very quickly. AvtoVAZ engineers did a very good job on this issue, since for our harsh winters the issue of high-quality heating of the interior is very relevant.
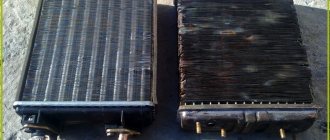
Types of Grant stove radiators
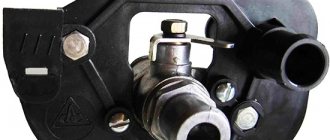
There are two types of radiators: with soldered pipes (factory radiator) and with removable ones.
Factory radiator with permanent pipes
The manufacturer produces radiators with non-removable pipes, that is, in order to dismantle it without removing the entire panel of the car, it is necessary to saw off the pipes coming from the radiator.
Radiator from Datsun with removable pipes
It is best to purchase a heater core from Datsun On-Do. The dimensions of the Datsun radiator are no different from the Grant one, with the exception of removable pipes, which will greatly reduce the pain during installation.
Adviсe
Antifreeze leaked into the cabin
To prevent problems with the heater core, you need to carefully monitor it. For example, from the first days of buying a car, periodically look under the car to see if there are dark spots there. And in the engine compartment it would be a good idea to observe the condition of the cooling system hoses. If you notice traces of antifreeze in any of these places, you need to immediately seek help, or carry out repairs yourself.
If possible, the hoses for connecting the heater radiator should be replaced with new ones, having coated the connection points with sealant. But some do not agree with this opinion. After all, sealant from the hose can get inside the cooling system and cause damage to the pump. As a result, the timing belt will break and the valves will meet the pistons.
The stove heating system on the Lada Granta car functions quite well, the owners have no complaints. The stove radiator is reliable and durable. However, there comes a time when the process of metal corrosion begins and the seams peel off. A faulty heating system can cause a lot of trouble, especially in sub-zero temperatures.
Frosting of windows and cold inside the cabin are the first symptoms of unstable operation of the heating system. Prevention is necessary.
Let's look at the step-by-step process of replacing the heater radiator on a Lada Granta car.
Step-by-step replacement process
It is necessary to remove the battery, the air filter box by pulling it out from the rubber dampers and remove the intake corrugation. You will need this to access the thermostat.
We drain the antifreeze from the cooling radiator by unscrewing the plug in the lower right part of the radiator. To drain, you will need a container of at least 10 liters.
Attention: It is necessary to drain the coolant when the engine is cold to avoid burns.
Remove the connector from the electronic accelerator pedal and unscrew the pedal from the car body using a 10mm socket wrench. Then remove the pedal from the studs.
Unscrew the screws securing the radiator cap with a 6 mm wrench and remove it.
We remove the radiator pipes and lower them down so that the remaining antifreeze drains.
Now you need to press down the brake pedal; to do this, remove the cotter pin that secures the pedal and press on it when we remove the radiator.
If the radiator is not dismountable, that is, the pipes are not removable, they must be sawed off with a hacksaw. If the pipes are removed, they must be removed and pulled out of the holes in the engine shield.
After removing the pipes, you can pull out the radiator by pressing the brake pedal down.
We install the new radiator in the same way, pressing down the brake pedal, first removing the pipes from the radiator and installing them after the radiator is placed in its seat.
If the radiator is not prefabricated, then the pipes can be sawed off and the connection can be made on the hoses.
Replacing the radiator of the Lada Granta stove with your own hands: photos and videos
Lada Granta has become a really popular car. And, in many ways, this happened thanks to the affordable price and good components.
For example, the stove installed on the Lada Granta is quite good, as it warms up the interior to the required level very quickly.
AvtoVAZ engineers did a very good job on this issue, since for our harsh winters the issue of high-quality heating of the interior is very relevant.
We dismantle the radiator of the Lada Granta stove
This radiator eventually leaked into the car interior. And antifreeze vapors are harmful!
Despite the fact that there are usually no complaints about the quality of the stove, breakdowns can still occur. If you focus on the radiator, it may clog or leak. In any case, you need to immediately begin dismantling the stove, after which it will be possible to inspect it in detail and understand the causes of the breakdown.
Most of the work will have to be done on the top of the engine compartment, as well as from inside the car. In fact, in this case we will not need a pit, a jack, or a lift. Just keep in mind that access to the engine compartment will be extremely difficult.
- To begin, unscrew a couple of clamps that secure the heater pipes to the heater radiator. This frees them up so we can remove the pipes completely.
- Now we will have access to draining the coolant from the radiator. Naturally, you will have to take care in advance of the container where this liquid will be drained.
- If possible, we move the pipes to the side. In principle, most of the work in the engine compartment is completed here.
- Next comes work from inside the car. Near the handbrake you can find one self-tapping screw that secures the tunnel, as well as another self-tapping screw for fixing the parking brake housing. Unscrew them completely. In addition, on the driver's side and on the passenger's side there will be two more screws that secure the tunnel on both sides.
One self-tapping screw under the handbrake tunnelUnscrew the two screws. One is visible in the photo, the second is to the right, closer to the gearshift knob
- Using a screwdriver, carefully remove the gear shift knob cover from the groove. At the same time, we lift the tunnel up a little, moving it to the left.
- We unscrew the nuts that secure the gas pedal, as well as the stand under it.
Three pedal mounting bolts - Two more screws that secure the radiator cap casing must be unscrewed and put aside.
The cover can now be completely removed to gain access to the radiator. Gained access to the heater radiator pipes - Next you will have to saw it off.
Only now the radiator can be removed by holding down the brake pedal, which will interfere. We saw off the radiator tubes to remove it