With the arrival of cold weather, owners of VAZ 2107 cars are faced with problems of inefficient operation of the stove. Everyone is familiar with the operating principle of the interior heater. The main source of heat in the car interior is the radiator, which modern manufacturers produce from two materials - copper or brass, and aluminum. Which heater radiator is better - copper or aluminum on a VAZ 2107 remains to be seen, since not only the efficiency of the heater, but also comfortable driving in winter depends on this choice.
Product added to bookmarks!
- Description
- Reviews
APPLICABILITY: VAZ 2104, 2105, 2107 with a carburetor engine and an aluminum radiator.
Red reinforced silicone radiator hoses.
Three-layer hoses, wall thickness 4.5 mm.
Advantages:
– the silicone used in production makes the product resistant to wear and prevents the appearance of microcracks;
– thanks to 3-layer reinforcement, they can withstand operating pressures of up to 0.2 MPa;
– tensile strength and other impacts are 5 times higher compared to rubber pipes;
– silicone pipes remain elastic at low temperatures (up to -40°C) and can be used at high temperatures (up to +180°C);
– silicone pipes fit perfectly into the cooling system seats, requiring no modification.
Includes: 1 radiator inlet hose (upper), 1 radiator outlet hose (lower), 1 thermostat hose, 1 connecting hose.
The condition of the radiator determines the proper operation of the car. Failure of this spare part can cause engine failure. Therefore, it is important not to hesitate in purchasing a radiator device. To purchase such a part for a VAZ 2107 in Russia will cost 500-4000 rubles .
Radiator malfunctions, their symptoms and causes
During operation of VAZ 2104, 2105, 2107 vehicles with a heater radiator, problems may occur that require repair work. As a rule, all problems boil down to the fact that the efficiency of heating the interior is reduced. Let's consider the most likely causes of this phenomenon.
- Air lock in the cooling system. Such a malfunction can occur as a result of replacing engine components related to the cooling system or antifreeze, as a result of which the stove heats poorly or does not give off heat at all. To restore the heater's functionality, you need to run the engine at high speeds to expel air from the system.
- When the stove tap is open, the line remains closed. The reason is a clogged locking mechanism or scale formation if water is used instead of antifreeze. The problem is solved by cleaning or replacing the faucet.
- The radiator remains cold when the tap is fully open. The problem may be caused by a problem with the water pump. The malfunction is difficult to miss, since the engine quickly overheats, as evidenced by the indicator on the instrument panel. If the engine is warmed up to operating temperature (+90 ˚ C), and the heater supply pipe remains cold, the alternator belt may break or there may be a blockage in the supply pipe from the pump.
- The supply pipe is hot, and the air from the stove is cold. This problem on classic Zhiguli models is quite common. The reason is clogged radiator honeycombs, which is due to the use of water instead of antifreeze or the use of additives to eliminate leaks. In this case, the radiator needs to be dismantled and washed.
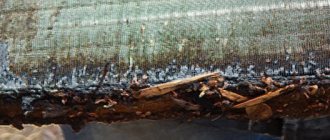
The stove may not heat well due to clogged honeycombs both outside and inside.
Problems with the heat exchanger can manifest themselves not only in the form of cold air supply instead of hot air, but also in the appearance of leaks. The problem can be detected by the formation of a puddle on the floor, as well as by the appearance of an oily coating on the side windows and windshield while the stove is operating. The reasons may be:
- coolant leakage through the heater tap;
- leak from the pipe;
- The radiator itself is leaking.
In the first two cases, the worn element needs to be replaced, and if a leak appears from the radiator, the part needs to be repaired or replaced.
If the cooling system uses antifreeze rather than water, the coolant leak must be eliminated as soon as possible, since the liquid contains substances harmful to human health.
What is this?
A radiator is usually understood as a device that removes heat from the fluid circulating in the engine cylinders, thereby preventing overheating. The part is located in the front part of the hood space.
The autoradiator is represented by the following components:
- Top tank.
- Core.
- Bottom tank.
- Pipes.
- Coolant drain valve.
If the radiator fails, the power unit begins to overheat and individual parts expand. This leads to jamming of the pistons in the engine cylinders. Because of this, the motor becomes unusable.
Service station technicians say that you need to change the radiator on a VAZ 2107 when the following changes occur in the car’s operation:
- The motor is overheating.
- The engine will not start.
- The car stalls while driving.
- Increased consumption of antifreeze.
Failure of the car radiator can be caused by:
- Depressurization of tubes and tanks.
- Contamination of pipes.
- Natural wear and tear of device parts.
What is a car heater radiator
Almost every car is equipped with an interior heating system, in which one of the main elements is the radiator. Thanks to this part, heat is collected from the coolant and subsequently supplied to the passenger compartment.
Where is the heater radiator installed on the VAZ 2104–2107 and what functions does it perform?
The heater radiator on all classic Zhiguli cars is located in a special box under the front panel. The product is a heat exchanger, the main function of which is to transfer heat from the coolant (antifreeze) with subsequent distribution throughout the cabin. This unit works in the same way as the main radiator of the power unit. For the stove to function correctly, the heat exchanger must be constantly heated. This is achieved by connecting the radiator to the engine cooling system using tubes and rubber pipes and constant circulation of liquid through a water pump (pump).
The heater radiator on the “classic” is located in a special box under the front panel
Stove radiator design
The heat exchanger consists of two tanks and copper or aluminum honeycombs. The tanks are connected by soldering or sealant, depending on the material of the part. The main components of the stove, in addition to the radiator, are the fan and the control unit, which consists of levers and cables.
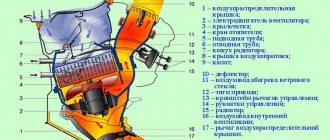
1 - additional motor speed resistor; 2 — fan casing; 3 — fan guide casing; 4 — spring holders of the lower housing; 5 — radiator housing; 6 — air supply cover; 7 — radiator gasket; 8 — stove radiator; 9 — coolant pipes; 10 — heater valve; 11 — impeller of the heater electric motor; 12 — electric heater motor; 13 — spring latch of the heater motor; 14 — pillow of the heater motor; 15 — flap of the side air inlets; 16 — lower cover (damper) of the heater, airflow for the feet
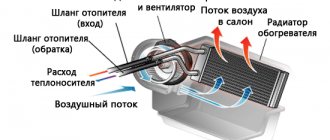
Air from outside passes through the hole in the hood and enters the plastic air intake casing located in the engine compartment under the windshield. The air flow then enters the heat exchanger, which is heated by the coolant. When the car is idle or driving at low speed, the heater fan is turned on in the cabin, which drives cold air through the radiator, thereby heating it and supplying it to the cabin.
The heater radiator consists of tanks and honeycombs through which coolant circulates
When the car is moving at high speed, the fan does not need to be turned on, since the oncoming flow creates sufficient pressure to pump warm air. The more the coolant heats up, the more heat the radiator gives off. The level of liquid entering the heat exchanger is regulated by a tap. Therefore, if there is a need to change the temperature in the cabin, for example, to make the air less hot, the tap is closed partially or completely using a flexible rod and lever.
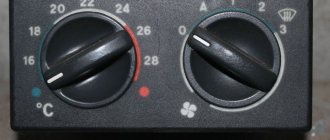
Controlling the stove is quite simple. There are several handles on the central panel:
- the top one is designed to adjust the position of the stove tap (to the left - the tap is closed, to the right - open);
- the middle handle changes the position of the air supply cover, thereby changing the intensity of the warm air supply;
- The lower lever allows you to adjust the damper of the heated glass air ducts (position to the right - the air flow goes to the side windows, to the left - to the windshield).
The heater in the cabin is controlled using three levers that can be moved horizontally
Prevention of breakdown of the VAZ 2114 crane
Following a few useful tips will help you prolong the service life of your heater tap.
In order to prevent the faucet from turning sour, it is necessary to periodically move the closing/opening lever of the faucet from one position to another. This problem is especially relevant when the seasons change, when you drive all winter with it open, and in the summer you turn off the supply. By the way, in the heat or when you have to drive in low gears, in order to avoid engine overheating, it is recommended to slightly open the heater valve (move the control lever to the “red zone”), but to prevent heat from the radiator from entering the cabin, completely close the air damper.
Modification of the heater tap
On some faucets (in particular, very often these are Luzar and YAVVA), not only the locking mechanism itself can break, but also the plastic tube can burst, so to make the faucet last longer, you can select the diameter and insert an additional tube . Recently, the box from Luzar already has such a through tube and it is made of brass. According to many experienced car owners, installing a YVVA faucet without modification makes no sense at all - the passage pipe is flattened. And in its through tube it is necessary in any case to install a long (thin-walled) tube with an outer diameter of 15 mm.
It also goes without saying that regular preventive inspection of components is necessary - timely detection of problems will not only minimize your costs, but will also protect your health and that of your passengers from danger, since antifreeze vapors are highly toxic!
Do-it-yourself modification of the VAZ 2107 stove - step-by-step photo report
1. The first step is to make a housing for attaching the snail. To do this, you need to cut plexiglass.
2. Using a hair dryer, carefully bend it to get this shape.
3. During the work, the “snail” plug was cut down in order to reduce the dimensions of the structure by about 3 cm.
4. I decided to make the side walls from 1.5 mm thick duralumin.
5. I recommend sealing all cracks and joints of the structure with silicone sealant or a similar sealing substance.
6. The most difficult thing, in my opinion, is working with the channels for supplying air flow to the air duct openings. It was decided to make them collapsible from the same material.
7. To reduce resistance and remove turbulence, I made smooth turns from duralumin.
8. Next, slots were made to air the driver's and passenger's feet with flaps.
9. An optional item, but I still decided to do it for myself - I installed a variable resistor for adjusting the speed of the cochlea instead of the backlight brightness resistor.
Now about the results of modification of the VAZ 2107 stove.
Everything turned out even better than I expected. The stove operates at low speeds completely silently, the air flow from the side slots is quite decent despite the multiple turbulences and bends of the structure. There is a uniform flow of air in all directions, which quickly and gently warms up the entire cabin. At the second and third speeds, the flow is simply “crazy”, so I turn it on only in case of emergency, for example, when I need to quickly warm up. Moreover, I noticed that after upgrading the stove, the unpleasant effect called glass fogging disappeared, and the car was dry and comfortable.
If you know other ways to improve the VAZ stove, write about it in your comments to the post. Thank you for your attention, good luck with your tuning!
Other interesting articles on the topic of tuning:
How to choose the best heater radiator for VAZ-2107
To optimize the operation of the stove, VAZ-2107 owners quite often replace the standard radiator with a heat exchanger from another domestic model or a foreign car.
Radiators of other VAZ models
An alternative to the factory radiator of the VAZ-2107 stove can be a similar product from the “five”. In general, for the “classics” there are two types of stove radiators - VAZ-2101 and VAZ-2105. Of course, the seventh model is suitable for a “five” heat exchanger. The standard size of a standard radiator from a “kopek” is 185x215x62 mm, from a “five” - 195x215x50 mm, i.e. the product from a VAZ-2101 will not fit into the plastic casing of a “seven” due to its thickness.
Tuning the VAZ 2107 stove: what tools and components will be needed
First of all, in order to make changes to the stove and radically solve all its problems, you need to stock up on snail from the “Eight”. Next, you will also need plastic, plexiglass, textolite (all these materials can be used to build a new building). Finally, to convert the stove to a "Seven" model, you will need bolts, nuts and sealant. Important information! Before you start work, carefully read the instructions for the VAZ 2107. One incorrect operation can lead to you being left without a stove altogether.
Before you start modifying the stove, you need to dismantle its lower and middle parts. After this, the parts are thoroughly washed. Then the entire lower part is cut off (you only need to leave a little plastic and the fastening points). The side walls are cut out of plexiglass or plastic. Their sizes must be adjusted to the location, since everything depends on the material chosen. The cut blank is attached to the side wall of the stove. The same manipulations are performed with the second wall. When this stage is completed, you can move on to the middle part of the stove. This is where the diffuser is cut off. Here it is important to pay attention to the presence of two bulges on the sides (supports for the radiator). There is no need to trim them. After the middle and lower parts are ready, you can start trying on the snail. It should become as high as possible, but at the same time not go beyond the level of the radiator stops. Finally, the bottom needs to be cut and installed. It is important to remember that the back of the stove will be the narrowest point. It is made as small as possible. The snail nozzle is placed in the center in order to obtain uniform airflow. When all these manipulations are completed, the structure is coated with sealant. After this, you can install the front wall and try on the stove in the car.
After fitting, you can remove the side air ducts and prepare for the final work. For the duct system, you can use regular plumbing hoses. To do this, holes are drilled in the body into which cuffs are inserted, and then plumbing hoses. Here it is important to ensure that some of the hoses are used to heat the passengers sitting in the rear. After this, the hoses are put on standard blowers. To ensure that there is no air loss at the joints, you can additionally secure them with self-tapping screws and coat the seams with sealant.
What is the result? Air blows evenly from all deflectors. Moreover, even at the first speed of the stove, the air flow exceeds the same figure at the second speed in the standard version. The windows no longer fog up (by the way, with such modifications you can also get rid of fogging of the rear window). And when the car is moving, the operation of the stove is not audible at all.
Factors affecting cost
The cost of an auto radiator for a VAZ 2107 is quite high. Therefore, for those motorists who want to save a little on their purchase, experts recommend searching thoroughly for the right spare part.
You should go through quite a few places of implementation in order to choose the appropriate option. When considering products at different points of purchase, you need to compare their cost and quality. The price of a radiator for a VAZ 2107 car depends on the following factors:
- Variety.
- Material of manufacture.
- State.
- Originality.
- Place of purchase.
- The need to order delivery of goods and the cost of such a service.
- Reputation of the selling company.
Brand name – LRh – Luzar Radiator heater
Heating radiators (also known as heater radiators, also known as heater radiators) are heat exchangers that use the heat generated by the engine to heat the vehicle interior. They allow you to maintain a comfortable temperature and prevent the car windows from fogging up.
For reference: different names of this node have equal rights of use. For example, “heating radiator” and “stove” come from the function of this heat exchanger, “heater radiator” and “stove radiator” - from the installation . . more details
Do-it-yourself modification of the VAZ 2107 stove - step-by-step photo report
1. The first step is to make a housing for attaching the snail. To do this, you need to cut plexiglass.
2. Using a hair dryer, carefully bend it to get this shape.
3. During the work, the “snail” plug was cut down in order to reduce the dimensions of the structure by about 3 cm.
4. I decided to make the side walls from 1.5 mm thick duralumin.
5. I recommend sealing all cracks and joints of the structure with silicone sealant or a similar sealing substance.
6. The most difficult thing, in my opinion, is working with the channels for supplying air flow to the air duct openings. It was decided to make them collapsible from the same material.
7. To reduce resistance and remove turbulence, I made smooth turns from duralumin.
8. Next, slots were made to air the driver's and passenger's feet with flaps.
9. An optional item, but I still decided to do it for myself - I installed a variable resistor for adjusting the speed of the cochlea instead of the backlight brightness resistor.
Now about the results of modification of the VAZ 2107 stove.
Everything turned out even better than I expected. The stove operates at low speeds completely silently, the air flow from the side slots is quite decent despite the multiple turbulences and bends of the structure. There is a uniform flow of air in all directions, which quickly and gently warms up the entire cabin. At the second and third speeds, the flow is simply “crazy”, so I turn it on only in case of emergency, for example, when I need to quickly warm up. Moreover, I noticed that after upgrading the stove, the unpleasant effect called glass fogging disappeared, and the car was dry and comfortable.
If you know other ways to improve the VAZ stove, write about it in your comments to the post. Thank you for your attention, good luck with your tuning!
Other interesting articles on the topic of tuning:
Diagnosis of radiator faults
Antifreeze or antifreeze is used as the liquid that circulates through the system. The liquid removes heat from the engine, thereby heating it, and the radiator serves to ensure that the heated antifreeze or antifreeze is promptly cooled by the outside air and again flows to the internal combustion engine block. The radiator design includes a base and plates made of copper or aluminum. More common are aluminum heat exchanger models, which have advantages such as low cost and high cooling performance.
On VAZ 2107 cars, the injector and carburetor, the cooling radiator differs in the location of the upper pipe. On a carburetor car it is located on the side of the filler neck, and on an injection car it is located on the opposite side.
Like all car parts, the cooling radiator of the VAZ 2107 also becomes unusable. To identify a heat exchanger malfunction, there are appropriate methods:
- The engine does not cool well. The reasons for poor engine cooling are various factors, and heat exchanger failure is extremely rare. Initially, you need to make sure that the pump, thermostat are working properly and that there is no air lock in the system, and only then start checking the radiator. The reason for the failure of this device is the deposition of scale and other contaminants on the walls, which cause fluid obstruction. Not only does the throughput decrease, but the efficiency of heat transfer also decreases, so the car owner can detect engine overheating above an operating temperature of 90 degrees.
- Presence of signs of leakage - aluminum or copper radiator plates are very fragile, so the ingress of stones or branches can damage the integrity of the device. Depending on the size of the damage, fluid leakage will occur, a decrease in the amount of which will lead to an increase in engine temperatures.
This is interesting! When replacing the part in question, you must first drain the coolant. If the car's mileage exceeds 40-50 thousand km, then it is necessary to replace the coolant.
How to drain coolant
Replacing the radiator can be combined with a complete replacement of the coolant, and it begins with draining the coolant from the system. In this case, special care should be taken, since this substance belongs to the category of toxic agents. Before you start draining the coolant, you will first need to wait until the antifreeze or antifreeze in the system has cooled down.
As soon as the engine on the car has cooled down, you can begin drastic steps to replace the radiator. However, first you need to buy a new radiator, since you cannot drive the car after draining the coolant. After the engine has cooled, you will need to open the interior heater valve to completely remove the antifreeze from the system.
This is interesting! To open the heater tap, you will need to move the regulator in the cabin to the extreme right position. It can also be opened from the engine compartment by finding its location and moving the lever to the appropriate position.
To completely drain the liquid from the system, actions are performed according to the following algorithm:
- It is not necessary to place the car above the inspection hole, since all actions will be performed from the engine compartment.
- First you need to place a container under the drain hole, the volume of which should not be less than 7-10 liters. It is best to use a plastic bowl for this.
- Next, you need to unscrew the drain plug located in the lower left corner of the radiator by hand.
- To speed up the process of fluid flowing out, you need to remove the plugs from the radiator (if any) and the expansion tank.
- To remove all the coolant from the tank, you will need to unfasten its clamp and lift it up.
- As soon as the antifreeze stops leaking, you will need to start draining it from the engine. To do this, you need to rearrange the container, and then unscrew the plug in the engine block with a key set to “13”.
- After the antifreeze has been drained from the system, you will need to tighten the drain plug in the engine and on the heat exchanger.
At this point, the process of preparing to dismantle the radiator on the VAZ 2107 is completed, and you can move on to the next step - removing the heat exchanger and replacing it.
Dismantling the device
Replacing the cooling radiator on the seven, both on carburetor and injection models, is carried out according to the same scheme. Dismantling begins with the necessary keys being prepared and further actions being carried out according to the instructions:
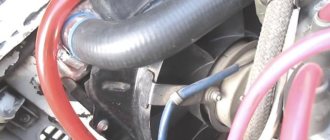
- First you need to loosen the clamps that secure the upper and lower pipes suitable for the heat exchanger.
- The fan sensor is disconnected by disconnecting the connector.
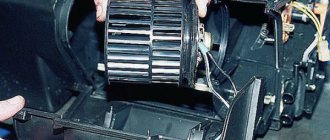
- The fan is attached to the radiator using three bolts. These bolts need to be unscrewed with an “8” key, and then the fan must be removed.
- The radiator is attached to the body with bolts, which can be unscrewed with a “10” key.
- After this, you can carefully remove the device from the engine compartment and then, in a more convenient position, unscrew the fan switch sensor from the heat exchanger body.
Once the heat exchanger is removed, you can begin checking its integrity. Usually a part is removed in order to replace it or make repairs. There are no problems with the replacement, you just need to install a new unit in place of the standard one, assembling all the parts in the reverse order of removal.
DIY repair
A radiator failure is when the seal of the device is broken and leaks are detected. The causes of such violations are various factors, and depending on the magnitude of the damage, a decision is made to carry out repairs. You can repair the VAZ-2107 radiator yourself, and there are many ways to do this:
- The introduction of chemical additives in the form of sealants, which are poured into the device and independently block the damaged areas. This method is not always reliable, as it depends on the quality of the sealant, but even the use of the most expensive sealants does not always eliminate the problem. After a short period of time, leaks may appear again.
- Using cold welding. This is a special plasticine-like mixture, which softens from the fire of a regular lighter, is applied to the damaged area, leveled and then hardens in contact with metal. The result is sealing the damage, but this method also cannot be called effective, since under the influence of vibrations, the joint is gradually damaged, which leads to a coolant leak.
- The most reliable way to deal with cracks on a radiator is to solder the device.
It is the latter method of repair that we will consider. At home, it is not difficult to solder only a copper or brass radiator yourself. To solder aluminum, you need to use special fluxes or argon, and they are not found in every garage. Therefore, we will look at soldering copper parts. For repairs you will need the following tools and materials:
- Regular soldering iron.
- Rosin with tin or phosphoric acid.
- A faulty radiator with a crack in its casing.
The repair process is as follows:
- First you need to find the leak, clean it, degrease it and treat it with rosin or acid.
- After this, you need to heat the soldering iron, and using tin, you need to pour it evenly over the entire area where there is a crack.
- After the tin has solidified, the device can be checked for leaks, washed off the acid and then put back in place.
Checking the tightness of the removed radiator is carried out in the following way:
- First you need to plug all the holes in the device, except for one, to which you need to connect the compressor.
- Immerse it in water completely or in the area where soldering was done.
- Apply air pressure inside the device to 1 atmosphere and for aluminum 2 atmospheres.
- The absence of air bubbles indicates that the connection is sealed, and if they appear, it will be necessary to make repeated repairs or replace the device.
Experts recommend trying to repair brass and copper radiators, but it is better to replace aluminum ones immediately.
Reinstalling the radiator
When reinstalling a device (new or refurbished), special care must be taken to avoid damaging it. Installation is carried out in the reverse order of removal. When connecting pipes, you need to check their integrity. It is unacceptable to leave pipes that have obvious defects in the form of cracks; they need to be replaced.
When installing pipes, you should also check the quality of the clamps. The presence of signs of rust and other defects indicates that it is better to replace the parts to prevent leaks at the joints. After assembling the device into place, you will need to properly fill in coolant (without the formation of air locks) in the form of antifreeze or antifreeze, but not ordinary water, and check the proper operation of the system. At this point, the process of replacing and repairing the radiator on the VAZ 2107 is over, and you can make a test drive to make sure that it is working properly.
You might be interested in reading about: choosing a stove radiator.
Advantages of an aluminum radiator
To find out which heater radiator is better to install on the seven, let’s make a comparative comparison. To do this, you need to find out all the advantages and disadvantages of the two types of stove heat exchangers. First, let's figure out what the pros and cons of aluminum units that are installed on classics from the factory.
The advantages of aluminum devices include the following factors:
- Cost is one of the main advantages of such devices, since it is precisely because of the low price that many choose models made of aluminum alloy. The price difference between copper (brass) and aluminum devices can be up to two times.
- Large selection - these models are more popular, despite some of their disadvantages. The reason for this popularity is their price, but you often have to make sure that it is better to buy a copper unit for the stove.
Among the advantages, heat transfer should also be noted, however, practice shows that heat transfer rates are significantly inferior to brass devices. For the seven, manufacturers do not produce three-row heat exchangers made of aluminum, which actually causes low heat transfer. Only two-row ones are produced.
Minuses
Before buying copper heater radiators for the seven, you need to find out the disadvantages of aluminum units. These include:
- Thermal conductivity - the heat conductivity indicators of the models under consideration are low, so if the owner does not want to have problems with heating the interior, then heat exchangers made of aluminum alloy are not worth buying.
- Unsuitable for repair - some craftsmen, if the device is damaged, try to solder it, but soldering aluminum can cost almost the same as a new radiator. Considering the difficulty of replacing it, then if the aluminum heat exchanger of the stove on the seven leaks, it is better to immediately replace it with a new one.
- Corrosive effects - aluminum alloy is also not resistant to rust formation, so it is possible that the device will not last long if water gets into the system.
The presence of so many shortcomings leads to the fact that owners of sevens are increasingly inclined to switch to brass units. However, there is no need to rush, and first let’s find out all the advantages and disadvantages of our main competitors.
Advantages of copper stove radiators
Now let’s find out why a copper stove radiator is better than an aluminum one. The advantages of these units include:
- Thermal conductivity - even if we take into account the fact that copper ones are only called such, since they contain much more brass than copper, they have high thermal conductivity. It is this indicator that is fundamental when choosing a heat exchanger from which you can get more heat to heat the interior.
- Easy to repair - even the slightest mechanical damage can be repaired at home. Moreover, after soldering work, the unit can last a long period of time (which also depends on the quality of the soldering).
- The entire radiator is made entirely of plastic without the use of plastic. Not only are the plates made of copper, or rather a brass alloy, but the body itself is also made of a similar material. This is a big advantage, because due to this design, operational parameters are increased.
- Three-row versions of radiators are produced. This brings more heat into the cabin.
With so many advantages, one wonders if these devices have any disadvantages.
Minuses
It is necessary to note some disadvantages of the copper heat exchangers under consideration. They also exist, and sometimes play a decisive role in choosing the appropriate units. The main disadvantage is the cost, which is 2 times higher than the price of aluminum analogues. It is precisely because of the big difference in price that most car owners give preference to aluminum competitors, having never experienced copper heater radiators on a VAZ 2107 in action.
What is better to put on a VAZ 2107
Having made a comparative analysis, we can summarize which heater radiator to choose for the interior of a VAZ 2107 car. Practical experience and reviews from car owners indicate that aluminum devices cope with their task perfectly. However, this is appropriate when operating a car in urban conditions. As soon as you leave the city at temperatures below -10 degrees, you immediately realize that the stove is not up to the task. The problem is in the double-row heat exchanger, which does not have time to heat the interior even when the heater fan is switched to maximum speed.
This is interesting! The main reason that the aluminum radiator does not have time to heat the interior is that the cold air that enters through the air intake, at high vehicle speeds, quickly cools the heat exchanger, which is reflected in the form of problems with the operation of the stove.
If you install a three-row copper radiator, then it copes with its task much better, as evidenced not only by the reviews of the owners, but also by the advantages of these units. Therefore, if you often have to travel outside the city in winter, then it is better to install a copper three-row radiator instead of an aluminum two-row one, with which you can forget about the discomfort and chilliness in the cabin of the 7 when the heater is running.
Design of heating radiators from LUZAR
LUZAR heating radiators are available in three types:
- Tubular-plate, prefabricated, aluminum. It consists of aluminum plates through which aluminum tubes pass, inside which coolant runs. The tanks on such radiators are made of plastic. Heater radiators of this type are used for heating small-sized salons due to limited heat transfer; have the best rigidity and light weight, as well as the lowest price.
- Tubular-tape, non-assembled (brazed), aluminum. The corrugated aluminum tape in such a radiator is located between aluminum flat-oval tubes. Radiator tanks of this type can be made of either plastic or metal. The design of non-assembled (brazed) aluminum devices is the most universal, allowing the creation of heat exchangers with any specified characteristics. Aluminum stove radiators are light in weight and relatively high rigidity, as well as at optimal prices.
- Tubular-tape, non-assembled (soldered), copper-brass. The design is very close to type 2 - between the copper flat-oval tubes there are copper strips folded in the form of an “accordion”. At the same time, the tanks on such heating radiators are made of brass - in order to increase the overall rigidity of the structure. Copper heating radiators - due to the high specific heat capacity of copper - have excellent heat transfer rates. However, due to the high softness of copper, heating radiators made of this metal are forced to have a narrow tube and a large interval (step) between the tubes, which imposes serious limitations on maximum efficiency. Also, copper heater radiators have the highest cost and the lowest rigidity to torsion, fracture and internal pressure. In this regard, copper heater radiators are “outdated” and are gradually falling out of use.
| See all advertisements in the archive |
The most common problems
Thanks to its simple design, the heater of the 2107 VAZ model rarely breaks down. However, sometimes failures do happen. Most often this happens due to:
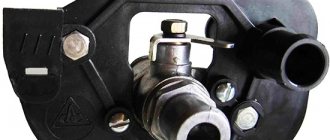
- sour faucet;
- clogged or cracked radiator;
- breakage of the cable drive.
It is the first of the mentioned elements that causes the greatest problems. The trouble is that in the winter the VAZ stove is actively used, while in the summer, of course, it sits idle for 4-5 months. Because of this, the tap often becomes clogged with solid particles contained in the antifreeze and jams. With the arrival of cold weather, it can be very difficult to open it, which is why the cable breaks or the locking fitting itself breaks. The faulty unit must be replaced.
The period of inactivity is also negatively displayed on the radiator. Without coolant circulation, deposits form on the coolant walls and oxidative processes are activated. As a result, the heat exchanger tubes become clogged, and subsequently the efficiency of the furnace as a whole decreases.
For preventive purposes, the radiator must be regularly washed with special compounds. Blockages are removed mechanically.
Leaks are another problem that often occurs with heaters. They occur due to the destruction of the faucet or loss of tightness of the joints of the pipes and radiator. The first two breakdowns are eliminated by replacing the failed element, and the last – by soldering. Fortunately, the original radiators on VAZ classics are made of copper, and therefore can be easily repaired.