The cold weather is coming, so it is extremely important that the heating system of your VAZ 2114 works properly. There could be a great many reasons for her refusal to work.
To prevent breakdowns, you should periodically check the condition of all elements of the stove and carry out preventive measures. However, it is not always possible to keep track of everything.
Today we will talk about the stove valve, which often becomes the cause of heater failure. Let's look at the main causes of breakdowns and ways to eliminate them.
Main malfunctions of the VAZ 2114 heater valve
It is not clear why, but it is this element of the cooling system that fails more often than others. This usually happens in the fall, when there is a need to use a heater. There are only two main reasons for crane failure:
- souring of the locking device;
- depressurization of the housing (leaking).
In the first case, it turns out to be impossible to open or close the tap. Oxidative processes inside lead to the elements of the locking mechanism sticking to each other.
Using force to remove constipation can lead to its complete destruction. This breakdown is not critical, and allows you to operate the car in the warm season. It is enough to simply block the flow of air into the cabin using a damper.
If a leak is detected, it is not recommended to use the car. Violation of the tightness of the valve body is manifested by the following symptoms:
- decrease in coolant level;
- presence of a characteristic odor in the cabin;
- the appearance of a greasy coating on the windshield;
- traces of coolant on rubber mats or carpet under the glove compartment.
It is worth noting that the heater valve has a non-separable body, which is why it cannot be repaired. Only replacing it will help here.
When to change?
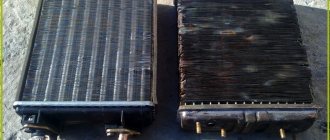
Let's remember Soviet times, when all radiators, including products for the heating system, were made of copper. These units had enviable reliability, so replacing the stove radiator was one of the rare procedures, and maintainability was not in doubt. Sometimes it became necessary to clean the cavities of these products from the accumulated scale.
The beginning of the 90s was marked by the appearance of aluminum radiators, which were cheaper. Such units have gained considerable popularity among manufacturers, who still resort to installing them in their new and existing models of cars. AvtoVAZ also professes this trend, heroically equipping the Lada Kalina with aluminum versions of radiators.
The use of products of this type causes a number of problems:
- The aluminum product does not have durability and tends to develop leaks after a couple of years of intensive use. Such a case does not involve repair, since it is not possible to eliminate the leak in the product.
- Coolant evaporating through a leaking radiator creates toxic fumes that penetrate the cabin, have a sweetish taste and settle on the windows in the form of fogging, similar to greasy stains.
- Structurally, the manufacturer placed the on-board system controller under this radiator. If antifreeze gets inside this device, it will fail. Replacing the controller is not cheap, so taking steps to replace the radiator as soon as possible is a good idea here.
- Access to the radiator assembly is very difficult, so even such an event as cleaning is a very labor-intensive task.
Among the main reasons causing antifreeze leakage from the heating radiator is the use of cheap antifreeze by Lada Kalina owners. There are plenty of fakes on the market, so careful selection is one of the keys to trouble-free operation of the heating system. Counterfeits contain the presence of various harmful substances that have a negative effect on the aluminum structure, causing leakage.
Today, special sealing substances designed to seal a small leak from the inside have become quite popular on sale. This method is not always able to provide help, but the risk of clogging the entire cooling circuit is quite high. You should not trust such components, but should be inclined to replace the radiator as soon as possible.
Which modification of this element should I choose? Most owners unanimously recommend DAAZ (Dimitrovgrad Automobile Assembly Plant) products.
Causes of breakdowns
It so happens that replacing the VAZ-2114 heater tap occurs more often than working with other elements of the car’s heater. Apparently, even at the production stage, the engineers did not think through this unit well.
The heater valve breaks for two reasons:
- Locking devices become sour. Because of this, the driver cannot open or close the tap. Oxidation provokes sticking of the locking elements to each other. If you use force, you risk breaking the locking devices. This is not so scary in the warm season, since air flows can be controlled by dampers. How to check the faucets of the VAZ-2114 stove for souring? Just give it a spin. If this requires a lot of force, the element is worn out and needs to be replaced.
- Violation of tightness. Depressurization entails a leak of coolant. Such a breakdown is indicated by a decrease in the coolant level, the appearance of a smell of antifreeze or antifreeze inside the car, the formation of greasy spots on the windshield and traces of coolant on the floor (in the glove compartment area, at the feet of the front passenger). Checking for leaks is easy. If it is broken, you will notice it immediately by characteristic signs.
Important! The stove faucet has a non-separable body. Therefore it is impossible to repair it. If an element breaks, you only need to replace it.
Preparatory stage
Before proceeding with dismantling the structure and installing a new faucet, it is necessary to accurately determine the cause of the problem. Often, antifreeze leaks into the interior appear due to wear of the rubber gaskets located between the heater tap and the radiator. In this case, the problem can be resolved by replacing worn-out products with new ones.
If the reason lies precisely in the breakdown of the crane, then it makes sense to first familiarize yourself with the models and design options on sale. The modern range includes both metal and ceramic taps, differing in price and performance characteristics. According to most car enthusiasts, ceramic products have a higher durability and longer service life.
As an alternative solution, some owners of Niva 21214 SUVs use not a special product, but a regular 1/2″ water tap (diameter 15 mm) to replace a worn part. Practice shows that such a non-standard approach to eliminating problems with the stove is fully justified (with the exception of some inconveniences with further valve control), since plumbing products are optimally suited for replacing an unsuitable factory locking element on a car stove, have good performance characteristics and increased reliability.
Work algorithm
The faucet can be replaced in two ways - with full or partial drainage of antifreeze.
The first option is suitable for those who decide to simultaneously replace the antifreeze. Before starting work, unscrew the drain plugs and wait for the coolant to drain into the container, after which we proceed to remove the assembly.
Replacement with partial drainage is suitable for those who have a supply of antifreeze for refilling. We place a container under the car at the junction of the cooling system pipe with the tap and disconnect this pipe, after which we lift its end up and fix it in this position. The loss of antifreeze will be 1.0-1.5 liters (it will drain from the heater), while the coolant will remain in the cooling system, but we will replace it after the work is completed.
Replacing the faucet of the VAZ-2114 stove is carried out using the following technology:
Loosen the clamps
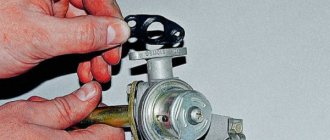
Disconnecting the heater tap rod of the VAZ 2114
- We place the car on a pit or overpass and wait until the engine cools down (not completely, but so that it remains warm).
- Drain the antifreeze (partially or completely).
- We disconnect the coolant supply and drain from the faucet on the side of the engine compartment.
- In the passenger compartment, remove the side decorative trim of the console on the passenger side.
- We loosen the clamps securing the pipes to the faucet fittings in the cabin and disconnect the pipes, having first placed a rag under them. If you plan to replace the pipes, you can disconnect them from the heater radiator and remove the faucet along with the pipes.
- Disconnect the control mechanism cable from the locking diaphragm axis lever. If it is not possible to separate them from the passenger side, then you can get to them from the driver’s side (after first removing the plastic trim).
- We climb under the car. We find two nuts securing the faucet body to the engine shield and unscrew them and remove the washers from the studs.
- We move into the cabin and remove the unit.
We recommend: How to distinguish retreaded tires from new ones
Assembly is performed in the same sequence as dismantling.
Video: How to replace a stove faucet. Simply and easily.
HOW TO CHANGE THE STOVE TAP WITH YOUR OWN HANDS?
You will need a pit to work with because the heater valve is located at the bottom of the hood, under the side trim on the passenger side. Replacing the stove valve on a VAZ 2114 is carried out in several stages:
- On the faucet, you need to brush the fasteners, rinse them with brake fluid, and leave them for a while so that the fluid cleans the threads on the studs and the nuts are easier to unscrew. To wash studs, it is better to use WD-40, if available. This is an important stage in the work, because rusted bolts can grab the nut so much that unscrewing them becomes problematic. Sometimes when unscrewing nuts, the bolts need to be held with an additional wrench or pliers.
- In the cabin, remove the side trim. Now you can see the pipes leading to the tap. Loosen the hose clamps and remove the hoses one by one. At the same time, keep a container with antifreeze near you, which you immediately place under the emptied pipes so that the remaining antifreeze flows out.
- If you decide to replace the hoses, they must also be released from the radiator. But if they are in satisfactory condition, then when you start assembling, you will only need sealant.
- Return to the pit and use a 10mm wrench to unscrew the nuts holding the tap in place.
- Go back to the body again and try to remove the heater valve of the VAZ 2114 towards the passenger seat. In this position, remove the lock and release the cable that controls the tap.
- Now you can install the new faucet. First put the cable on it, secure it with a spring clip, and only then can you screw it into place. Install O-rings between the valve and the body. Use sealant to secure the stove pipes in place. Don't forget to pour the antifreeze back into the radiator at the end.
Replacing the stove valve of the VAZ 2115, as well as the VAZ 2113, is carried out in the sequence described above. The design of the heater in these VAZ models is the same as that of the VAZ 2108.
The device of the stove of the Daewoo Nexia car
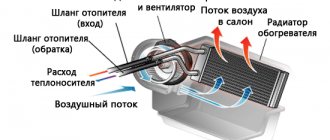
The stove allows you to create a comfortable microclimate for the driver in the interior of any car. In addition, it heats the glass, freeing them from ice or frost. All this is especially true in the cold season.
An important condition for the operation of the stove on the Daewoo Nexia is the power unit warmed up to the standard temperature. The stove starts heating well only after the engine has warmed up.
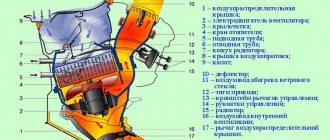
The interior heating system consists of the following parts:
The electric motor of the Daewoo Nexia car heater has a cylindrical shape and a plastic-metal body. Its technical characteristics are as follows:
The stove vacuum switch is a damper control device. The driver from the cabin can set a comfortable operating mode for the stove by moving the levers on the control unit. If it is not possible to direct the air flow to the desired area of the cabin, minor repairs will be required.
Warm-cold switch or blower direction switch? If the first - look at the “beard” under the tidy on the right (where the passenger’s knees are) - there is a cable that moves the damper lever. Perhaps he jumped off or something else happened to him, move the handle and see if it works. And if there is blowing, then, most likely, the hose (thin, almost like the rod from a handle) coming from the intake manifold into the cabin (under the tidy) has come off - the damper drive is vacuum, and the vacuum is taken from the intake through the hose.
Old timer
https://www.nexia-club.ru/f/hodovaya/4737-ne-rabotaet-pereklyuchatel-pechki/
General ventilation of the interior is carried out through the air intake, which is located in the area of the Daewoo Nexia windshield. The air intake takes in the required amount of air, supplies it to the stove components - there it warms up and enters the cabin.
Features of the operation of the Daewoo Nexia car heater in recirculation mode
Car owners know that it is impossible to operate a Daewoo Nexia car for a long time with a stove operating in recirculation mode - the concentration of carbon dioxide in the cabin can greatly increase. Therefore, it is recommended to use this mode only when crossing areas with strong odors (landfills, fires, etc.).
Articles
- 2108-8101204-20 – internal outlet hose;
- 2108-8101200-20 – supply internal hose;
- 2108-1300080-10 – clamp;
- 2108-8101150 – crane (AvtoVAZ);
- 2108-8101150-12 – faucet with ceramics (Yavva LLC);
- 21082-8101208 – external outlet hose;
- 2108-8101206 – external supply hose.
Replacing the VAZ-2115 heater tap most often worries the owner of a domestic vehicle in two cases - if the switch has soured or the motorist has discovered an antifreeze leak that has occurred in the housing.
Heater valve VAZ-2115
The VAZ-2115 heater valve, which required repair due to the first problem, is most often changed in the spring-autumn period, when with the onset of the first noticeable cold or spring warmth, the motorist does not turn on the switch, fixing it only in one extreme position (closed or open) . As a rule, souring of an element occurs due to its being in one position for a long time.
In turn, replacing the stove tap due to a second malfunction is the result of normal aging of the seals.
The heating must always be in working order, if, for example, the first case does not threaten the car owner with huge problems in the future, then the second situation should be paid attention to immediately, the cost of the consequences of such an antifreeze leak can result in a cost that is several times higher than the price of the faucet. It is worth noting that, along with other important procedures, qualified specialists recommend replacing the stove filter every fall; this element of the system is often clogged with leaves and other debris, which reduces the flow of air entering the cabin.
Reasons for replacement
If the heater valve fails, it will have to be replaced. There are two main reasons that lead to the need for such a procedure.
| Cause | Explanation |
| Oxidation | Due to oxidation, the performance of the faucet is significantly reduced. This is not the most difficult problem, but difficulties may arise when constantly opening and closing the faucet. It's better to replace it right away |
| Coolant leak | This problem is more complicated and can bring more problems. This is due not only to the likelihood that the interior will be filled with antifreeze, which will have to be washed out. Coolant leakage leads to engine overheating. |
Agree, it would be a shame to spend a lot of money on restoring or even replacing the power unit if the reason for this is a banal breakdown of the stove faucet.
To prevent such problems, we strongly recommend that at the first sign of failure of this unit, you take appropriate repair actions.
We recommend: How to make a glass defroster with your own hands?
How to determine a breakdown
There are several ways to detect that something is wrong with the stove:
- Inspect the unit visually;
- Check the current coolant level and monitor it if it drops sharply;
- Raise all the carpets inside the cabin, determine if there are any traces of coolant on the floor;
- Check the operation of the radiator;
- Make sure that the pipes through which the liquid passes are intact.
Traces of leakage
If the warm air supply regulator, that is, the faucet, cannot be repaired, it cannot be repaired, then be sure to urgently replace the unit. To do this, it is not at all necessary to go to a service station. This kind of work can easily be done with your own hands.
Choice
Before replacing, you must purchase a new faucet. Today, manufacturers offer VAZ 2114 owners a choice of three options:
- Factory product;
- Ball valve;
- Regulator made of ceramic plate.
Each of them has its own advantages and disadvantages, so it is impossible to single out a clear favorite among the presented options. Decide for yourself based on the cost and functionality of the unit.
Replacing the heater valve on a VAZ 2114
Today on sale you can find taps with a metal shut-off device and with a ceramic one. The latter are considered more reliable, as they are resistant to oxidative processes, however, as far as tightness is concerned, models with a metal lock are in no way inferior to them.
There are also valves with a ball locking mechanism, but they are also not particularly reliable. The table below shows the models of heater valves for the VAZ 2114. The price of the valves varies from 150 to 350 rubles, depending on the model.
| Manufacturer | Catalog number | Material locking mechanism |
| OAT DAAZ | 21080-810115000 | Metal |
| AvtoVAZ | 21080-810115000 | Metal |
| Tsn-Citron | 8.5.2 | Metal |
| "Road map" | 21080-8101150 | Ceramics |
| JAVVA | 2108-8101150 | Ceramics |
| Luzar | 2108-8101150 | Ceramics |
Tools and supplies you will need to replace the faucet:
- set of wrenches;
- Phillips and flat screwdriver;
- pliers;
- container for collecting drained coolant;
- rag.
First, we place the car on an overpass or in a pit. Let the engine cool down. Next you need to drain the coolant. This can be done by unscrewing the drain plug (key 13) on the cylinder block, after opening the expansion tank, or through the drain hole at the bottom of the cooling radiator.
Next, we find under the hood on the front passenger side two pipes leading into the cabin. Using a Phillips screwdriver, loosen the worm clamps and remove the hoses. If coolant leaks from them, substitute a container and use a rag.
Now let's go to the salon. In the front passenger seat at the bottom left we look for the pipes going from the radiator to the heater tap. For convenience, remove the left panel cover covering the radiator. Loosen the clamps securing them and disconnect the hoses. If liquid leaks, use a rag.
When the hoses are disconnected on both sides, go back under the hood and unscrew the 2 nuts on the studs securing the pump housing. Here we use the key for 10. We move into the salon and pull the tap towards us. Using pliers and a flat-head screwdriver, disconnect the drive cable of the faucet locking mechanism, after first removing the bracket that holds the rod.
We remove the broken heater tap. We begin the installation of a new faucet by attaching the cable and pipes going to the heater radiator.
Then we reassemble in reverse order. Once installation is complete, do not replace the panel cover. After pouring coolant into the radiator, start the engine and warm it up until the fan turns on.
We check the operation of the system by opening the damper, turning on the heater fan, and moving the valve control lever left and right.
We periodically visually inspect the faucet and the connection points to it for leaks. If everything is fine, replace the instrument panel cover.
Preparatory stage
To change the heater tap, you need to perform 2 preliminary operations: partially drain the coolant and remove the glove box.
Antifreeze is drained in the following sequence:
The glove box is removed by unscrewing several screws holding it in place. Some of them are located immediately under the glove compartment lid, the other part is in the depths of the box.
Before proceeding with dismantling the structure and installing a new faucet, it is necessary to accurately determine the cause of the problem. Often, antifreeze leaks into the interior appear due to wear of the rubber gaskets located between the heater tap and the radiator. In this case, the problem can be resolved by replacing worn-out products with new ones.
If the reason lies precisely in the breakdown of the crane, then it makes sense to first familiarize yourself with the models and design options on sale. The modern range includes both metal and ceramic taps, differing in price and performance characteristics. According to most car enthusiasts, ceramic products have a higher durability and longer service life.
As an alternative solution, some owners of Niva 21214 SUVs use not a special product, but a regular 1/2″ water tap (diameter 15 mm) to replace a worn part. Practice shows that such a non-standard approach to eliminating problems with the stove is fully justified (with the exception of some inconveniences with further valve control), since plumbing products are optimally suited for replacing an unsuitable factory locking element on a car stove, have good performance characteristics and increased reliability.
Choosing a new faucet
VAZ-2114 owners are often interested in what is better to choose instead of the old faucet and how to find a good, proven element.
Some will say that only the original faucets for the stove on the VAZ-2114 perform well. This is actually a misconception. In fact, the locking mechanism of such taps is based on a rubber membrane, and the duralumin body rusts and sours. Their only advantage is the price. The cost of a new faucet will be up to 120 rubles. But if the car is used frequently, the elements will have to be changed every year.
If you are replacing the stove tap, choose one of two options. Decide for yourself which faucet to choose, based on your available budget. Both elements are good:
- Ceramic. The locking mechanism is made of ceramic, and the body is made of high quality plastic.
- Ball. The essence of such a locking mechanism is a ball with holes.
The following manufacturers can be distinguished:
- YAVVA;
- Citron;
- Road map;
- DAAZ;
- Luzar (Luzar).
Factory (standard), ball or ceramic valve, which is better?
Among car owners on various forums, discussions constantly arise about which heater tap is better. Most often, battles unfold between two options: ball or ceramic. Almost no one doubts that a standard valve based on a rubber membrane is not reliable, more often than others it leaks, “sticks” and is especially susceptible to acidification. As proof of this, see the images above, where the reason for the replacement is a jammed faucet and a fluid leak.
Ball or ceramic?
We recommend purchasing a ceramic faucet. The body of such a faucet is ordinary, but the locking element consists of two ceramic plates with slots that rotate relative to each other.
Ceramic heater tap
A ball valve, in principle, is also not bad; the undoubted advantage of such a valve is its greater throughput compared to a ceramic one (when open, the passage hole is equal to the internal diameter of the pipe). At low temperatures this is especially noticeable, but the likelihood of souring is higher for a ball valve than for a ceramic one.
Node malfunctions
There are three faults in the valve of the VAZ-2114 stove, but if they occur, the unit must be replaced, since it cannot be repaired.
Crane breakdowns:
- Incomplete opening/closing of the channel. It occurs due to wear at the junction of the axle and the shut-off valve. As a result, a significant backlash appears, due to which, even when the valve lever is moved to the extreme position, the damper does not open the channel completely. This malfunction negatively affects the performance of the stove.
- Gate valve jammed. This happens because the tap has not been used for a long time and the moving element has become stuck and does not move. Attempts to open with force result in the rupture of the connection between the axle and the valve or the formation of strong backlash, which causes the valve to also become inoperable.
- Loss of tightness. The tightness of the unit is ensured by seals on the damper axis. If these elements are worn out or damaged, the liquid flows out through the mounting hole of the axle. This malfunction does not affect the performance of the stove, but antifreeze leaks will appear in the interior.
We recommend: Where is the engine number of a car?
The first two faults can only be identified visually by removing the valve from the car. As for the loss of tightness, a symptom of a breakdown will be traces of antifreeze on the floor mat in the cabin. And since a leak can occur due to leaks at the junction of the pipes with the heater elements, when leaks appear, first of all, find the location of the leak. If the faucet leaks, there will be traces of antifreeze on the body.
WHY DOESN'T THE OVEN TAP WORK?
One of the reasons for a non-working faucet is souring. As a result of corrosion under the influence of chemical liquids, the flag loses its mobility, and the tap stops opening or closing. If this happened when the tap was open, then warm air will flow inside even when no one needs it.
Sometimes a failed heater faucet in a VAZ 2114 leads to air in the system, the stove does not heat, and cold air enters the cabin.
But the most common defect is a leaking stove tap. Antifreeze gets into the car body and stains the floor mats. In both the first and second cases, it is necessary to replace the VAZ 2114 heater valve.
If you find antifreeze under your feet, do not rush to immediately buy a new faucet. The leak can come from a burst pipe; even the heater radiator can leak. First, find out where the antifreeze is leaking from, and only then go to the auto parts store to make purchases.
Dismantling and replacing the stove valve on a VAZ-2114
It seems that to replace the faucet on a VAZ-2114 you need to remove the instrument panel. In reality, it will be enough to remove the side trim piece, as well as the glove compartment. The main rule is to unscrew all the screws that you can see.
Right sidebar
The result of our efforts is what is shown below.
The result of dismantling the cladding
And now you can see two “internal hoses”. What to do next is clear to everyone.
What can you see under the cladding on the right?
Loosen the clamps installed on the faucet side and remove the hoses. By the way, antifreeze may leak here (it is poisonous).
Under the hood
Below, near the partition, you can see two “external hoses”. Loosen the clamps and remove the hoses from the pipes. Next, use a spanner to unscrew the two nuts (see photo).
All the actions performed under the hood
Let's go to the salon.
In the cabin
Without disconnecting the rod, remove the faucet (photo 1). Then immediately remove the “holder” (photo 2). And then, by pulling the assembly outward, it will be possible to remove the mechanical rod completely.
Three final steps
As you can see, everything is simple. Installation is carried out in reverse order.
And tell me Nexia has a faucet for the stove & | Daewoo Nexia club
To do this, you will need to open the hood and, with the engine warm, touch the antifreeze supply pipe connected to the radiator and the throttle hose with your hands.
Nexia. finishing of the stove. in the salon, Tashkent
All this is especially true in the cold season. This is felt most strongly in the cold season. The master says hydriki... Ilya Hello everyone!
There must be circulation in the heater radiator, otherwise when winter comes, you open the tap and there will be an unpleasant surprise - the radiator...
In addition, it heats the glass, freeing them from ice or frost.
As a result, the access of hot air to the legs of the passenger and driver is almost completely blocked. It takes 8-10 minutes to completely drain, so hurry up. In this case, you need to pay attention to the profile that the gasket has.
To do this, unscrew a couple of screws. In this case, you need to pay attention to the profile that the gasket has. Now, onto the new Daewoo Nexia heater tap, we move the bracket that secures the rod to the drive. Next, we install the new product with all gaskets in the reverse order. It would be better to combine all known information into a single post!
Now you don’t need to run all over the Internet and look for bit by bit all the information about the Nexia stove. Now EVERYTHING that I know will be displayed here! Get ready for a sea of information. It warms up the air and blows on the windows from the passenger compartment.
The air temperature increases due to the exchange of heat between the walls of the radiator and the heated antifreeze that comes from the engine. The supercharger is an electric motor with rotating blades.
Changing the rotation speed allows you to regulate the flow of air coming from the stove, making it more or less intense. It allows the driver to regulate the operation of the supercharger. The damper controls all air flows passing through the radiator, allowing you to change the temperature in the cabin.
The device is located in the general structure of the stove. This unit is a plastic lever that controls the air flow.
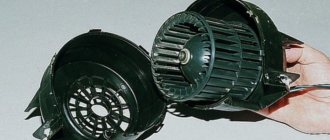
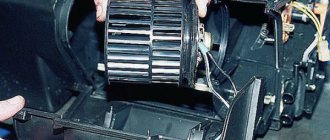
During operation, it opens or closes the heat pipe of the radiator and directs air flows to different areas of the cabin - blowing glass, foot area, rear, etc. This feature is useful if the driver wants to reduce the air temperature in the cabin by several degrees without turning off the heater. Heater motor The electric heater motor is installed behind the stove radiator. This compact motor rotates a plastic impeller, creating a continuous flow of air through the radiator tubes.
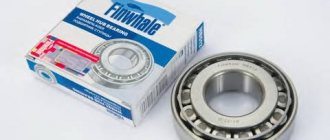
The motor housing is metal, inside there is a rotor with copper winding and a central shaft on ball bearings. Engine catalog number - SB Cost - from rubles. It is this device that is responsible for opening and closing the external air intake damper and the warm air recirculation dampers in the cabin.
Device catalog number - ER Clogging of the furnace radiator The heater radiator, like any other part, becomes unusable over time. We take out the radio and disconnect the wires.
We take out the stove control unit by releasing the latches.
We take out the stove control unit. Unscrew the screws and remove the center console. Remove the plastic sides of the console.
Daewoo Nexia is one of the possible stove malfunctions!
Unscrew and remove the mounting frame for the radio and heater control unit. We remove the plastic casing of the stove and gain access to the radiator.
Reply Andrey, I have the same problem, I disassembled the torpedo to the radiator, it turned out that hot air was blowing through the radiator, and cold air was blowing nearby, so they mixed and it turned out... Vova Ministry of Emergency Situations Hello everyone, Nexia g 1.6 16V, in winter it’s just cold.
What to do, I flushed the system and filled it with antifreeze! I placed a foam gasket between the drain outlet for the air conditioner evaporator and the reservoir of already warm air after the radiator... Anatoly A. Volume for a 16-valve one and a half... Alexey Good afternoon.
Source
Replacing the VAZ 2114 stove tap with your own hands (step by step)
Work is performed on a cold engine:
- Unscrew the side panel of the center instrument panel on the passenger side or remove the panel completely.
- Place rags under the faucet and the passenger's feet.
- Open the hood and unscrew the clamps of the heater outlet and inlet hoses, remove the pipes from the faucet and drain the liquid into an empty container.
- Move into the cabin and use a Phillips screwdriver to unscrew the fastening clamps of the heater radiator pipes to the faucet. Remove them and place a container to drain the coolant.
- Using pliers, remove the crane lever rod bracket and remove it from the hole in the lever.
- Then move under the hood again and unscrew the two fastenings of the faucet to the shield.
- Move into the cabin and remove the faucet.
- Install the new faucet in its place.
- From the engine compartment, secure it with two nuts. It is recommended to pre-lubricate them with anticorrosive agent.
- Move into the cabin, open the faucet completely and tighten the bracket.
- Place the pipes on the engine compartment and passenger compartment sides and secure them well.
- Fill with coolant if drained completely. Or unscrew the nipple on the throttle assembly and pour liquid into the tube until it is full.
- Replace the pipe, start the engine, warm it up, tighten the clamps of the faucet pipes and turn on the heater.