How to drain condensate from a gas reducer? Correct sequence of actions
What is the possible reason? It may be quite trivial, and do not rush to get scared right away.
Before you imagine terrible horrors with the upcoming engine overhaul and similar headaches, remember the instructions that were given when installing gas equipment. Surely the masters mentioned the features of its regular maintenance. Do you regularly check the oil level? Condensate drainage should become exactly the same automatic and regular.
How to drain condensate from a gas reducer
, everyone who decides to install gas equipment will have to find out. Moreover, preferably, immediately after installation of the system. And don’t be shy about asking to poke your finger into the required plug, so that you don’t have to flip through the equipment passport afterwards, wondering where the required hole is located.
- The procedure itself is extremely simple and does not require any additional tools. The only thing worth taking care of is unnecessary, waste containers (most often they cut off half a plastic bottle) and rags, which you also don’t mind throwing away: condensation stinks unspeakably, and even eats into everything. If it leaks onto the garage floor, you will have to ventilate it for months;
This procedure is not performed when it is cold - the engine must be well warmed up before draining. When the desired temperature is reached, the motor turns off;
A prepared container is placed under the gearbox, and rags are placed around it just in case;
A bolt is unscrewed, a plug is on a thread, or a faucet is opened - what exactly is intended for draining depends on the equipment that was supplied to you. On most options, this is precisely a bolt, which is located on the same plane as the fittings;
- Wait for a while until it stops dripping.
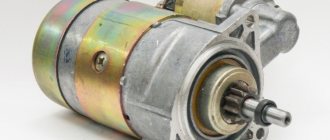
During operation of a vehicle with propane gas equipment, gas condensate is formed in the additional fuel system. To remove it, the 4th generation device provides additional filtration (vapor phase filter). In the first modifications of HBO, there is a different scheme for these purposes.
You will learn how to drain condensate from a 2nd generation gas reducer from this article.
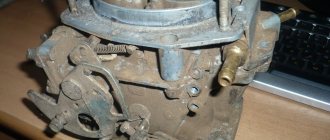
How to drain condensate from a lovato gas reducer
Hello friends, since I have an HBO installed, I decided to carry out scheduled maintenance. I always only changed the filter, but then (thanks to Drive) I came across the fact in the feed that it is necessary to drain the condensate. I changed the filter regularly, but did not drain the condensate at all. After watching the video on YouTube, I went to do it) I also bought a filter, a new one, since this is the topic.
There’s probably no point in talking about replacing the filter, there are 3 hexagons in the housing above the gearbox. Close the tap on the gas cylinder and change it for yourself.
They decided with him and installed him. I didn’t remove the process of unscrewing what and where, it’s difficult to get to, the gearboxes are different. I found a photo on the Internet of a similar gearbox that I have installed. Everything is clearly written.
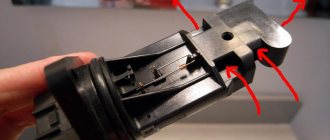
Detailed instructions for unscrewing the tap
Are you looking for information on how to quickly and safely turn off the tap on a propane-butane gas cylinder? Then read our instructions and see the step-by-step photos posted just below.
In order to cope without any difficulties with the valve, which can “sit tightly” in the neck of the cylinder, you will need to apply force. And, depending on the equipment at hand, you may need an assistant.
First you need to release the remaining gas, if any, in this cylinder. To do this, it is enough to turn the valve flywheel in the direction indicated on it. If there is still gas left inside, you will hear a characteristic hissing sound - this is the remaining liquefied gas coming out.
Having unscrewed the valve flywheel, you need to turn the cylinder over and drain the remaining gas and condensate accumulated at the bottom of the vessel into a pre-dug hole. It is advisable to protect your hands and face with gloves and a mask, respectively.
To ensure that any remaining gas does not cause any harm, it must be disposed of immediately. The best option is to burn it out. It can burn for a long time. When the fire goes out, the area can be sprinkled with bleach or bleach, which will get rid of the unpleasant odor.
Then you need to secure the cylinder body. How to do this depends entirely on your imagination and the devices at hand. For these purposes, they use welding, metal pins, a vice, a board, clamp the cylinder with the wheel of a large car, fasten it to a tree with a belt, and many other options. Therefore, choose for yourself the method of fixation that will be convenient for you.
In most cases, there are no problems with unscrewing the valve - this simple method allows you to easily unscrew it.
Step-by-step instructions for draining gas condensate
First you need to prepare a container of a suitable size (a cut-off plastic bottle will do) and a rag that you don’t mind disposing of. Before removing the liquid, it is necessary to run the car engine on gas to warm up the evaporator. It is best to do this in warm weather or in a closed box.
If we drain the Tomasetto AT 07 (Tomasetto) aka Digitronic (Digitronic) gearbox, it would be more correct to prepare, for replacement, a coarse filter for the propane-butane mixture and sealing rings for it. Then you need to close the fuel supply valve from the cylinder and exhaust the remaining gas from the system.
Without changing the filter element, the supply can not be shut off; there is no pressure in the cavity where condensate accumulates.
In the case of gearboxes such as Lovato RGV/RGE (Lovato), Atiker VR02 (Atiker), BRC AT 90 (BRS), the effects will be the same (except for the filter element). It is only worth noting that you do not need to apply excessive force when tightening the plug, it is plastic (except for the brass).
Terms of service
Normal and stable operation of gas equipment on a car is possible only with its timely maintenance (maintenance). ]GBO 1,2 and 3 generations[/anchor] announce that routine maintenance will be carried out within 10-15 thousand km. car mileage. Which includes operations such as:
- replacement of coarse filters;
- draining condensate from the gearbox;
- cleaning of electrovalves;
- checking and eliminating gas leaks;
- fuel system adjustment;
But in reality, it is often necessary to reduce the service interval based on mileage, for several reasons:
- low-quality gas fuel at gas stations (propane-butane mixture);
- low quality of spare parts, as well as their counterfeiting;
- long engine operation on gas when the car is parked (as is the case with motor oil).
If you are not sure of the absence of these reasons, it is recommended to monitor the presence and pour out the oily liquid from the evaporator every 2-3 thousand km. mileage _
In addition, it is important not to forget to remove condensation from the gearbox before preparing the car for winter use.
Safety rules when handling the cylinder
Gas cylinders are extremely dangerous. Every year, dozens and hundreds of household gas cylinders explode, destroying homes and killing people, and in most cases the reason for this is a violation of the rules of their operation.
When filling up gas legally, at a specialized substation, along with a full cylinder, you will receive a reminder on its safe transportation, storage and use. Among other things, it is prohibited to install cylinders closer than half a meter from a gas stove or a meter from a stove, heater or radiator.
You should not use a winter gas mixture with a high propane content in the summer: it will evaporate too actively, and the cylinder may swell or even burst from excess pressure - and this is with 3 mm thick steel walls.
It is also prohibited to use swollen, dented or damaged cylinders: there is no guarantee that it is sealed and will withstand gas pressure reaching 8 bar.
Connecting a gas cylinder to the stove - how to connect a gas cylinder to the stove
Connecting a gas cylinder to the stove
Not everyone will afford to build a country mansion with all the amenities. Some of the population are content with small plots with wooden houses, where they come on weekends. There is no point in running a gas pipe to the house, and it is expensive, but connecting a gas cylinder to the stove will come in handy. And it’s inexpensive, and you can do it yourself.
Do you know what needs to be done to properly connect the cylinder to the stove? If not, then after reading this article to the end, it will not be difficult for you to make the connection yourself.
What you need to connect
- Gas stove. She must not be quite old. Be sure to check the integrity of connections and burners.
- Gas reducer (30 mbar). Experts consider gearboxes with threaded connections and brass nuts to be the most reliable.
- Gas hose. It should be 1.5 meters longer. For example, if there are 5 meters from the installation site of the slab to the cylinder, then you will need 6.5 m; this is necessary so that the hose is not connected under tension, so it can crack faster.
- Fittings and clamps for connections. This will be needed if you decide to use an old stove; new models already come with such adapters.
- The tool must be copper-plated or brass-plated. Safety rules provide for working with gas connections only with such keys; they do not give a spark in case of accidental failure.
- As an additional sealing material, you will need flax or fum tape.
- Soap solution.
Note! A special gas hose must be used for connection. When purchasing in a store, explain this to the seller
Under no circumstances should you use an old hose that was lying in your basement; even if it looks good, it may have internal cracks and the consequences will be disastrous.
Work order
We will assume that the stove in the kitchen is already installed. The gas cylinder must be placed in another room or at least 1 meter away from the stove. The place for the cylinder must be clean and prepared. Build a special mount from wooden slats.
Note! In case of using a shielded cylinder, the distance can be reduced to 0.5 m
Connection to plate
First you need to connect the hose to the stove. This is a completely safe job. We screw it onto the hose of the stove, tighten it with a clamp and, screwing the fum tape onto the inlet fitting of the stove, wrap it until it stops.
Connection to cylinder
First you need to install a reducer on the cylinder. It is screwed onto a special adapter with the accompanying wrapping of fum tape.
The entire connection process must take place with a thorough inspection of each part:
- There should be no contamination on the gearbox and the cylinder, especially at the threaded connections.
- The hose deserves special attention. In addition to the appropriate length, it should not have cracks or narrowing, and do not allow it to twist. It is also better to replace it after the expiration date.
- There should be no rust on the clamps during operation; this can lead to their rupture. If corrosion appears, it is better to immediately replace them or purchase specialized ones with anti-corrosion treatment.
Check after connection
When you have completed all the work, you need to check the integrity of the connections
Carefully open the gas cylinder valve. You will hear a characteristic hissing sound
This means that the reducer is working properly and gas has begun to flow into the stove.
Then you need to dilute a little soap with water, it is advisable to add more soap so that the foam is thick. Apply foam with a soft sponge to each connection; if small bubbles appear, this indicates that the connection is not reliable and needs to be tightened.
If no shortcomings are observed, then you have done everything correctly and you can turn on the stove and cook.
The main safety rules are prescribed in SNiP 42-01-2002. And if you have carried out such work, then your knowledge will help readers connect the equipment correctly.
If you are concerned about your own safety and the safety of your home, choose the right gas cylinder. And this story will help you with this.
https://www.stroitelstvosovety.ru
Transportation rules
- Transportation is carried out in specially equipped vehicles marked with warning signs.
- A special permit is issued for the transportation of cylinders with LPG and technical gases.
- Each gas cylinder is designated by its own color: household propane-butane mixture – red, oxygen – blue, acetylene – white, carbon dioxide/nitrogen – black with the designation of the chemical element/compound, argon – gray, helium – brown.
- It is strictly prohibited to transport containers with different gases together, as well as empty/consumed ones together with full ones.
- When transported in a car, they are laid horizontally no higher than the sides, in no more than three rows; in a container - standing, and it is permissible to transport tanks with oxygen and acetylene together.
- Propane-butane containers can be transported standing up without containers, with a spacer between them and a reliable fence.
When loading/unloading gas cylinders, it is prohibited:
- To work alone, there must be at least two loaders.
- Work in overalls and gloves contaminated with fuels and lubricants and vegetable oils.
- Load oxygen tanks into a car body that has spills/stains of fuel and lubricants, as well as debris and foreign objects.
- It is strictly unacceptable to carry containers with gases on your arms/shoulders, roll the cylinders, or move them, dropping them, or hitting them against each other.
- Hold and feed the container with the shut-off valve down.
- Load/unload tanks without protective caps.
Inside buildings, steel containers with any gases must be transported on a stretcher with reliable fastening or a special trolley with wheels with rubber tires; In this case, it is permissible to transport two cylinders together - with oxygen and acetylene for gas welding work.
Natural gas and its benefits
The very name natural speaks about the origin of the gas. It belongs to minerals and consists of the following components:
- methane (70 - 98%);
- heavy hydrocarbons (butane, propane, ethane);
- nitrogen;
- hydrogen;
- helium;
- carbon dioxide;
- hydrogen sulfide.
It is formed in the bowels of the earth in a reservoir state under pressure. It is produced using wells, using the factor of pressure difference in the formation and special equipment that allows collecting the production product. Natural gas is transported through pipelines, using gas carriers, also called tankers, and in railway tanks. A gas tanker is a vehicle that allows the transportation of the extracted product in a liquefied state.
The advantages of natural gas include:
- high calorific value;
- ease of transportation;
- small amount of harmful emissions;
- automation of the combustion process.
It is used for space heating, water heating, cooking in private properties, apartment buildings, public institutions, for heating offices and commercial premises, as fuel for cars, in technological processes for manufacturing products for various purposes.
How to drain condensate from a gas reducer?
It is best to clarify this point immediately. After you install LPG on your car, the installer should tell you in detail how and when to perform this procedure.
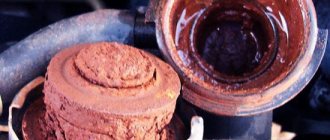
In order to drain condensate from the gas reducer , you need to prepare a hexagon (at “5” or “6”), a container into which you will drain the condensate, it can be a plastic glass or bottle. You will also need rags and gloves. The smell of this condensate is very strong and very persistent, so you need to do everything carefully so as not to spill a single drop.
Note: When draining condensate, it is recommended to replace the gas filter.
1. Before draining the condensate , it is necessary to warm up the engine to operating temperature.
2. Next, you need to install a container and rags under the gearbox itself (for insurance).
3. Afterwards, you need to unscrew the bolt or faucet; there may also be a plug, in other words, a drain hole specially designed for draining.
4. When the condensation starts to flow, wait until all the “smelly stuff” has drained out and tighten the bolt back. In total, approximately 30 ml of condensate should drain, it all depends on how often you drain the condensate from the gas reducer.
5. After carrying out such a procedure, unfortunately, not all condensate is drained. In order to remove condensation completely, you need to use a little trick. The principle is as follows: a hose of the required diameter (from the medical “system”) is put on the medical syringe. Then the hose is installed in the drain hole and the syringe plunger draws out any remaining condensate.
If you notice that there is a lot of condensate, and you regularly drain it, you should change the gas station; most likely, the quality of gas at this gas station leaves much to be desired.
Source
How to drain condensate from a gas reducer?
After switching from gasoline to gas, many motorists mistakenly believe that installing LPG is all that is required of them in order to forget about gasoline prices and start really saving. However, it is not. In fact, in order for everything to work properly, it is necessary to regularly monitor the condition of gas equipment and timely replace certain elements.
One of the most important “commandments” when operating gas equipment is the timely replacement of filters and, of course, the timely draining of condensate from the gas reducer. Unfortunately, not everyone knows about this, and some know, but simply ignore this rule.
In this article I will talk about why to drain condensate, when it is necessary to do this work, and also how to do it correctly.
In fact, this important procedure should be performed regularly or after a certain mileage. If you ignore it, then very soon you may have troubles in the form of a decrease in engine power, tripping, or other unpleasant phenomena associated with unstable operation of the power unit.
The most important thing in this matter is not to fall into despair, and not to come up with different versions as to why the engine began to behave this way, that is, in other words, don’t overwhelm yourself. The first step is to check what may be related to the problem, and it is very easy to check. Next, you should remember the rules for operating gas equipment, which the installers should have told you.
Those who installed gas equipment on your car could not help but tell you that you will have to regularly drain the condensate This nuance is very important, so it is unlikely that you were not told about it; most likely, you yourself forgot about it, without attaching much importance to it. This, by the way, also happens, for example, it is also recommended to check the oil in the engine or gearbox regularly, almost every day before leaving, but does anyone do this? Only a few, hardly.
Draining condensate from the gas reducer , as well as checking the oil level, should become a regular occurrence, which you will make it a rule to do once a month or once every two months. In principle, opinions on how often it is necessary to drain condensate from the gearbox often differ; some say that at least once a month, others say that it is enough to drain condensate every 10 thousand km.
Draining condensate from the LPG reducer
During operation of a vehicle with propane gas equipment, gas condensate is formed in the additional fuel system. To remove it, the 4th generation device provides additional filtration (vapor phase filter). In the first modifications of HBO, there is a different scheme for these purposes.
You will learn how to drain condensate from a 2nd generation gas reducer from this article.