Purpose
A lambda probe (oxygen sensor) is necessary for the normal functioning of ignition systems and the preparation of a combustible mixture. Measuring the oxygen content in the exhaust gases passing through the exhaust tract, it transmits the received data to the ECU. Pre-installed software processes the received information and optimizes the composition of the combustible mixture, as well as the ignition timing, which allows:
- Develop maximum engine power in all operating modes.
- Reduce fuel consumption.
- Reduce the content of harmful substances in exhaust gases.
This becomes possible when a stoichiometric combustible mixture containing fuel and oxygen necessary for its combustion in certain proportions enters the cylinders. Measured in kilograms, the optimal ratio of air to gasoline is 14.7:1, and in calculations is denoted by the letter λ (lambda), borrowed from the Greek alphabet. Hence the name - lambda probe.
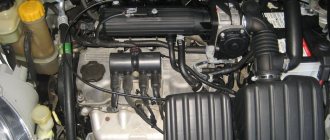
Checking the lambda probe with a tester
We take an electronic constant voltage millivoltmeter and connect it in parallel with the LZ (“+” “-” to the LZ, - to ground), and the lambda probe must be connected to the controller.
When the engine warms up (5-10 minutes), then you need to look at the voltmeter needle. It should periodically move between 0.2 and 0.8 V (i.e. 200 and 800 mV, and if less than 8 cycles occur in 10 seconds, it’s time to change the LZ. Also replace if the voltage “stands” at 0 .45 V.
When the voltage is always 0.2 or 0.9 V, then there is something wrong with the injection - the mixture is too lean or too rich. Since the oxygen sensor voltage should change all the time and jump from ≈0.2 to 0.9V.
There is another quick way to check the lambda probe . You should do this:
Carefully pierce the positive contact of the tester (black lambda wire), the other contact to ground. With the engine running, the readings should range from 0.1 to 0.9V. Constant readings (for example, 0.2 all the time) or readings that go beyond this range, or fluctuations with a smaller amplitude indicate a malfunction of the probe.
- all the time 0.1 - little oxygen
- all the time 0.9 - a lot of oxygen
- The probe is fine, the problem is something else.
If you have the time and desire to bother, you can conduct several tests on a rich and lean mixture and additionally check the lambda probe sensor .
- Disconnect the oxygen sensor from the block and connect it to a digital voltmeter. Start the car and, by pressing the gas pedal, increase the engine speed to 2500 rpm. Using a device for enriching the fuel mixture, reduce the speed to 200 per minute.
- If your vehicle is equipped with an electronically controlled fuel system, remove the vacuum tube from the fuel pressure regulator. Look at the voltmeter reading. If the instrument needle approaches the 0.9 V mark, it means the lambda probe is in working condition. A malfunction of the sensor is indicated by the lack of response from the voltmeter, and its readings are less than 0.8 V.
- Do a lean mixture test. To do this, take a vacuum tube and provoke an air leak. If the oxygen sensor is working properly, the digital voltmeter reading will be 0.2 V or lower.
- Check the operation of the lambda probe in dynamics. To do this, connect the sensor to the connector of the fuel supply system, and install a voltmeter parallel to it. Increase engine speed to 1500 rpm. The voltmeter readings with a working sensor should be at the level of 0.5 V. Another value indicates a failure of the lambda probe.
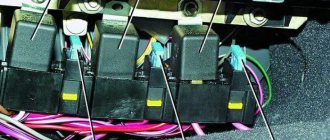
Checking the voltage in the heating circuit
To check the presence of voltage in the circuit, you need a voltmeter. We turn on the ignition and connect it with probes to the heater wires (you cannot disconnect the connector, it is better to pierce it with sharp needles). Their voltage should be equal to what the battery produces when the engine is not running (about 12V).
If there is no plus, you need to go through the battery-fuse-sensor circuit, since it always goes directly, but the minus comes from the ECU, so if there is no minus, look at the circuit to the block.
Checking the lambda probe heater
In addition to measuring voltages with a multimeter, you can also measure resistances to check the serviceability of the heater (two white wires), but you will need to switch the tester to Ohms. The documentation for a particular sensor must indicate the nominal resistance (usually it is about 2-10 Ohms), your task is only to check it and draw a conclusion. The video shows this method:
Device
Structurally, the VAZ-2110 oxygen sensor is designed in the same way as similar devices installed on other cars. It consists of:
- Housings with a protective tip in which slots are made.
- Two electrodes, one of which (internal) is made of zirconium, and the other (external) is made of platinum.
- Wires with a connector with which the lambda probe is connected to the vehicle's on-board electrical wiring.
The principle of operation of the sensor is based on the potential difference between electrodes heated to 300 - 400 °C. The higher the difference, the less oxygen is contained in the exhaust gases.
Repair
Diagnostics
The VAZ 2110 lambda probe has four outputs:
Pads for VAZ 21102
Checking the oxygen sensor heater comes down to a basic check of the heater circuit:
- the presence of voltage at the power contact of the vehicle’s on-board network (if there is no voltage, check the entire circuit);
- presence of continuity of the negative contact circuit.
In the future, we are exclusively interested in the signal wire, or rather, the change in voltage passing along it from the sensor to the ECU during various engine operating modes. You can check the operation of the sensor in two ways:
- Using a voltmeter;
- Using an oscilloscope (motor tester).
Since this instruction is intended for the common man who simply cannot have professional equipment in principle, we will diagnose the sensor using a voltmeter.
Method one: reading trouble codes
In order to read the fault codes located in the controller’s memory, it is necessary to either connect special diagnostic equipment to the diagnostic block (located on the left side under the instrument panel console) (too simple - not for us), or close contact “B” to ground, which is so The same can be done by connecting contacts “A” and “B”.
Diagnostic block VAZ 2110
- “A” - contact connected to the vehicle ground;
- “B”—controller signal contact;
- “G” — control of the VAZ fuel pump;
- “M” is a contact for issuing information (serial data).
After these contacts are closed, turn the ignition key to position “III” (do not start the engine), observe the “CHECK” indicator, which should flash the number 12:
- Flash;
- 1-2 second pause;
- Flash;
- Flash;
- Long pause of 2-3 seconds;
- Double repetition of the above cycle.
Reading fault code number “12”
Attention! This code indicates that the self-diagnosis program is running, otherwise this program does not work.
After this, the program displays codes of existing faults in a triple cycle (each code three times), in the absence of these, code “12” continues to be displayed constantly.
Attention! When the diagnosis is completed, these contacts are allowed to be opened only after the ignition is turned off, after ten seconds.
Erasing fault codes from the ECU memory in order to make sure that the fault has been eliminated occurs by turning off the controller's power for at least ten seconds. The power is turned off either by disconnecting the negative terminal from the battery or by removing the controller fuse.
Attention! Operations with power supply to the controller must be carried out strictly with the ignition off!
Method two: checking changes in LP parameters
So, let's get to the “delicious” part:
- We connect the negative probe of the voltmeter to the car body;
- We connect the positive probe to the signal wire of the lambda probe;
- Warm up the engine to operating temperature;
- We warm up the sensor itself by setting the engine speed to 2500 - 3000 rpm for three minutes.
We observe the sensor:
- It must turn on, that is, the voltage must be in the range of 0.8 - 1.0 volts and turn on at a frequency of 8 - 10 times every ten seconds;
- If the voltmeter shows a value of 0.45 volts and it does not change, then the sensor does not work - replace it;
- When the damper is opened sharply, the voltage should jump to about one volt, and when closed sharply, it should drop to almost zero.
Method three: elimination method
Of course, all of the above methods are good, but without a clear understanding of the operation of the system, there is a high probability of making a mistake when diagnosing, as well as understanding the principle of wiring the block on a VAZ 21102. For example, the “loss” of code P 0131 (low level of the LZ signal) does not mean that the sensor began to “mope”, perhaps it really “sees” the “lean” mixture, because it only “monitors” the system - no more and no less. Therefore, there are checks that exclude these errors:
Location
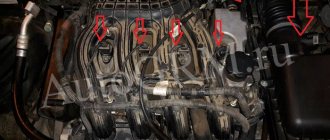
During production, changes were repeatedly made to the design of the VAZ-2110. Therefore, depending on the specific modification of the car, the lambda probe may be located in different places:
- In the upper part of the exhaust pipe, near the resonator (on models of early years of production).
- On the exhaust manifold, in front of the catalytic converter (on new 1.6 liter engines).
The latest models of cars, equipped with sixteen-valve engines, were equipped with two oxygen sensors, one of which is located in front of the catalytic converter, and the other behind it.
Symptoms of a problem
The main culprit for the failure of the lambda probe is low-quality fuel, due to which carbon deposits form on the electrodes, causing overheating of the contacts. Wire breaks occur less frequently. Most often, the driver finds out about a breakdown when the CHECK ENGINE lamp lights up, and computer diagnostics issues a fault code P0131. But it also happens that the ECU, for some reason, does not see the problem. In this case, the driver may suspect something is wrong, based on the following characteristic signs:
- Increased fuel consumption.
- Deterioration of the traction characteristics of the internal combustion engine.
- Unstable operation of the motor (vibrations, dips, floating speed).
If suspicion arises, it is necessary to first carry out a visual inspection. If there are no mechanical damages, control measurements should be taken.
Examination
To detect faults, it is best to visit a service center and seek help from diagnostic mechanics who have special equipment at their disposal. If this is not possible, you can arm yourself with a multimeter and perform a series of control checks. To do this you will have to:
- Attach thin needles to the tips of the multimeter. They are necessary in order to take measurements without disconnecting the sensor from the electrical wiring.
- Warm up the engine to operating temperature. Only in this case will the lambda probe begin to function, and the results obtained will be correct.
- With the ignition on, measure the voltage between the signal (black) wire and ground (gray wire). On the connector these are terminals 1 and 2. It is normal if you get a reading of 0.45 - 0.50 volts.
- Measure the resistance between the white wires (terminals 3 and 4). It should be in the range from 2 to 10 ohms.
- Start the engine and measure the voltage between the signal wire and ground again. It should change cyclically, every 1.5 - 2 seconds, within 0.1 - 0.9 volts.
If at least one of the indicators is outside the specified limits, the lambda probe is faulty and should be replaced. Measurements taken with the connector disconnected from the electrical wiring may be incorrect.
Instrument testing
For such work, you can use a tester, oscilloscope or digital voltmeter. Considering the features of these devices, a voltmeter would be the optimal solution.
Examination
The check sequence will be as follows:
- Start the engine and let the car warm up.
- Next, we find the element we are interested in. If there are soot deposits or other external signs of a malfunction, there is no point in carrying out further testing with instruments. And so it is clear that it is out of order and needs to be replaced.
- Also check the condition of the wiring, the presence or absence of mechanical damage on the device.
- If everything looks fine, unplug the connector and connect a voltmeter.
- Now you can start the engine.
- Press the gas pedal in neutral to reach the 2500 rpm mark. After this, release the pedal.
- Remove the vacuum tube from the fuel pressure regulator.
- We check the oxygen sensor for functionality. To do this, look at what the voltmeter shows. If the reading is 0.8 volts or less, the probe is not working.
- It would be a good idea to check the device for a lean mixture. To do this, you need to turn on the air intake using a vacuum tube.
- If the voltmeter reads 0.2 W or less, the oxygen sensor is working normally. Deviation from these indicators indicates a breakdown of the device. Therefore, it needs to be replaced.
Article on the topic: Engine oil volume on a VAZ 2109
Price
Even on a VAZ-2110 of the same year, there are oxygen sensors not only with different catalog numbers, but also from different manufacturers. Most often this is Lada 2112-3850010-20. Prices for this part in stores range from 2200 – 3200 rubles. But you can also choose a replacement from a reputable brand. Among the possible options:
- Bosch 0 258 006 537 (2300 – 2700 r).
- NGK 1628 (2500 – 2800 r).
- Era 570023 (1700 – 2000 rubles).
All these components will normally fulfill their purpose.
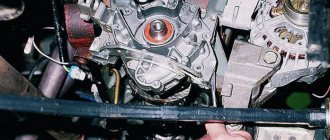
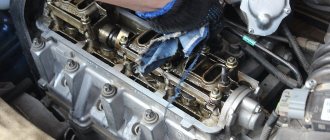
Replacement
To remove/install the lambda probe, you must first warm up the engine to operating temperature and then turn it off. It is very difficult to unscrew the part when it is cold. After reaching the desired temperature, be careful not to get burned:
- Disconnect the connector.
- Armed with an open-end or socket wrench, first move the sensor from its place, and then unscrew it and carefully remove it from the socket.
- Make sure the socket is not damaged. Sometimes scale mounds form in it, which can damage the new part during installation. If there are any, they will have to be removed with a file.
- Install the new sensor and tighten it properly.
- Connect the connector to the electrical wiring.
If you do everything correctly, no problems should arise.
Restoring the performance of the lambda probe by cleaning
In some cases, the oxygen sensor stops working only because the holes in the protective screen and the ceramic tip itself are covered with soot. To restore the functionality of the part, it is necessary to clean the soot from the lubricating zone, but when performing such work, you must follow certain rules
It is important not to use for cleaning:
- metal brushes;
- sandpaper;
- files;
- other objects that can damage the ceramic element.
The best method to get rid of contaminants is to soak the ceramics of the lambda probe in a solution of orthophosphoric acid, but to do this, you must first carefully saw off the protective cap. If acid cannot be found, you can use a rust converter, which is sold in stores selling auto chemicals. Of course, to clean the part from soot deposits, the sensor must be removed.
To soak a ceramic tip, it must be placed in liquid for 15-20 minutes; the soot should disappear from the surface on its own. If the deposits are not completely removed, they can be cleaned with a soft toothbrush. After the procedure, you need to secure the protective screen using camp welding. When it is not possible to restore the lambda's functionality, there is only one option left - to buy a new oxygen sensor.