The car owner of a "tens" may be taken by surprise by a breakdown of the clutch system. This means that there will be unplanned expenses for spare parts and auto repair shop services. Replacing a VAZ 2110 clutch is not cheap, from 3,500 to 5,000 rubles, not counting the cost of spare parts. However, there is an option to save a significant part of your personal savings and replace worn-out parts with new ones - yourself. Let's face it, this is not an easy procedure. But, following the instructions, it is possible to deftly manage it in one day.
On a note! Do not rush into a global repair, since in some cases it is too early to change the clutch on a VAZ 2110. It is possible to eliminate the formation of a defect by adjustment. On the top of the gearbox housing there is a drive cable mounting bracket with two nuts. By tightening one of the nuts, it is possible to install new pedal travel. After this, the mechanism will serve some more.
Preparatory stage
Content
Before changing the clutch on a VAZ 2110, you need to prepare a place for repairs and tools. For this process, the most suitable solutions are: a car lift or an inspection hole. If there are no such conditions, due to a hopeless situation, it is possible to replace the clutch with a 2110 in “Spartan conditions”. It is enough to find a flat surface area in a garage box, a parking space or in the yard.
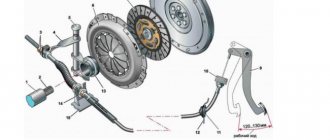
Clutch diagram for VAZ 2110: 1 - release bearing guide sleeve; 2 — gearbox input shaft; 3 — cable lead; 4 — clutch release fork; 5 — fork axle bushing; 6 — pressure disk assembly (basket); 7 — driven disk; 8 - flywheel; 9 — clutch pedal; 10 — mechanism for automatic adjustment of cable length; 13 — clutch release clutch (release bearing); 14 — lower tip of the cable sheath; 15 — bracket installed on the gearbox housing; A - the displacement distance of the leash, checked when installing the cable (27 mm).
Also, for repairs you will need:
- locksmith set with open-end wrenches and sockets up to 22 mm;
- a jack and several short boards (wooden blocks);
- container for possible draining of transmission oil from the gearbox;
- centering shaft (mandrel).
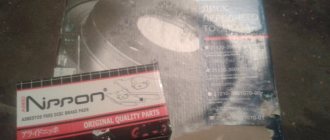
As for the clutch itself, it is sold in sets (3 in one, 2 in one) and parts separately.
The system includes 3 replaceable elements:
- release bearing;
- clutch disc;
- basket.
It is more practical for a car owner to ask in advance how much new clutch parts will cost to replace a VAZ 2110. This will help prepare the necessary budget. The price of spare parts varies and depends on the manufacturer. Among manufacturers of quality parts, the leaders are: Sachs, Luk, Valeo and Krafttech. These spare parts are guaranteed to fit the vehicle and have a long service life. Poor quality parts may not fit at all or may fail in the first days after repair.
How it works and what it consists of
The VAZ 2110 has a single-plate clutch with a central pressure spring. The drive operates via a cable. The casing is attached simultaneously to the pressure plate and flywheel. The design also provides for a driven disk.
Device diagram
The factory clutch system for the VAZ 2110 is called VIS. Many people complain about it because it doesn’t work very effectively, although others are sure that there is no more worthy alternative for the “ten”. So opinions differ on this matter.
The main components of the system include:
- casing;
- Crankcase with a cover and supporting planes with which the unit is attached to the frame;
- Driven and pressure plate;
- Release bearing. It disengages the clutch;
- Flywheel;
- Shutdown plug;
- The cable wire that goes to the pedal (far left in the car interior).
Replacing the clutch of a VAZ 2110
After the conditions and tools are prepared, you can begin to work. First, remove the front left wheel and securely fix the car. Please note that there are two repair options: with complete dismantling of the gearbox and without it. In our case, we will talk about how to replace the clutch on a VAZ 2110 without removing the box.
The process is made easier by the fact that you don’t have to drain the transmission oil, disconnect the drive axles, and remove the heavy unit from under the car. The smallest set of operations saves time. However, to be on the safe side, you need to have a container ready where you can drain the oil from the gearbox in an emergency.
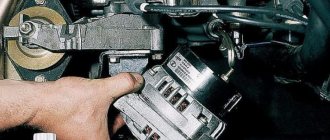
After fixing the car, open the hood, disconnect the battery and remove it completely. For easy understanding, the entire further process of replacing the clutch with your own hands on a VAZ 2110 will be described in the form of step-by-step instructions:
- Unscrew the two ball joint bolts (the wheel has already been removed);
- go to the engine compartment and remove the connector for the mass air flow sensor;
- disconnect the air intake corrugation;
- remove the air filter housing;
- disconnect the clutch cable from the gearbox by unscrewing the two fastening nuts;
- unscrew the starter bolt;
- Unscrew the gearbox bolt, located slightly to the right of the starter;
- we find another upper bolt securing the gearbox to the engine and unscrew it;
- disconnect the speed sensor plug;
- go to the bottom and dismantle the longitudinal rod along with the cup (crab);
- we find the lower starter bolt and 2 gearbox mounting bolts, unscrew them;
- remove the torque mount;
- unscrew the gearbox shift lever;
- place a jack under the engine through a wooden spacer (on the edge of the pallet);
- unscrew the nuts of the rear engine mount;
- lower the engine with a jack (it will fall to one side);
- carefully separate the engine and gearbox;
- We carefully lower the disconnected box down until it hangs on the drive axles.
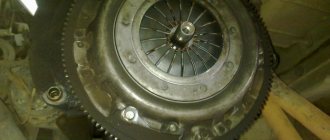
The first stage of replacing the clutch on a VAZ 2110 without removing the box has been completed. As a result of dismantling, there was access to the clutch basket on the engine and the release bearing on the gearbox. Unscrew the bolts securing the basket to the flywheel and remove it. Carefully remove the release bearing from the input shaft.
After a careful examination of the removed parts, it becomes clear whether it is worth changing the entire clutch pack or whether you can limit yourself to changing the disc and bearing. It is worth noting that the replacement of the VAZ 2110 clutch basket occurs every 80 - 150 thousand km, depending on the operating mode. The disc and bearing wear out more often.
After purchasing new spare parts, we proceed to the second part of the repair and do the following:
- install the basket with the disk in place and tighten the fastening bolts;
- insert the centering shaft (mandrel) into the central hole of the crankshaft;
- then tighten the bolts tightly and remove the mandrel. It should fit freely into the hole, simulating the gearbox input shaft.
- Next, install the release bearing on the box;
- carefully lift the gearbox and connect it to the engine, slightly rotating the drive axis;
- Once the box is in place, you can fasten it with bolts and install the dismantled parts in the reverse order.
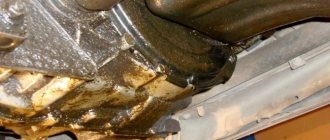
On a note! It is advisable not to leave the box hanging for a long time (more than 2 days). The fact is that the drive seals are under heavy load and they can be partially deformed. The formation of damage will lead to oil dripping from the transmission during further operation.
Popular problems and their solutions
There are several characteristic faults that occur on the VAZ 2110. Let's try to understand the reasons for their occurrence, and also consider ways to solve the problem.
- The clutch drives. The reasons may be: The pedal has insufficient travel, the tension is too tight. To eliminate this, you need to adjust the drive;
- The driven disk is deformed. Only replacement will help here;
- The driven disc hub sometimes gets stuck. If so, try washing it and lubricating the input shaft splines. If the element or the shaft itself is worn out, then replace them;
- The friction linings are broken and the rivets are loose. The best solution is a complete replacement of the casing, which includes a spring and a disk;
- The pressure plate is warped or warped. Replace the linings, but first make sure that there are no deviations in the end runout of the disk;
- There were problems with the cable. Pull it up. If there is no result, replace with a new one.
- The friction linings on the driven disk often burn or wear out. There is only one solution - replacement;
- Oil has reached the surface. We have already described how to solve the problem above;
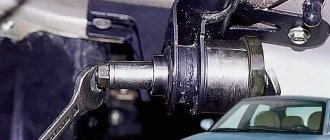
Clutch adjustment on a VAZ 2110 after replacement
Setting up the transmission system will help to complete the repair efficiently. To do this, loosen the adjusting nuts on the cable. The clutch pedal will rise. We take a ruler and measure the distance from the front wall to the pedal in the cabin. The working stroke, regulated by the operating instructions, should be 120 mm (±5mm).
Press the pedal several times. Then, tighten the adjusting nut, simultaneously measuring the distance between the pedal and the wall. As soon as the desired value of 12 cm is reached, tighten the nut, holding the lock nut with another wrench. A similar adjustment operation, after replacing the clutch with your own hands, can be performed on a VAZ 2110 with a 16-valve engine.
Getting ready for replacement
If during operation at least one element of the mechanism has failed, be it the clutch basket, release bearing or driven pulley, then it is better not to save money and replace the device completely. This is also worth taking into account when changing from one imported mechanism to another, since the differences can be serious.
VAZ 2110 car
Which clutch is better?
This question is asked by every VAZ 2110 owner when he is faced with the need to choose a mechanism. Below are the results of reviews of devices by experts in the Russian automotive market. It is also worth noting that during the research process, the most popular manufacturers among domestic motorists were considered.
- Krafttek. The kit does not include a bearing, so you will have to buy it additionally, and there is also no quality mark. The basket is equipped with 18 petals and the driven shaft (Y 3200A B0206) has 4 springs. This mechanism is recommended for use in the VAZ 2110.
- German manufacturer Luke (Lamellen und Kupplungsbau). The set is complete, you don't have to buy anything else. The packaging contains the MT14 quality mark. In addition, the driven shaft is marked with markings for proper installation. The element basket also has 18 petals, and the driven shaft is equipped with 6 springs. It is also worth noting that the basket side is marked on the shaft.
- Valeo, manufacturer France. A complete set, you don’t have to buy anything extra. Moreover, this clutch comes with a lubricating fluid for the mechanism, as well as a CD with installation instructions. There are 18 petals in the basket.
- Russian. The kit does not include driven and pressure pulleys, as well as a release bearing. Nevertheless, the product received the AYA70 quality mark. There are 12 petals in the basket, and 6 springs on the driven shaft. The product has been approved for installation in the VAZ 2110.
- Pilenga, country of origin unknown. The kit does not include a pressure pulley and a release bearing, so if you decide to replace the mechanism completely, then these components will need to be purchased. There are 18 petals in the basket. There are 8 springs on the driven shaft. There are no approval marks on the packaging.
Clutch disc at installation location
Actually, any of the clutches listed above is suitable for VAZ 2110 cars. For example, the Luke cannot produce maximum torque, so engine power will be reduced when driving. Krafttek is a fairly reliable, time-tested mechanism, although you will have to purchase some additional elements to install it.
Apparently, the best option is Valeo.
It is worth noting that this unit also has many positive reviews on the Internet from other motorists. But keep in mind that if the package for this mechanism does not contain lubricating fluid and a CD with installation instructions, then this is a fake. Having installed such a device, be prepared for the fact that it may fail after 5 thousand kilometers.
How much does a new clutch cost?
Let's consider the cost of each individual mechanism for VAZ 2110 cars.
- Kraftek. Today the price for a set of Kraft devices is 1,800 hryvnia in Ukraine and about 6 thousand rubles in Russia.
- Luke. At the moment, the cost of the original on the Ukrainian automobile market is about 1,550 hryvnia (5 thousand rubles);
- Valeo. The cost is about 1,600 hryvnia in Ukraine and approximately 5-6 thousand in Russia;
- VAZINTERSERVICE. Its cost also averages about 1,500 hryvnia on the Ukrainian car market and about 4,500 rubles on the Russian one;
- Pilenga. It is the cheapest option presented. Its price at the moment is about 700 hryvnia in Ukraine and almost 2 thousand rubles in Russia.
Cost of replacement at a service station
Depending on the region where you live, prices for installing the mechanism may vary. However, on average in Russia, installing a clutch by specialists will cost a car enthusiast at least 1,500 rubles. As a rule, the average price for installation fluctuates around 2 thousand rubles. In Moscow, prices for installing a device can range from 4 to 6 thousand rubles.
Sorry, there are no surveys available at this time.
Accordingly, in Ukraine, specialists at a service station will charge at least 500 hryvnia for installing the mechanism, but the driver should be prepared to pay a little more for a replacement. At Kyiv service stations, technicians can charge up to two thousand hryvnia for installation.
Which clutch is better to put on a VAZ 2110
Below are the most famous companies that produce clutches for the VAZ 2110, I suggest you familiarize yourself with them and make your choice.
| KraftTech KraftTech – there is no marking on the factory release bearing, but the thrust bearing is designated as X2200C; driven disk – Y 3200A B0206. Main features: four damper springs, there are 18 petals on the diaphragm spring. The box bears the designation: 2110 W3200C B2240. | Luk Luk – the kit does not include a release bearing, its marking is: SKF 500 063820; the pressure plate is branded 2 D24 120 0252 10, and the driven disk is branded 320 030810. The latter has marks for precise orientation during installation. The driven disk has six springs, the basket has 18 petals. The side is last marked. | Valeo Valeo - marking is applied only to the bearing: Valeo SNR BB 126 18S50. The kit includes a mandrel for precise installation. The spring element of the pressure plate consists of 18 petals. There is a mark on the package - 21102-21103-21108-2111-2112 826622. |
| VIS VIS - there are no marked parts, the only special sign is the approval mark - AYA70. The pressure plate spring has 12 lobes, the driven disk has 4 large and 3 small damper springs. On the box: 2110-1601180. | Pilenga Pilenga - there are no markings or designations on the parts, but on the packaging it is noted: CK-P-4005 2110. The driven disk is equipped with 4 small and 4 large damper springs. The pressure plate spring includes 18 lobes. | FINWHALE and QML FINWHALE and QML - smooth start of vehicle movement from a standstill; uniform movement of the car without jerking; the softness of the clutch pedal ensures comfortable driving and reduces driver fatigue; high safety properties make it possible to increase the service life of gearbox synchronizers and other transmission parts; predictable stable resource, reliability and durability; ease of installation, the clutch kit includes a centering mandrel and lubricant, it is possible to replace the clutch in the absence of special tools and materials, there is no need to buy them; and, finally, an excellent price-quality combination. High quality clutch kit at an affordable price. |
| Engine model | Clutch pressure plate | Driven clutch disc | Clutch release bearing clutch |
| VAZ-2101,21011, 2103,2105 | 2103-1601085 | 2107-1601130 | 2101-1601180 |
| VAZ-2106, 2121 | 2121-1601085 | 2106-1601130 | 2101-1601180 |
| VAZ-21213,21214 | 2121-1601085 | 21213-1601130 | 2101-1601180 |
| VAZ-341 (diesel) | 2121-1601085 | 21045-1601130 | 2101-1601180 |
| VAZ-2108. 21081, 21083 | 2109-1601085 | 2109-1601130 | 2110-1601180 |
| VAZ-2110, 2111 | 2110-1601085 | 2110-1601130 | 2110-1601180 |
| VAZ-2112 | 2112-1601085 | 2112-1601130 | 2110-1601180 |
| Driven clutch disc | Friction lining | Internal diameter of the lining, mm | Outer diameter of the lining, mm | Distinctive features |
| 2106-1601130 | 2106-1601138 | 130 | 200 | 12 rivets for fastening the linings, arranged in pairs |
| 2107-1601130 | 2107-1601138 | 142 | 200 | 12 rivets securing the linings |
| 2109-1601130 | 2109-1601138 | 130 | 190 | 18 rivets for fastening the linings |
| 2110-1601130 | 2110-1601138 | 140 | 200 | 18 rivets for fastening the linings |
| 2112-1601130 | 2110-1601138 | 140 | 200 | 18 rivets, two springs have white stripes |
| 21213-1601130 | 2110-1601138 | 140 | 200 | 18 rivets for fastening the linings |
| 21045-1601130 | 21045-1601138 | 140 | 200 | 16 rivets, arranged in pairs |
Signs of clutch wear
We indicated the main sign of clutch wear at the beginning of the article - disc slipping during acceleration. This symptom begins to appear in the last gears, since the mechanical resistance during acceleration at such speeds is much higher. The more the disk is worn, the lower the speed it becomes noticeable. In addition, a specific smell appears from rubbing against the basket.
Another no less accurate indicator of friction disc wear is the position of the left pedal when starting off. If the car starts to move at the moment when the left pedal is in the upper position, then most likely the mechanism will not “live” long. But this may also be due to incorrect clutch pedal adjustment.
In case of unnatural wear of the disc (fractures, cracks, chips), the car may twitch when moving away, and characteristic sounds may be heard from under the hood.
Instructions for self-replacement
Why pay if you can do all the work on changing a component of the transmission system yourself? Of course, if you do not have experience in this, then it is better to entrust this matter to specialists. But if you follow the instructions, there should be no problems with replacement.
Getting ready for replacement
- new clutch for your car;
- a set of wrenches, you will also need socket wrenches;
- screwdriver;
- crowbar;
- jack;
- bricks.
Step by step instructions
So, if you decide to change the clutch device yourself, but do not want to bother with dismantling the gearbox, then we will look at the replacement process without removing the box. Let's get started:
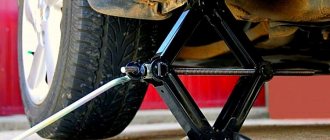
- Unscrew the screws securing the left wheel of your car and place the front part of the VAZ 2110 on a jack. To protect yourself, place bricks under the car body. Also place wheel chocks under the rear wheels.
- Next, you need to completely remove the wheel and unscrew a few mounting screws that hold the ball joint in place.
- After removing the wheels, open the hood and disconnect the battery. To do this, it will be enough to remove the negative terminal from the battery. This is done in order to prevent short circuits during repair work.
- Now you need to remove the air filter element housing. This must be done in order to gain access to the screws with which the gearbox is attached to the internal combustion engine.
- If there is engine protection, then let's start removing it. Unscrew all the screws around the perimeter of the motor protection and remove it.
- Remove the long screw that secures the anti-roll bar.
- Now let's get down to one of the most crucial moments in this work process. If you decide not to dismantle the transmission, you will still need to move the unit to the side. In order for the unit to move freely, it is necessary to remove the left mudguard. After this, unscrew all the ball joint bolts.
- Next, move the left strut behind the wheel drive. Otherwise, you will not be able to move the gearbox.
- After this you will need to disconnect two connectors from the transmission. To the right of the unit there is a plate responsible for fastening the jet thrust. By the way, the other part of the plate is located at the gear shift lever. Visually remember the location of the jet thrust fastener, otherwise you will have to sweat later to adjust the unit selector to the working position.
- With the connectors disconnected and the torque rod removed, the transmission is essentially freed from its main mounts. Now you need to disconnect it directly from the internal combustion engine. Here, use wrenches and remove several bolts (usually no more than three) and one nut.
- Now it is necessary to dismantle the rear cushion, which, in fact, attaches the gearbox to the engine. This should be done so that the engine is not released too much, so it is better to place the internal combustion engine on a jack or on supports.
- The same must be done with the gearbox, having first moved it to the required distance. Here you may need help, since it will not be easy to move the unit and place supports under it alone. In addition, everything must be done carefully to prevent mechanical damage to the unit.
- You now have access to the clutch mechanism. Replace it, and then reassemble all parts in the reverse order. Tighten the transmission-to-engine screws securely. After replacing the clutch, you need to center the disc.