Causes of failure
The most obvious factor indicating problems with the crankshaft oil seal is numerous traces of oil on and near the engine. There may be several reasons for the loss of strength of the crankshaft oil seal (CS). Here are the main ones:
- Natural physical wear of the part associated with a long service life, which has already approached 3 years or even exceeded it;
- Problems that arose during the last installation of a new SC;
- Incorrect assembly of the unit, which resulted in a violation of the tightness and integrity of the cuff;
- Presence of mechanical damage on the element;
- The use of rubber of dubious quality, which even theoretically could not last long.
The design of the “ten” provides for the presence of two crankshaft oil seals - front and rear. Their replacement is somewhat different. Therefore, they should be considered separately.
Tools and materials
What's a repair without tools?! You will need a certain set of everything you need. This set includes:
- Car keys;
- Timing belt tensioner;
- Set of screwdrivers with bits;
- Waste collection container;
- Antifreeze or high-quality graphite lubricant;
- Container with motor oil;
- Heat-resistant sealant;
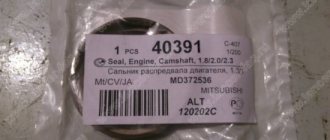
- New crankshaft seals.
Diagnostics and signs of malfunctions of VAZ 2110 oil seals
To correctly diagnose a car for oil leaks, you need to make sure that the supply system, oil filter, crankcase ventilation system are not clogged, and that the flow capacity of the hoses is not impaired. If the leaks on the engine do not disappear, the seals need to be replaced.
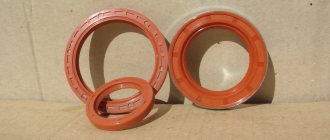
An oil seal (radial seal or shaft seal) is a rubber-metal product that ensures the sealing of rotating joints of car parts. During operation, the cuff does not touch the surface of the shaft, and the parts are sealed using special notches in the area of shaft rotation due to the vacuum they create.
A characteristic sign indicating the need to replace the oil seal is traces of oil leakage through the lip of the seal. Since the crankshaft pulley rotates quite quickly, the oil atomizes, resulting in the entire front part of the engine and the auxiliary drive belt becoming oily. Another symptom that makes it inevitable to replace the crankshaft rear oil seal is the appearance of engine oil at the junction of the cylinder block and the clutch housing.
What is needed for repair
If you decide to repair it yourself, take care of the site where you plan to inspect the machine. This could be an overpass or an inspection ditch in which it will be convenient to make the replacement.
The set of tools for work should include screwdrivers, cuffs, new oil seals, a set of heads and keys. Be sure to use sealant when making repairs. Remember that parts and consumables must be purchased only from the manufacturer, in order to avoid purchasing low-quality products or counterfeiting original parts.
Replacing the crankshaft oil seal on a VAZ 2110 16 valves
In order to remove and replace the front crankshaft oil seal of a VAZ 2110 (16 cl), you will need the same standard set of tools. All actions are also similar to the procedure for replacing the cuff on an 8-valve engine. So, the algorithm for removing the front cuff from the crankshaft is as follows:
- Remove the timing belt.
- Remove the generator belt.
- Remove the front right wheel and, if necessary, the fender liner.
- We unscrew the bolt securing the crankshaft pulleys and dismantle them.
- We replace the cuff and put everything back together in reverse order.
If you are replacing the front cuff, it makes sense to replace the back one as well. And if you do this at the same time, you will save time, since the components are replaced from one place with the removal of the wheel and, possibly, the fender liner.
How to determine the wear of oil seals on a VAZ-2110
An oil leak from under the clutch housing cover can be seen if you drive the car into an inspection hole.
The oil seal itself is a product made of a combined material. In this case, it is rubber and metal. The purpose of the oil seal is to provide a tight seal between the rotating parts of the car. In another way, the oil seal is called the shaft cuff.
Before changing oil seals, you need to check the following engine parts and systems:
- Check the oil supply system for blockages.
- Oil filter.
- Hoses for their integrity.
- Crankcase ventilation system.
Cuff edges
When you see these drips, suspicion falls on the front crankshaft oil seal.
You can verify this by removing the timing cover.
If all these systems are in working order, and oil leaks on the engine do not disappear, it means that the seals have most likely become unusable. The most characteristic sign that indicates the deterioration of the seals is traces of oil smudges on the edges of the cuff.
Since the crankshaft pulley rotates at high speed, oil gets onto the entire front part of the engine, and the accessory belt also becomes oily. Such a belt will have to be changed, since its contact with oil is unacceptable. In addition, there is another sign indicating wear of the rear oil seal. These are traces of oil on the joints of the clutch housing and cylinder block.
Work order
- First of all, we disconnect the negative terminal, as a result of which we de-energize the VAZ-2110. After this procedure, it is necessary to remove the protection of the timing belt and the car engine.
- We loosen the tense timing belt, and then simply remove it, making sure that the marks match.
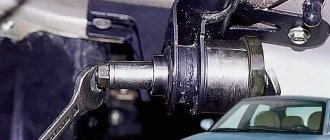
- We remove the right wheel in front of the VAZ. After completing the manipulations with the wheel, the generator drive belt is also removed, after which you must unscrew the bolt securing the crankshaft pulley.
- The engine oil is drained and the oil pump, to which the front oil seal is attached, is dismantled. We replace the cuff and carefully coat it with sealant.
- The cuff on the inside is generously coated with oil, then remove the seal and take out the front cuff of the car. We collect all this in the reverse order of the above steps.
Replacing the rear cuff will be much more difficult. The procedure for carrying out repair actions is as follows:
- We remove the negative terminal from the battery, after which it is necessary to remove the clutch basket. After these procedures, we proceed to dismantling the flywheel, and then to removing the crankcase casing.
- The rear oil seal holder is removed by unscrewing the tightened bolts securing it. We unscrew the bolts that secure the flywheel.
- While holding the latch, you need to pull out the seal. To do this, you can use a vice and inspect the fixing part of the cuff. If there are any defects in it, this part is also replaced, and then the working edge of the new cuff is placed inside the retainer and the gasket is replaced.
- The edge of the crankshaft together with the flange is generously coated with oil. We install the holder, very carefully tucking the working edge of the sealing ring onto the flange. Reassembly after repair is carried out in the reverse order. After making repairs, you need to check from time to time to see if engine oil is leaking.
How to replace the front crankshaft oil seal
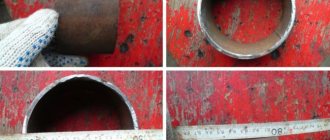
You will need : remove the timing belt, prepare two screwdrivers, a piece of pipe and a hammer.
Procedure:
- Pry off the crankshaft timing belt using two screwdrivers.
- Remove the toothed pulley from the crankshaft nose.
- Remove the oil seals by prying them up with a screwdriver and then remove them from the oil pump cover.
- Lubricate the working edge of the new oil seal with engine oil and press it in with a suitable piece of pipe.
Assembly is carried out in reverse order.
When is it time to change?
The car crankshaft has two oil seals: front and rear. They are dense elastic rings in a hard cage.
Their purpose is to prevent dust and dirt from entering the crankcase and to prevent oil leakage. The service life of the sealing rings is 150 thousand kilometers. But consumables may wear out sooner. The reason for this may be:
- poor quality product;
- work under increased loads;
- overheat;
- untimely replacement of oil and filter;
- use of oils that do not meet the recommended ones.
You can diagnose the replacement of oil seals by the oil stains that appear on the engine and gearbox. An oil leak can cause the timing belt to break, causing damage to the valves. In this case, it may be necessary not only to replace the valves, but also to overhaul the engine.
Front SC
We recommend starting with the front one, since this oil seal is the easiest to replace. Even a car owner without much experience can handle it. Once you learn how to change it, you will most likely be able to replace the rear crankshaft oil seal yourself. But it is better to act according to the circumstances.
Retrieving an element
The steps for replacing the front oil seal are as follows:
- Remove the protective cover located on the timing belt;
- Remove your engine protection. You will have to get under the bottom and unscrew the corresponding fasteners;
- Set the piston of the first cylinder to top dead center on the compression stroke;
- Slightly loosen the timing belt tension, after which it can be easily removed;
- Remove the front right wheel;
- Remove the generator drive belt, and also do not forget to remove the pulley;
- Now we dismantle the fasteners of the crankshaft pulley and take it out. Here you will need to first remove the key;
Front SC
- Be sure to drain the engine oil from the system. To do this, prepare an appropriate container in advance. If you plan to refill the oil, be sure to keep the container clean and dry;
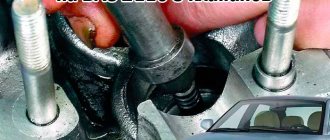
- Remove the oil pump. It is on this that the desired crankshaft oil seal is located;
- To remove the SC, you will need a flathead screwdriver;
- At the same time, check the condition of the oil filter. Replace it if necessary;
- Having dismantled the old front crankshaft oil seal, you can now install a new one in its place;
- Installation of the SC is carried out with a 27 mm nozzle or head;
- Assembly of the unit is carried out exactly in the reverse order.
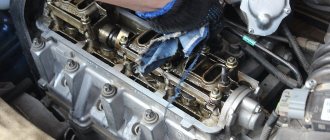
Since replacing the AC requires serious dismantling work, it is not superfluous to simultaneously check the condition of other units, replace the oil, filter or other parts.
Features of replacing oil seals on a 16 valve engine
The difference in replacing the front crankshaft oil seal on a 16-valve and 8-valve engine is only in the number of pulleys. To correctly align the timing marks, the timing marks on the rear timing belt guard must align with the timing marks on the exhaust and intake timing gear pulleys. Accordingly, when removing the crankshaft timing pulley, the TDC mark must coincide with the installation mark on the oil pump cover.
Replacing the rear crankshaft oil seal on a 16-valve VAZ 2110 engine is carried out similarly to an 8-valve engine.
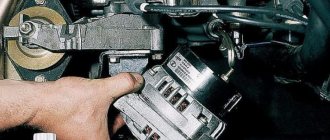
Using a 10mm wrench, unscrew the three bolts of the front timing cover. Remove the timing cover.
Rotate the lower pulley until the mark on the camshaft toothed pulley aligns with the installation tab on the rear timing cover. By removing the rubber plug in the upper part of the clutch housing, we make sure that the mark on the flywheel is located opposite the slot in the clutch housing cover.
Using a 17mm wrench, loosen the nut securing the tension roller. Turn the tension roller to a position in which the belt will be loosened as much as possible. Remove the timing belt.
Unscrew the bolt securing the generator drive pulley. Remove the generator drive pulley. Use a screwdriver to pry up the crankshaft toothed pulley and remove it from the crankshaft toe.
Removed generator and crankshaft drive pulley.
Use a screwdriver to pry up the seal and remove it from the cover.
We take a new oil seal, lubricate the working edge with engine oil and press-fit a suitable piece of pipe.
To replace the rear crankshaft oil seal, you will need to remove the gearbox and clutch. Using a 17mm socket, unscrew the six flywheel mounting bolts.
Mark the position of the flywheel relative to the crankshaft.
Having screwed a self-tapping screw into the oil seal, pry up the oil seal and remove it from the holder, helping with a screwdriver.
Using the old oil seal as a mandrel, press in the new oil seal. We install the flywheel according to the marks. Lubricate the threaded part of the bolts with sealant.
Subscribe
to our channel in
Index.Zen
Even more useful tips in a convenient format
Knock in the VAZ 2110 engine, 8 valves
How to determine the knock of the connecting rod bearing?
How to deeply press the front crankshaft oil seal
Why do you need to change crankshaft seals?
Oil leaks on the rain cover may also indicate wear of the crankshaft oil seal.
Replacing parts that have expired and do not perform the necessary functions allows you to avoid failure of other parts, which extends the overall life of the vehicle.
Replacing crankshaft oil seals does not depend on operating time or total mileage. It depends on the:
- Operating conditions.
- The age of the car.
- Driving style.
- Periods of engine maintenance and prevention.
Oil seals can be changed in a timely manner if cracks are visible on their surface and the rubber loses elasticity . Such measures will significantly extend the life of the motor.
Consequences
A worn oil seal is no longer able to hold oil, which begins to come out and settle on surfaces.
If you do not change the seals in time, this can lead to the following consequences:
- Oil consumption will increase significantly.
- Dirt will begin to accumulate under the hood, which can lead to unstable engine operation.
- Rubber parts under the hood that get oil on them will begin to deteriorate.
- If oil gets on the battery terminals, it will break the contacts and, accordingly, there will be problems with starting the car.
And the oil seal may simply suddenly collapse, which can lead to undesirable consequences on a long journey.
When and why do you need to change crankshaft oil seals?
Today this part is a very important part of the car. This is due to the fact that even with a slight displacement an oil leak will appear.
According to experts, it is worth replacing the oil seal at least once every three years. Although, this period of time is conditional, since in some situations it may be necessary to perform unscheduled repairs. For example, in case of engine overheating.
It is worth starting unscheduled repairs only if there are certain signs indicating the need for such work. In this case, an oil leak may be an alarm.
During any repair, the master must have a certain set of tools and materials on hand. When replacing oil seals, you do not need to use specific equipment. It is enough just to choose the appropriate size seals. Do not forget that these parts in a car, presented on the domestic automobile market, can be single-edged, as well as with or without anthers. Replacing oil seals should only be done with similar models.
Many modern car owners believe that only a qualified specialist working in a car workshop can change oil seals. This is a misconception, since today there are a huge number of manuals and recommendations posted on the Internet, thanks to which the work process is simplified.
Work order
- First of all, we disconnect the negative terminal, as a result of which we de-energize the VAZ-2110. After this procedure, it is necessary to remove the protection of the timing belt and the car engine.
- We loosen the tense timing belt, and then simply remove it, making sure that the marks match.
- We remove the right wheel in front of the VAZ. After completing the manipulations with the wheel, the generator drive belt is also removed, after which you must unscrew the bolt securing the crankshaft pulley.
- The engine oil is drained and the oil pump, to which the front oil seal is attached, is dismantled. We replace the cuff and carefully coat it with sealant.
- The cuff on the inside is generously coated with oil, then remove the seal and take out the front cuff of the car. We collect all this in the reverse order of the above steps.
Replacing the rear cuff will be much more difficult. The procedure for carrying out repair actions is as follows:
- We remove the negative terminal from the battery, after which it is necessary to remove the clutch basket. After these procedures, we proceed to dismantling the flywheel, and then to removing the crankcase casing.
- The rear oil seal holder is removed by unscrewing the tightened bolts securing it. We unscrew the bolts that secure the flywheel.
- While holding the latch, you need to pull out the seal. To do this, you can use a vice and inspect the fixing part of the cuff. If there are any defects in it, this part is also replaced, and then the working edge of the new cuff is placed inside the retainer and the gasket is replaced.
- The edge of the crankshaft together with the flange is generously coated with oil. We install the holder, very carefully tucking the working edge of the sealing ring onto the flange. Reassembly after repair is carried out in the reverse order. After making repairs, you need to check from time to time to see if engine oil is leaking.
Rear crankshaft oil seal VAZ 2110. Replacement on an 8-valve engine
Replacing the back cuff is a more difficult task compared to replacing the anterior cuff. It will take a little more time and effort to get the job done. Let's take a closer look at how to do this:
- Disconnect the battery.
- We remove the flywheel; to do this, you need to disconnect the gearbox from the engine.
- Loosen the bolts securing the holder and carefully press out the part.
- Carefully press in the new cuff. It's better to use a mandrel.
- Coat the joints of the holder with sealant and assemble everything in reverse order.
The difficulty is that you need to get to the back of the engine, which requires you to do the routine work of disconnecting the gearbox from the engine and removing the flywheel.
→ Get useful materials for VAZ 2101-2110 Thanks for subscribing!
Do-it-yourself replacement of the front and rear crankshaft oil seals
Replacing the crankshaft oil seal is a labor-intensive, but technically not very difficult task, which any car owner who has basic skills in repairing his vehicle can cope with.
To perform the manipulation you will need a garage, pit or lift, as well as several hours of free time. The least difficult part is replacing the front crankshaft oil seal. The rear element, located behind the gearbox, clutch basket and flywheel, requires much more time and labor.
- When do you need to change seals?
- Tools and materials
- Replacement procedure
- Replacing cuffs on a “classic”
- Replacing oil seals on front-wheel drive cars produced by AvtoVAZ
- Evaluation of results
- Interesting Facts
When do you need to change seals?
A direct indication for replacing the crankshaft seals on the VAZ-2114, VAZ-2106 and other domestically produced cars is their destruction and oil leakage in the area of the AC pulley or in the area of the rear part holder. The procedure is also carried out during related work, which includes replacing the flywheel, replacing the crankshaft, replacing the clutch, and the like.
It is worth noting that cuff repair itself does not take much time. Almost the entire scope of work is represented by the disassembly and dismantling of units that hide the necessary parts underneath. On average, the work of removing and reassembling the front element takes 1-2 hours, the rear element takes 5-8 hours if the work is done in a garage. Car service specialists perform it within 2-3 hours.
Tools and materials
Replacing the crankshaft oil seal on VAZ-2109 vehicles, as well as all other vehicles produced by VAZ, regardless of the type of power unit, will require the following set of tools:
- Pit, lift or jack;
- Car stands (if a jack is used);
- A set of wrenches, including spanners;
- Hammer;
- Slotted screwdriver;
- Crosshead screwdriver;
- Gasoline, kerosene or other solvent;
- Engine oil;
- New spare parts;
- Silicone sealant.
Note: when buying new rubber bands, you need to make sure that there are springs inside them - metal rings located on the inner surface of the element. Car dealerships often come across defective products without springs. Some car owners shorten the spring before installation, claiming that this improves the characteristics of the oil seal.
Replacement procedure
The procedure for replacing the oil seal on a VAZ-2107, 2106 and other “classic” models is no different. Front-wheel drive vehicles have some differences in the preparatory work due to the different location of the power unit. At the same time, engines with 8 valves (VAZ-2115, 2110) and 16 valves (Kalina, 2112) do not have any fundamental differences in replacing the elements in question.
Replacing cuffs on a “classic”
Replacing the rear crankshaft seal on a “classic” is carried out exclusively on a pit or a lift, since only such conditions allow you to safely dismantle the gearbox. The procedure is performed in the following sequence:
- installing a car in a pit;
- dismantling the driveshaft;
- dismantling the gearbox;
- dismantling the clutch;
- dismantling the rear cover of the clutch housing;
- dismantling the holder;
- removing the old element and pressing in the new one;
- reverse assembly.
The old seal is removed using a hammer and a drift, inserting the latter into the holes for the crankcase mounting bolts and applying light blows with a hammer. Before pressing, the new cuff is lubricated with engine oil or silicone sealant. Pressing is carried out by carefully striking the seal with a hammer or using a mandrel.
To dismantle and replace the front gasket, you will need to remove the power unit cooling fan and the generator belt. After this, you need to unscrew the nut and remove the crankshaft pulley. The element itself is located below it. To avoid difficult work on removing the front engine cover, the element is removed using a slotted screwdriver.
If this cannot be done, dismantling and replacing the VAZ-2107 crankshaft oil seal is carried out using a self-tapping screw. It is screwed into the side of the cuff, after which the element is pulled out with an ordinary nail puller. Before pressing in a new gasket, its seat should be cleaned of dirt. Pressing is carried out by analogy with the rear cuff.