Adjustment procedure
The whole process can be divided into three parts:
- Lamp markings
- Markings on the wall
- Setting low beam lamps
From this article you will learn how to set up and adjust the headlights yourself. Before starting work, be sure to check the following components of your car: suspension springs, tire pressure, tire sizes, since the direction of light directly depends on their condition. If these parts are faulty, the angle and quality of adjustment may be affected.
What will you need?
- Chalk, glowing tape or something else for marking
- Flat wall
- At least 8 meters of vertical surface in front of the wall
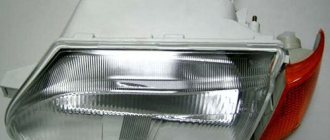
Headlights VAZ 2106
The VAZ 2106 car was developed on the basis of the first luxury model of the Volga Automobile Plant VAZ 2103 in the mid-70s of the last century. Visually, these cars are very similar. Externally, the VAZ 2106 differs from the Troika only in the absence of chrome in the body trim, more modern bumpers and a redesigned rear lights.
Tuning
Fog lights and optics tuning for VAZ 2106
Additional fog lights must be mounted on the front apron of the vehicle closer to the road surface to improve the dispersion of fog from below. Many products offered by car dealerships are adapted for installation in a vertical plane. In this position, the fog lights occupy the same height as the standard optics, which significantly reduces their dispersion coefficient. The location of fog lights in the front bumper will be much more effective.
To purchase fog lights, the price of which is relatively reasonable, it is advisable to check the seats of the toggle switches on the instrument panel.
The best way to tune VAZ 2106 headlights is the procedure of completely replacing components. For optimal selection of tuned products, we recommend using BMW E34 optics. Further work is carried out in the following order:
We dismantle standard products together with protective elements.
We drill the required number of holes for mounting the products.
We mount the body of the optical element (headlight) from the BMW and attach the nuts to the bolts without tightening, because further adjustment will be required.
We also attach other optical components.
Having installed and secured the headlights on the landing surfaces, you should start setting them up, including installing an additional “relay” for separate activation and control of the front optics.
An element of headlight tuning in this vehicle can be considered the VAZ 2106 headlight protection, which can take various forms. Most often, car enthusiasts use grilles as protective elements, which are installed at the same fastening points as the screws of these products.
Initially, you will need to open the hood of your car and take out the old headlights that have served you for many years. Also remove the protection along with them. After this, you need to try on new headlights from BVM, for which you will need to drill several holes to install them. The next step is to install one BMW headlight in its place and insert the bolts into the drilled holes, but do not tighten them all the way, as we will still need to adjust the installed headlights.
In the same way, you need to attach the remaining front and rear lights. After fixing the headlights in their places, you should start adjusting them. For more convenient settings, when installing headlights, you need to place a special spring under them. Adjust the position of the headlights so that the light from them is directed in the direction you need. Remember, it is necessary to adjust the position of the headlights only on absolutely flat surfaces, so that the light flux is not distorted. If you have some capital, in addition to rear and front headlights, you can also install “fog lights” on the rear and front bumpers on your VAZ 2106.
How to disassemble the speedometer follow the link.
Adjustment
We check the correct adjustment of the headlights of the VAZ 2106 by the location of the light spots on the screen. We check and adjust the headlights on a flat horizontal platform. The screen can be a sheet of plywood (approximately 1.0 m high and 1.7–2.0 m long), a light building wall, a gate, etc. We place a fully fueled car with a jack, tools and a spare wheel secured in their regular places perpendicular to the screen at a distance of 5 m between it and the headlights. We check and, if necessary, adjust the tire pressure to normal. We put the assistant in the driver's seat. To ensure that the body takes the correct position relative to the wheels, we swing the car by the wing. We begin the adjustment with the external headlights. We mark the screen with chalk, as shown in Figure a. The distance between the marks on the screen corresponding to the centers of the external headlights should be 1180 mm. Cover one of the external headlights with a piece of cardboard or fabric and turn on the low beam
Using a Phillips screwdriver, rotating the adjusting screw located above the headlight, align the horizontal border of the light beam with the bottom line on the screen. The headlight frames have special recesses for access to the adjustment screws. If one of the screws is closed, remove the frame
By rotating the second adjusting screw, located, when looking along the car, to the right of the right headlight (to the left of the left), we align the point where the light beam breaks (the intersection of the horizontal and inclined boundaries) with the vertical line of the center of the headlight on the screen. We also adjust the outer headlight on the other side of the car. We mark the screen as shown in Figure b. The distance between the marks on the screen corresponding to the centers of the internal headlights is 840 mm. Cover the outside headlights with cardboard or cloth and turn on the high beam headlights. By alternately closing the internal headlights and rotating the adjusting screws, we set the center of the light beams, as shown in the figure.
The screw above the headlight changes the position of the beam vertically, and on the left - horizontally. It is better to adjust the headlights on the VAZ 2106 at night or in cloudy weather.
Replacement
To remove the headlights we need a screwdriver. Due to the fact that all headlights are changed identically, we will analyze the process using the example of the left inner headlight. The headlights are attached to the car body using screws.
And so, to replace you need:
Open the hood and in the engine compartment, mark the wires suitable for the headlight with a marker. Disconnect the wires.
Now, from the outside of the car, press the headlight trim latches and remove the trim.
Unscrew the three screws securing the headlight to the body and pull the headlight out.
How to adjust the headlights on a VAZ 2103, VAZ 2106?
Note! Before you start adjusting, be sure to wait until it is dark, or if this is not possible, then adjust the headlights in some dark room, for example in a garage, but in this case the car will only have to stand level and sit in the driver’s seat. a person whose weight is about 75 kg and when adjusting the pressure in the wheels should also be brought back to normal!
Adjustment: 1) In order to adjust the headlights, first think about which headlights you will start your adjustment with, from the internal ones (lower-upper figure) or from the outer ones (lower-lower figure).
2) Let’s say you’ve figured out the headlights, then on some structure, draw with regular chalk the following diagram for adjusting the external headlights:
Or this one for adjusting the interior headlights:
Note! Coordinates on these diagrams: number 1 is a horizontal line that corresponds to the center of the headlights. 2, 3 is a line that passes through the centers of the light spots. A and B, C and E are also vertical lines that correspond to the centers of light of the headlights. And the letter O is the center line!
3) Then get into the car and place it on a flat surface, driving the car 5 meters away from this diagram.
Note! Remember that the site of the structure must be level and thus the car will have to stand strictly perpendicular to this wall!
4) Now remove the trim from your car that covers the headlights. (For information on how to remove the trim, see the article entitled: “Replacing headlights”, point 3)
5) Next, when the lining is removed, cover with thick dark-colored material the side of the headlights that you do not plan to adjust yet.
6) Then turn on the low beam on your car and see how your right outer headlight shines, if necessary, then adjust it... (Continued in point 7)
7) To adjust this headlight, take a screwdriver in your hand and use it to turn the headlight adjustment screws, thereby adjusting the direction of light of this headlight.
Note! When adjusting, always try to adjust the headlight first in one plane, and only after this adjustment, take hold of another plane on which the headlight light falls, for example, first adjust the headlights horizontally relative to the diagram, and then vertically, thanks to this adjustment of the headlights you can quickly and more accurately adjust!
If the external headlights are adjusted correctly, then pay your attention again to the diagram, and special attention to line 2, with which the upper limit of the light spots of the external headlights must coincide! (Always remember, in order for the adjustment to be more correct, adjust both outer headlights at once, and not first the outer one then the inner one, etc. The headlights are always adjusted together)
And also pay your attention once again to the diagram, namely, take a closer look at those places where the points of the light rays intersect with lines A and B!
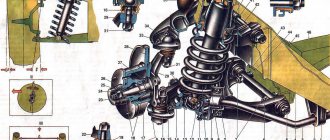
The adjusting screws for the outer and inner headlights are shown in the photo below:
Note! Using screw 1, the headlight is adjusted in the horizontal direction, and using screw 2 in the vertical direction. And if we talk about the external headlight, then adjusting screw 3 is responsible for vertical adjustment, and screw 4 is responsible for horizontal adjustment!
 Now move on to adjusting the interior headlights and adjust them in the same way.
9) Next, take a rag and, if necessary, cover the outer headlight with it, then turn on the high beam and check the adjustment of the inner headlight that you just adjusted.
Note! If necessary, then use a screwdriver to adjust the direction of the light beam, starting first from one plane and then smoothly moving to adjusting the other!
With correctly adjusted internal headlights, the light spots, namely their central part, should be on intersecting line 3, and this line should intersect with lines C and E!
10) Finally, turn off the headlights and then install the headlight trim in its place.
Additional video: If you are interested, watch the video below, where the headlights are adjusted on a special stand:
Source: vaz-russia.com
Adjusting headlights and PTF on Lada XRAY | Topic author: Oleg
Adjusting headlights and PTF on Lada XRAY Low beam headlights should illuminate the road well, but should not blind oncoming drivers. It is convenient to adjust the headlights using a special optical device, but if necessary, you can adjust the Lada XRAY headlights yourself. Let's look at the features of this event. You will need: A flat wall or a sheet of plywood measuring 2x1 m. A tape measure 10 m long. A sheet of cardboard to cover one headlight. Assistant or weight weighing 75 kg. Check the tire pressure, it should be correct. How to adjust the headlights Place the car in front of a wall at a distance of 10 m or place a sheet of plywood measuring 2x1 m in front of it. Set the electric corrector control to position “0”. Place an assistant (or a 75 kg load) in the driver's seat. Measure the distance h from the ground to the center of the lamp and the distance l between the centers of the headlights. Mark the screen according to the picture. Cover the right headlight unit with a sheet of cardboard and turn on the low beam. We perform vertical adjustment of the headlight beam. Using a Phillips screwdriver or a 6-point hexagon, turn the screw on top of the headlight, aligning the upper horizontal border of the light with line G. Perform horizontal adjustment of the headlight light. We use the same tool to turn the screw (closer to the edge), aligning the kink of the upper border of the light with the vertical line A. Similarly, we adjust the other Lada XRAY headlight. Note: a slight deviation of the bend downwards is allowed, no more than 20 mm and to the right, no more than 100 mm. If the headlights cannot be adjusted, check the installation of the headlight and lamp. How to adjust fog lights Place the car in front of a wall at a distance of 5 m or place a sheet of plywood measuring 2x1 m in front of it. Place an assistant (or a 75 kg load) in the driver's seat. Mark the screen according to the picture. Cover the right PTF with a sheet of cardboard and turn them on. We rotate the adjusting screw in the front bumper with a long Phillips screwdriver, moving the light in a vertical plane. We bring its upper horizontal border to line G. We similarly adjust the other PTF. If you cannot adjust the PTF, check the installation of the headlight, lamp and bumper. Let us remind you that other instructions for repair, maintenance and operation of the Lada XRAY crossover can be found in this category or by content. https://lada.online/do-my-self/repair/repair-lada-xray/1534-regulirovka-far-i-ptf-na-lada-xray.html
Adjusting the headlights of a VAZ 2106 – Repairing a VAZ 2106
June 19, 2011. Turn on the light and first cover both headlights on one side with a rag and, after adjusting the beam of light, adjust the high beam from .
How to adjust the headlights? – Autoclub VAZ 2106
I understand that this is a stupid question, but still. (IMG: How to adjust the headlights?
Rear lights
The rear light on a Zhiguli consists of four lamps located in one housing:
- turn indicator;
- size;
- reverse light;
- stop signal.
The block is covered with glass or plastic with separate cells for each headlight. It is necessary to change the lamps in the rear headlights after the trunk trim has been removed, since the lens fastening nut is located in the passenger compartment. The license plate lamp socket is located near the rear headlights. The process of replacing light bulbs in the rear unit goes through stages.
- Holding the diffuser with one hand, unscrew the nut located in the trunk.
- Remove the diffuser.
Regardless of which lamp needs to be changed, clearance or stop, all lamps are removed from the VAZ 2106 taillight in the same way.
- Lightly press the lamp.
- Turn counterclockwise.
- The protrusions on the base must match the gaps in the cartridge.
- Pull out the light bulb.
- Replace in reverse order.
The diffuser, before it is tightened with a nut, is always installed into the headlight unit from below and only then pressed by hand over the entire area.
How to adjust car headlights with your own hands?
One of the significant factors ensuring traffic safety on the road is the level of illumination of the roadway and the clarity of the boundaries of the pedestrian zone. The parameters of the correct light emission of the unit are especially important for the dark time of day. An experienced driver will figure out the need to adjust the light flux himself. Beginners in the car industry will be prompted by traffic participants racing in the oncoming lane. They will notify you with two flashing high beam signals that the light is “hitting” your eyes. Adjusting the headlights with your own hands should be carried out periodically, at least after 50 thousand of the route traveled.
DIY angel eyes for VAZ 2106
08.03.2016
Having a car today will no longer surprise anyone. Of course, everyone would like to own an expensive and beautiful vehicle, but not everyone, alas, has such an opportunity. This is precisely why the products of the domestic automobile industry are still popular among car enthusiasts.
As they say, it may be ugly, but it’s inexpensive and unique. In addition, our car owners do not despair and are constantly coming up with something new in order to somehow improve the appearance of their iron horses.
Do-it-yourself angel eyes for a VAZ 2106 is one of the most popular options, and all because such tuning is affordable for every owner of the beloved “six”.
First of all, you will need plastic transparent sticks (rods from blinds will do just fine). The only thing is that these sticks should not be faceted or hollow.
Preparation of the work front
- In order to correctly adjust automotive optics, it is necessary to create conditions as close as possible to those in which the unit is in a real situation. The carrying capacity of a vehicle is the weight of the driver, the cargo constantly carried in luggage, and the power of its own design. Therefore, when deciding how to adjust the headlights on your own, you need to make sure that the trunk contains the usual set of accessories: a fire extinguisher, a jack, a spare tire, a set of tools, etc.
- To ensure the correct position of the body, before checking, you need to make sure there is sufficient tire pressure. If the parameters are lower than those specified by the manufacturer, connect the pump and achieve the required value.
- Adjusting the headlights is faster if you invite an assistant for this purpose. It must have the same weight as the owner of the vehicle.
- A useful precaution would be to check the condition of the fastening connections of the lamps. You need to make sure that the screw assembly is easy to adjust; if there is rust, get rid of it (for example, using a WD-40 solution). For the control process, the rigidity of the structure should be slightly weakened, and after the process is completed, the position of the fastener should be returned to its original state.
- Before starting work, it is necessary to get rid of the dirt accumulated on the surface and around the optical instruments, so that the lenses become transparent. Otherwise, it will not be possible to achieve adequate results from the adjustment process.
- Adjusting the headlights should be done with working equipment, especially pay attention to the voltage regulator and generator . Most of the problems are described in the technical manual included with the unit upon purchase.
- A leak in the connection of the optical assembly may cause the light bulb to become cloudy. In order to restore the level of luminous flux, it is necessary to notice the light source and glue the structural elements with sealant. The algorithm for assembling and disassembling the lanterns is outlined in the passport.
Headlight faults and repairs
An unpleasant feature of the headlights on a VAZ is the gradual decrease in the quality of light. In 70% of cases, drivers notice that the lamps have stopped shining normally when the glass on the headlight has already become cloudy by 30 - 40%. Clouding of the bulb on a halogen lamp is the second reason for the decrease in illumination. If the headlights and headlights in your car stop working, there may be several reasons:
- The light bulb itself burned out.
- The fuse or fuse box has failed.
- Burnout, rupture of the electrical wire.
- Oxidation of contact tips, current does not pass through the circuit.
- Loosening of the electrical wire fasteners.
- A breakdown of the switching relay or oxidation of a specific contact of the steering column switch is observed if there is no switching from high beam to low beam and vice versa.
The six is equipped with a three-lever switch for adjusting the headlights. If the levers sink and do not lock, the part must be replaced.
How to disassemble a headlight
Analysis is carried out in 10 minutes. The glass is glued to the reflector, you need to heat the sealant that holds the block around the perimeter, then use a flat screwdriver or knife to pry the glass and remove the element. Installation of glass is carried out using soft glue in the reverse order.
Some drivers heat the headlight with a hairdryer, lamp, or steam bath. If you use a lamp, there is a possibility of overheating the glass. Acrylic parts may further become cloudy if the temperature exceeds 70 degrees.
Replacing light bulbs
Replacing low beam bulbs begins with dismantling the headlight trim. The plastic cover must be pryed off with a screwdriver and removed from its seat. The block is located closer to the edge of the car and is carried out in stages.
Before starting any work related to replacing lamps, checking electrical wiring, or repairing headlights, you must remove the negative terminal from the battery:
- Loosen the three mounting screws holding the headlight rim. Do not remove the screws completely.
- Take the headlight in your hand, turn the loose rim, the screws should come out of the grooves.
- Remove the rim, take out the diffuser; the element is held by the rim and falls out along with it.
- Pull the headlight with the block out of the niche, remove the plug of the power supply wire.
- Disconnect the fastener.
- Remove the used bulb from the headlight.
Install the new part and reassemble the headlight in the reverse order. After installing a new element, it is necessary to correct the geometry of the light beam.
Headlight corrector and repair
A luminous flux corrector, or more simply a headlight corrector, will allow you to adjust the headlights if the vehicle's ground clearance has changed due to a loaded trunk. In this state, the car tilts backwards, the high beam headlights lose adjustment, blind oncoming drivers and do not illuminate the first 10 meters in front of the car. The light from nearby lamps poorly illuminates the roadside and is scattered.
The adjustment is carried out manually; the part will allow you to lower the light beam down when the trunk is loaded and align the beam for normal mode. For the VAZ 2106 there is an option to use electric correctors. The position of the reflector is adjusted through a servo drive, which changes the angle of inclination of the reflector through a worm gear.
Cleaning the optics
Despite the fact that the internal headlamp unit is protected by a waterproof housing, additional gaskets and hermetically sealed, the optics must be cleaned both outside and inside. External cleaning, polishing, and application of protective varnish are carried out quite often and do not require dismantling the diffuser.
Internal cleaning must be carried out at least once every 6 months, preferably when replacing a light bulb.
You can clean the internal parts from dust using non-abrasive products that do not contain alcohol. Micellar nail polish remover is most often used. It is necessary to remove the lamp, pour diluted liquid and plain water into the block in a 1:1 ratio and shake the block well. Rinse with clean water and dry.
If acrylic glass has lost its transparency, polishing and varnishing are used.
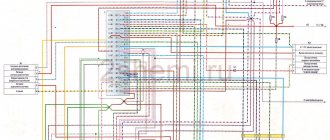
Headlight electrics
The electrical circuit for connecting lamps on the VAZ 2106 is simple and reliable. The circuit uses only the necessary circuit elements with a minimum of sensors and fuses. The power supply is checked by testing the electrical wire with a voltmeter if the light bulb, relays and fuses are working correctly, but there is no road lighting.
The electrical circuit of headlights for Zhiguli includes the following elements:
- headlight units;
- accumulator battery;
- generator;
- ignition;
- fuse box for each lighting element;
- indicator light on the dashboard;
- steering column switch for low/high beam;
- low/high beam relay;
- external lighting switch.
Understeering's shifter
The driver switches the low beam to the high beam independently, through the steering column switch. In this case, you must first turn on the outdoor lighting button. If the exterior lighting is inactive, the driver can use the high beam briefly by pulling the switch lever towards himself. The high beam headlights blink due to the fact that the switch contact is powered directly from the ignition switch.
The steering column switch is attached via a clamp to the steering column bracket and has three operating modes: low, wide, high. The main malfunction in the operation of the tube is considered to be melting, oxidation or burnout of contacts, or a crack in the housing.
During repairs, it is necessary to disassemble the steering column, check the wiring and examine the contacts.
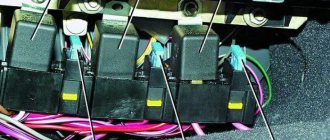
Headlight relay
In the electrical network of Zhiguli, a relay of type 113.3747–10 is used; on earlier brands, GOST RS-527 relays are installed. The blocks are located in the engine compartment on the mudguard on the right. The low and high beam relays have the same parameters and characteristics:
- Voltage – 8 V.
- The distance between the contacts is 2 mm.
- The maximum winding resistance is 85 Ohms.
The contacts close when the optics are turned on. Relay repairs on the VAZ 2106 are not carried out; the element is simple and cheap; replacement is carried out independently and takes up to 15 minutes.