Timing chain meaning
On the one hand, everything would seem extremely simple. To drive the camshaft, a chain is the most reliable and simple solution. It is much lighter than a gear mechanism, it does not require as much care and lubrication as a gear drive mechanism, it does not take as much kinetic energy from the crankshaft, and it is cheaper to manufacture.
But the drive chain has a lot of disadvantages:
- non-repairability - the chain cannot be restored and must be replaced if it fails;
- noisy at work;
- difficulty in tension;
- difficult installation and dismantling.
It is also worth noting that the VAZ 2106 timing chain is replaced not according to regulations, but based on wear, since the quality of the chains that go on sale is extremely unstable. Some chains can safely go through the entire cycle until the next engine overhaul, while other chains stretch after 5-7 thousand km. That’s why they are changed quite often, and if this is not done, a malfunction of the gas distribution mechanism cannot be avoided.
Adjusting the timing chain of VAZ 2106
All work on replacing the chain is carried out with your own hands and using several keys, which are included in the standard set. The same applies to chain adjustment. It is more convenient to change and adjust the chain with the engine removed, but if it stretches before capital is required, then you will have to remove the hood cover at a minimum. You don’t have to do this, but changing the chain without a hood is much more convenient.
When replacing and adjusting the chain, the most important thing is not to get lost in the marks. The key on the crankshaft must be strictly opposite the ebb, which is made on the cylinder block. If you miss this moment, you will not be able to adjust the operation of the timing belt.
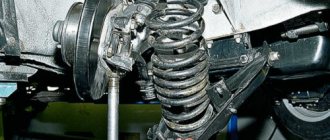
Removing the old timing chain begins with removing the alternator drive belt and removing the crankshaft pulley. Many people recommend dismantling the radiator, but in principle, if you work carefully, it won’t hurt. Difficulty can only be caused by the breaking of the crankshaft pulley mounting nut. It is best to remove the nut from the inspection hole using a power wrench, after putting the car on the handbrake and engaging first gear.
After this, you need to get to the upper drive sprocket. To do this, remove the valve mechanism cover, and after that you will have to remove the front engine cover. In this case, you need to ensure that no remnants of the old front cover gasket remain either on the cover or on the block. Also, do not forget about the three bolts that secure the pan to the lid. If the cover does not come off immediately, you can lightly pry it off with a wide flat screwdriver, but without damaging the sealing surfaces.
How to set the ignition on a VAZ 2106? (Step by step video instructions)
The main reason for replacing a double row timing chain is excessive stretching.
The critical elongation is detected remotely by noise - the chain rattles and rubs against adjacent parts. In fact, extreme wear leads to loss of power, throttle response and unstable engine operation due to the mutual displacement of the camshaft and crankshaft. This will be visually indicated by a displaced auxiliary drive pulley. Coordination of the relative position angles of the camshaft (CV) and crankshaft (CV) is done by aligning the marks on the sprockets with the ebbs on the engine housings. There are two of the latter: one is located on the front aluminum cover (long dash), the second is on the bed of the RV. Unambiguity of the relative location of the “beacons” is important throughout the entire chain change operation.
Welcome!
Do you know what valve timing is? In the article we will get acquainted with the concept and try to explain and show clearly the correct installation of phases by marks.
Note! You will need the following tools: a screwdriver, three wrenches “8”, “10” and “13”, a special wrench for turning the crankshaft pulley (if you don’t have one, use a “36” socket).
While operating a VAZ 2106 car, the car owner may encounter difficulty starting the engine and interruptions in the operation of the power unit. The cause of such malfunctions is incorrectly set ignition timing, which requires timely adjustment. This kind of work is not particularly difficult, so even those car owners who have little idea about repairing their car can handle it. In this article we will tell you how to set the ignition on a VAZ 2106.
The car is accelerated to a speed of approximately 45 kilometers. They turn on fourth speed and sharply press the gas pedal. After such a sharp acceleration, pronounced detonation and ringing of the so-called fingers appear, which goes away as the car accelerates, this may indicate a faulty ignition.
Carrying out such engine repairs yourself is not difficult. To set the ignition of the VAZ 2106 yourself, you will need the following tools:
- Voltmeter or test light operating on 12 volts.
- Socket wrench No. 13.
- Candle key.
You can set the ignition on the VAZ 2106 engine to 4 or 1 cylinder. The operating algorithm is slightly different depending on the cylinder with which the work is being done. Also in this article we will tell you how to set the electronic ignition on a VAZ 2106. First of all, you need to determine which marks will be used to set the ignition.
The ignition is set according to the marks on the timing belt. The long mark corresponds to zero ignition, the middle mark corresponds to five degrees of the angle, the short mark corresponds to ten degrees of the advance angle. You can also find the top dead center mark on the pulley rim, and there is also a small indentation on the pulley located opposite the top dead center mark.
It is according to these marks that you should set the contactless ignition on the VAZ 2106. You need to unscrew the spark plug from the 1st cylinder with a spark plug wrench, close the spark plug hole that appears with a plug or your finger. You need to turn the crankshaft with a special key before the start of the compression stroke. This compression stroke begins as soon as the piston begins to move upward.
Compression can be determined by the pressure in the spark plug hole. You need to turn the crankshaft until the mark on the cover located on the timing belt matches. If you use low-octane fuel, then you need to align the mark on the crankshaft pulley with the long mark, which equals zero advance angle.
If you fill the engine with 92 gasoline, then you need to align the mark with the average mark. Next, unfasten the latches and remove the distributor cover. After turning the crankshaft, the rotor will be in a position where the rotor contact in the distributor is directed towards the first cylinder. Having aligned the marks, you should draw from distributor line that passes through the cover latches and is directed parallel to the engine axis.
In the event that such an imaginary line does not intersect the cover latches, it is imperative to make the appropriate adjustment: Unscrew the nut that secures the distributor, and then pull the distributor up. When rotating the rotor axis, it should be aligned parallel to the engine axis.
We install the distributor in place, fix it with the fastening nut, but do not fully tighten it. Next, you will need a test lamp or voltmeter. This device must be connected at one end to the output of the ignition coil, while the second wire from the lamp is connected to ground or to the carburetor.
Turn on the ignition and smoothly turn the distributor. It is necessary to turn until the control lamp goes out. If the lamp does not initially light, then no adjustment is required. After this, we begin to turn the distributor counterclockwise. As soon as the warning light comes on, secure the distributor by tightening the nut.
We turn on the ignition and install the distributor in place. Checking the correctness of the work done is not difficult. We accelerate the car to a speed of 40 kilometers and sharply press the gas in fourth gear. If such manipulations cause detonation that does not go away when the car accelerates, early ignition is set.
Conclusion
As you can see, self-adjustment and setting of the ignition on a VAZ 2106 car is not particularly difficult. Every car owner can handle this kind of work; you don’t need to use any special tools to set the ignition in your car correctly. If you have any difficulties with this work, then below we have prepared a video that clearly explains how to set the ignition on a VAZ 2106. It is recommended to carry out such an adjustment every 15 thousand kilometers or as characteristic signs of an ignition problem appear.
Read more: Alarm Tomahawk 9010 instructions Tomahawk 9010
Content
[ To uncover]
[Hide]
Motorists have long been convinced of the advantages of electronic (non-contact) ignition, which does not have the disadvantages of contact ignition, for example, there is no need to adjust the gap in the contact group. In this article we will look at how to adjust the ignition on a VAZ 2106 for the 1st cylinder.
There are marks and castings on the cylinder head cover and crankshaft pulley.
Using the marks you can adjust the ignition timing:
- the first mark, located clockwise, means that the ignition timing is 10°;
- the middle mark is designed to set the lead angle to 5°;
- the shortest, last mark sets the advance angle to 0°: in this case, the mixture will ignite when the piston reaches top dead center.
Marks on the cylinder head cover
The marks are aligned by rotating the crankshaft, either by a ratchet, or by using a special wrench on the nut.
A classic of the genre, VAZ 2106 '97. This is the second time the timing chain has been replaced on this car in a month, since the first time the client brought an “original VAZ” chain produced in a nearby basement. A month later it stretched and hello again. But we have all been praising the quality of our spare parts for a long time, so we had to consult with experts in the car market and choose the chain that received the least number of complaints. Operation will show!
Along the way, we’ll change the air filter, alternator belt, tensioner shoe, damper and all the sprockets, and the song begins.
The client went on foot to get the non-weight bearing, damper and belt because he did not immediately take care of the purchase.
Let's start replacing
We will need: a special wrench for 36 and a universal pulley clamp.
This car is carburetor, but if an injector is installed, the replacement procedure is not much different.
View under the hood.
Remove the air filter housing from the carburetor. Unscrew the three 10mm and four 8mm nuts securing the housing to the carburetor.
Be careful not to drop anything into the carburetor, otherwise you will have to remove it, and maybe the intake manifold too. Because if, with the car running, they get under the intake valve, then you can go straight to repair the head.
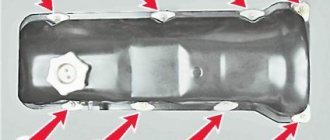
Remove the fuel line and distributor cap. Unscrew the eight nuts 10 securing the valve cover and remove the washers with the plates.
Remove the choke cable and throttle valve drive. Then remove the valve cover along with the gasket; it is also better to replace it.
Remove the protection from below.
Drain the antifreeze.
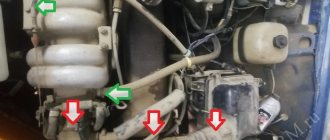
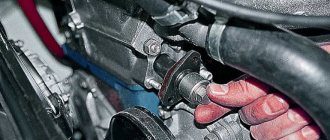
Loosen the nut 19 securing the generator.
Unscrew the clamps on the pipes and remove the latter.
Loosen the clamp on the lower pipe of the pump and remove it with a slight movement of your hand.
Disconnect the power wires for the cooling fan and the temperature sensor on the radiator. We remove the radiator along with the pipes and thermostat.
Loosen the generator tensioner nut and use a pry bar to move it forward. Remove the generator belt.
Now we rotate the crankshaft by the pulley with a magic wrench of 36 and ensure that the marks on the pulley and the cover match, as well as on the camshaft sprocket and the ebb of the latter bed.
Now comes the fun part. Unscrew the nut 36 holding the crankshaft pulley. We lock the pulley with a special key and unscrew it. If there is no such thing, you can turn on the fifth speed, ask a friend to press the brake and lightly turn the key to unscrew it.
We remove the pulley. We unscrew the six bolts and three nuts 10 on the side, three bolts from the bottom of the camshaft drive cover. Let's take the last one.
Dismantling and installation of VAZ 2106 chain
To dismantle the chain, you need to release the tensioner, which maintains the chain in a constantly tensioned state. You will also need to remove the plastic chain guide, which is located to the right of the drive mechanism above the idler gear. Now nothing prevents you from unscrewing the camshaft drive sprocket bolt.
The VAZ 2106 chain tensioner and damper deserve special attention. It is best to change the damper immediately, since it often wears out and can be destroyed during operation. The chain tensioner simply needs to be checked for functionality. If the chain tensioner rod extends to a distance sufficient to tension the chain, then leave it alone. If it jams or does not move at all, it must be replaced or repaired.
Timing chain VAZ 2106: characteristics
| Engine | Number of timing chain links | Chain length |
| VAZ 2101, 05, 011 | 114 | — |
| VAZ 2103-2106 | 116 | 495.4..495.8 mm |
- Remove the air filter housing and cover the carburetor with a rag so that nothing unnecessary gets into it. At the same stage, you can drain the oil from the engine.
- Disconnect the choke cable and the central wire from the distributor.
- Disconnect the tubes and move them to the side so as not to interfere.
- Remove the fan casing.
- If the impeller is on the pump, then unscrew the bolts securing it and remove it along with the generator drive belt and pulley.
- Remove the crankcase protection.
- Clean the entire front part of the engine from dirt, rinse with solvent or gasoline.
- Place chocks under the rear wheels, engage maximum gear (fourth or fifth), and pull out the handbrake.
- To loosen the nut on the ratchet, you need to hit it sharply with a hammer.
- Remove the cover from the block head by unscrewing all the nuts securing it.
- Bend back the washer that is located under the camshaft sprocket bolt. By sharply hitting it with a hammer, loosen the tightening.
- You remove the car from speed.
- Rotate the crankshaft pulley until the mark on the crankshaft pulley with the mark on the front cover moves. At the same time, the mark on the ripening star and the ebb on the pastel should be aligned.
- Unscrew the nut on the ratchet and remove the pulley.
- Unscrew the nuts and bolts that secure the front engine cover. There are 9 attachment points in total. Remove the cover.
- Bend the locking plate and remove the bolt from the accessory drive sprocket.
- Loosen the nut on the VAZ 2106 timing chain tensioner. Using a mounting spatula, press the tensioner and fix it by tightening the nut.
- Unscrew the bolt on the camshaft.
- Unscrew the limit pin near the small crankshaft sprocket.
- Release the chain and remove this sprocket from the crankshaft.
- Taking care not to turn it, remove the auxiliary mechanism drive sprocket and timing chain 2106.
Read more: Motor oil - synthetic or semi-synthetic: which is better for internal combustion engines and what is the difference
At this point, the removal can be considered complete; now you need to install a new one. But be sure to generously lubricate the chain with fresh engine oil before starting any work.
Marks on the camshaft VAZ 2106
I’ll say even more - it is advisable to replace the timing chain at the same time as changing the oil in the VAZ 2106 engine. In general, the sequence is strictly the opposite:
- Tighten all the bolts that secure the sprockets. Rotate the crankshaft two turns to check whether the marks on the crankshaft and camshaft sprockets are aligned. If everything is installed correctly, then all the marks should match (on the crankshaft sprocket opposite the ebb in the block, and on the distribution sprocket opposite the ebb of the bearing cover).
- All bolts are tightened only with a torque wrench. The tightening torque should be in the range of 41.2-51 N*m.
- Tension the chain.
- Wipe all seats and install gaskets (new).
- Install the generator drive and impeller.
- Check the ignition timing. If necessary, adjust it.
- Loosening and unscrewing two bolts securing the timing chain guide housing 2106.
- Unscrew both tensioner mounting nuts.
- Unscrew the shoe fastener and pull it out (along with the shoe itself).
- Install the damper first.
- On the new tensioner, loosen the cap nut. Press the rod all the way in and tighten the nut. This fixes the rod and puts the tensioner in its place without any problems.
- Knock out the oil seal and use a suitable mandrel to replace it with a new one.
- Unscrew the cap nut and remove it. At the same time, the timing tensioner rod extends and the chain is tensioned by means of a shoe.
- Turn the crankshaft one to one and a half turns. In this case, the spring on the shoe should itself adjust the tension force. Please note that you can turn the crankshaft in three ways: with a ratchet wrench, with a crooked starter, or if you jack up one rear wheel and engage maximum gear. Of course, it is most convenient to do this with a ratchet wrench, since the next step will be problematic to complete yourself.
- Feel the tensioner rod and turn the crankshaft. Stop at the moment when the rod goes to its maximum depth into the body.
- Replace the cap nut and tighten it.
It is worth saying a few words about the correct replacement of the timing chain of the VAZ 2106 and similar models (2101-2107). You should not succumb to provocations and listen to “experts” who advise disconnecting the chain and stretching it, tying it to the old one with wire.
This method has a chance to exist only in one case - if the breakdown overtook you on the road, far from populated areas, and you need to drive a bloody nose for a hundred, five hundred, thousand kilometers in order to carry out high-quality and correct repairs after that.
But if you have all the tools and capabilities, then you shouldn’t do repairs right away that are of poor quality, no matter how. Here, perhaps, we can finish a short excursion into the theory of engines, and specifically into the design of the timing chain drive on the VAZ 2106.
As you can understand, all the work can be easily done with your own hands and quite quickly.
The chain has virtually zero ability to stretch and compress, and fairly limited flexibility. Therefore, in order to provide it with constant tension while working in its place at any speed, it has to be literally shackled, using a system of tensioners and dampers.
This problem on the VAZ 2106/2107 is solved by a damper - an additional spring-loaded clamping bar. They have a steel frame covered with a layer of durable rubber. Tensioners and dampers dampen vibration and noise quite effectively. The chain is prevented from falling off by a stop pin that is screwed into the block or cylinder head. During normal operation the chain does not touch it.
Replacing the timing chain on a VAZ is necessary when its critical wear has occurred, its service life has been exhausted, and tightening it with all sorts of “cunning” methods no longer gives results. These methods include:
- increasing the length of the working part of the tensioner by pressing on a piece of tube of a suitable diameter;
- “addition” of an additional bracket to the shoe and other “bullying” of the engine.
An extended timing chain no longer ensures accurate valve timing, which negatively affects engine performance. In addition, she wears out the shoe and constantly “beats the head off” the pacifier. In addition, engine noise increases, fuel consumption increases and engine starting becomes worse. It is also worth saying that the chain sometimes breaks with all that it entails.
For work we will need: keys “10”, “13”, “17”, a special wrench for the crankshaft pulley nut (or a “36” head), a screwdriver, a mounting blade, a hammer, and a bit.
- Fenox PC2103C3 — 519 rub.
- Kraft KT 017736 — 620 rub.
Read more: Changing the Renault Logan alternator belt yourself, instructions with photos
The original number of the timing chain tensioner is 2101-1006060, the average price is 364 rubles.
- TSN 671 — 254 rub.
- Riginal RG2101-1006060 — 230 rub.
- Trialli MT 151 — 407 rub.
Replacement frequency: every 200 thousand km.
First, remove the block head cover.
Now we turn the crankshaft until the mark on the camshaft sprocket aligns with the mark on the housing.
The mark on the crankshaft will also need to line up with the mark on the camshaft cover.
Next, bend the lock washer of the camshaft sprocket bolt. Then we engage fourth gear and put the car on the handbrake.
Then loosen the camshaft sprocket bolt.
Using a 10mm spanner, unscrew the two nuts of the studs connecting the parts of the casing. Using a 10mm socket with an extension, unscrew the bolt securing the upper casing to the bracket. We remove the casing. Using the “10” wrench, unscrew the “propeller”.
Using a 10mm wrench, unscrew the three nuts and six bolts securing the camshaft drive cover to the cylinder block.
Remove the camshaft drive cover.
Using a 17mm wrench, unscrew the bolt securing the tensioner shoe.
... and remove the shoe.
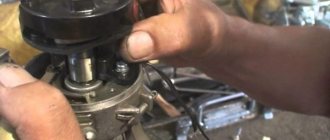
Using a chisel, bend the edge of the lock washer on the oil pump drive sprocket bolt.
Using a 17mm wrench, unscrew the bolt securing the oil pump drive sprocket.
Remove the bolt and washers.
We remove the star. We take out the camshaft drive chain. Then, lifting the chain, remove the camshaft sprocket.
Using a 10mm wrench, unscrew the chain limiting pin and remove it.
Before installing the chain, align the mark on the crankshaft sprocket with the mark on the cylinder block.
Using a 13mm socket, loosen the cap nut of the chain tensioner. Turn the crankshaft clockwise one and a half to two turns. In this case, the tensioner spring, acting on the tensioner shoe, will automatically adjust the chain tension. Tighten the tensioner cap nut.
As the vehicle is used, the chain drive slowly stretches. Deformation of the metal joints does not occur - the reason for the phenomenon lies in the abrasion of the hinges of each link, the formation of gaps and backlash. Within 1-2 bushings, the wear is small, but multiply the gap by 116 and you will get a noticeable elongation of the element as a whole.
How to determine the malfunction and degree of wear of the chain:
- The first symptom is an extraneous noise coming from under the valve cover. In particularly advanced cases, the sound turns into loud rattling.
- Remove the valve cover and check the alignment of the marks on the camshaft sprocket and crankshaft pulley with the corresponding protrusions on the body. If a shift of 10 mm or more is observed, the element is clearly stretched.
Once, during the process of diagnosing the “six” engine, I had to observe the following picture: the elongated chain not only broke the damper, but also made a deep groove in the cylinder head housing. The defect partially affected the valve cover contact plane, but no cracks or engine oil leaks occurred.
A chain stretched by 1 cm or more can jump 1-4 links along the gears. If the element “jumped” one section, the valve timing is disrupted - the engine vibrates strongly in all operating modes, significantly loses power and often stalls. A clear symptom is shots in the carburetor or exhaust pipe. Attempts to adjust the ignition and adjust the fuel supply are useless - the engine “shaking” does not stop.
- double-row chain, suitable for a specific engine type;
- 3 gears - two large and one small (sold as a set);
- tensioner shoe;
- damper plate;
- power unit front cover gasket;
- high temperature silicone sealant.
Let's start replacing
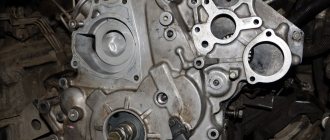
VAZ 2106 engine assembly
After installing a new chain, you need to carefully double-check the marks that are on the casting of the cylinder block and on the casting of the camshaft housing, as well as the correspondence of the marks on the gears to them. If the chain is installed correctly, the automatic hydraulic spring tensioner itself will take care of tensioning the chain, all we have to do is reassemble the engine in the reverse order.
When installing the cover, you should not use an old gasket, even if it looks perfect. It has already been pushed through and will not be able to perform its functions at the proper level. Now there are a lot of good sealants on sale that completely replace paper gaskets, seal the connection reliably and are not afraid of high temperatures.
By replacing the VAZ 2106 timing chain in a timely manner, we will not only get rid of excess noise and clanging when the engine is running, but will also prevent more serious malfunctions that can occur from a worn mechanism chain. Change your chains on time, and have a good trip!