02 September 2015 Lada.Online 25 234 0
The windshield of a car is replaced if it becomes scratched, scuffed or cracked. The process is not complicated, but requires knowledge of certain skills. Replacement of fixed body glazing for all Lada cars (Granta, Priora, Largus, Kalina, Niva 4x4, Vesta or XRAY) and foreign cars is similar, the only difference is in the requirements for glue.
Design features and when it may be necessary to replace the windshield on a Priora
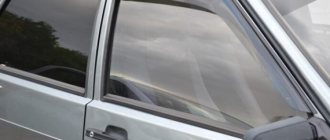
Unlike the Lada model range, starting from the VAZ-2101 and ending with the VAZ-2109, on the Priora the windshield is not attached with a rubber seal, but “sits” on the sealant. This method is modern and has some advantages. In addition to the aesthetic appearance, installing glass with sealant increases the reliability of its fastening. It is impossible to squeeze it out of the passenger compartment with your feet, since it is securely connected to the body part. However, in the event of an accident, you can break the glass itself to get out through the front.
The need to remove the windshield on a Priora arises in a number of the following cases:
- When it is necessary to replace a product due to the unsuitability for further use of the device installed on the vehicle. The reason for this may be damage to the glass in the form of chips and cracks.
- If the seal of the product has been broken. This can be determined by the corresponding signs of drips in the interior in the area where the device connects to the body part. Such phenomena often occur when installing a windshield without following the instructions.
- When to replace gutters. If these parts were installed poorly from the factory, they may come off during vehicle operation. To install them correctly, you will need to remove the windshield.
The need to dismantle the device may also arise if traces of corrosion appear in the front part of the roof or on the side pillars. To prevent further spread of negative consequences, the metal should be cleaned and processed. Usually in such cases, the areas of the body to which the windshield is attached are also affected.
If there is a need to replace the windshield on a Priora, then it is not at all necessary to visit a special service station for this. It is quite possible to do the work yourself, provided you have the appropriate tools. We will consider in detail what tools and materials will be needed to remove and install the windshield on the Lada Priora.
This is interesting! Often on a Priora the windshield is damaged during the removal and replacement of the windshield wiper trapezium.
What is needed to replace the windshield on a Priora
On the Priora, the windshield is mounted on a sealant, which somewhat complicates the process of dismantling work. As for installing a new product, it is much easier to do this than, for example, if it were installed on a rubber seal (like on a classic). To dismantle the windshield from a Priora, you will need the following list of tools:
- string - it is important to use a string, and not a fishing line or ropes;
- string holders - special handles;
- awl for removing the windshield. It is distinguished by a specific design - a flat surface of the knife with a cutout in the end part;
- flat-head screwdriver for removing standard glass displacement limiters.
Having such a tool at your disposal, you can not only remove the windshield from the Priora yourself, but also carry out such work at a professional level. However, as you understand, having a special tool does not mean that the work will be done correctly. That is why below are detailed instructions on how to remove the windshield on a Priora.
After dismantling, you will need to install a new product. To implement this process you need the following materials:
- adhesive-sealant on which the windshield will be glued (special set);
- kit for replacing the windshield on a Priora. It includes such elements as side gutters or edging, top sealing rubber and glass movement limiters;
- degreaser;
- new windshield.
After preparing a complete list of tools, you can resort to implementing actions. To do this, we will consider in detail the process of how to replace the windshield on a Priora yourself.
Glass with rain sensor
The rain sensor is designed to automatically turn the windshield wiper and, in some cases, the washer on and off. The operating principle of the sensor is based on the refraction of an infrared light beam. The beam, passing through drops of water, snow, or dirt, coordinates a special photo element to turn on and operate the cleaning devices. The rain sensor can be moved to a new glass when replaced. The cost of glass with a rain sensor will average 5,000 - 9,000 rubles. , together with installation, about 7000 - 11000 thousand.
Instructions for replacing the windshield on a Priora: how to dismantle it
First, let's take a closer look at the process of removing the windshield. Why isn't it easier to knock out the windshield? After all, it is mounted on a sealant, and even if the main part of it is removed by destruction, you will still have to remove fragments around the perimeter. This will be much more difficult to do than cutting glass using a string.
It should also be noted that the dismantling process is not at all difficult, and it is quite possible to cope with it yourself. To do this, it is important to arm yourself with the necessary tools and get down to business. To remove the windshield from a VAZ-2170-74 Priora, you need to do the following manipulations:
- Before you begin, you should take care of safety precautions. Be sure to wear safety glasses when cutting the glass, as while cutting the glass a piece may break off and fly in your direction. In addition to glasses, it is also important to use gloves.
- Remove the hood. This will greatly simplify all manipulations. However, this is not at all necessary to remove the windshield. If you plan to carry out work without removing the hood, then it should be covered with thick fabric so as not to be scratched during the work.
- Remove the right and left parts of the frill (plastic part under the windshield). First remove the wiper arms along with the windshield wiper blades.
- Remove gutters. It is almost impossible to remove them without damage, so you should definitely buy new ones first, which will be installed along with the glass.
- It is also important to dismantle some elements in the interior. In particular, you need to remove the plastic trim of the side pillars.
- There is no need to completely remove the headliner, but you should definitely loosen the fastening of the front part and move it to the side.
- If possible, move all wires to the side so that they are not damaged by the string during the process of cutting the glass.
- Remove the standard glass displacement limiter with a screwdriver.
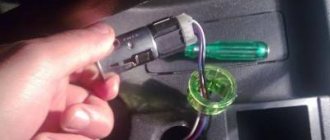
- Next, we move on to directly removing the windshield, for which you will need to first disconnect it from the sealant. A steel string will help us in this matter. We insert one part of the string into a special holder (you can use a screwdriver instead of a holder).
- The second part is attached to the end of a forked awl.
- Next, we go into the interior of the car, and using an awl, we pass the string through the glass in the lower part in the center (or in any other place on the windshield, but in its central part).
- The photo below shows what this procedure is.
- When the string is passed through the glass, all that remains is to attach the holder to its other end, and then carry out the appropriate manipulations around the perimeter of cutting or sawing out the sealant (separation of the glass from the body).
- The sealant should be cut off slowly and carefully, avoiding damage to the glass. Usually this procedure takes 20-30 minutes. In this case, it is important to move sequentially: starting from the center from the bottom, you need to reach the corner, and then, without removing the strings, reach the top. After this, cut off the sealant from the top, go down to the side and from the bottom reach the center.
- When you move in the upper part, be sure to control the position of the string so as not to cut off the paint on the roof, otherwise this will subsequently lead to the accelerated appearance of “saffron marks”.
- After successfully completing these manipulations, all that remains is to remove the windshield from the Priora.
It is recommended to invite an assistant to remove it from the car body. In addition, it should be lifted using special clamps with suction cups. This will eliminate the possibility of it slipping out of your hands.
The video below shows how to dismantle the windshield on a Priora with your own hands without outside help.
Consider the sequence of work and follow all recommendations. After dismantling, before installing a new product (or one that has been removed), you need to carefully remove the old sealant (the most difficult stage).
Explanation: digital symbols on glass
Auto glass receives the following designations:
- ASI M461 DOT 183 - the product complies with the ANSI Z1 standard adopted in the USA.
- E2 43R 001207 – the product has successfully passed tests according to the standards of UNECE Regulation 43.
- ….8 – the number of dots indicates the month, the number – the year (in this case – 2021 or 2008 – this can be determined by the type).
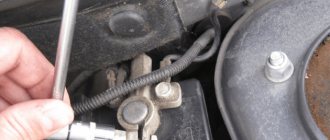
The heated windshield of a Priora car should work correctly. To check this, the following connection diagram is proposed:
A “+” wire must be drawn from the battery to the mounting block, then placed inside the relay block. At the top of the car glass, connect the contact to the negative wire. Route the wires under the casing. From the relay, run the brown wire to the alternator warning light (white wire).
Continue connecting according to the diagram - everything is simple.
How to install a windshield on a Lada Priora: replacement instructions
Initially, you need to carefully remove the old sealant. To do this, we use a sharp knife, with which all residues are cleaned. It is important to clean the seat before installing the windshield until it is in perfect condition. After all, this determines not only how long it will last, but also how well it will be planted.
Before installing a new windshield on a Priora, you need to clean the seat on the car body, as well as the surface of the windshield around the perimeter using a degreaser.
After this, we move on to the actual process of installing the windshield:
- The activator from the kit is applied around the perimeter of the glass and body opening. Use tweezers with cotton wool to apply.
- Before applying sealant to the body part, you should install the sealing rubber in the upper part of the windshield.
- And secure the gutters on both sides. By the way, the correct installation of drains is carried out only by removing the windshield.
- Before applying the sealant, treat the surface of the body and glass with a primer or primer from the kit (it is black).
- The primer dries for at least 10 minutes (read the instructions).
- We apply sealant around the perimeter, at least 0.5 cm thick, always using a gun. Preheat the sealant, since unlike silicone products, glass is much denser, and even when using a gun, it will be extremely difficult to squeeze it out without preheating.
- It is important not to leave any places where the sealant layer will be missing.
- When applying it, locks should be made at the interruption points, which will prevent the possibility of a decrease in tightness.
- Next, you should lean the windshield, placing it on the sealant. You need two people to do this to position it evenly. In addition, you need to hold it not with your hands, but with special suction cups (as shown in the photo below - this is not correct).
- After this, do not forget to install stops (adjusting wedges) that limit the likelihood of the windshield moving. With their help we adjust the position of the glass.
- The photo below shows where the adjusting wedges are installed.
- At the final stage you need to fix the glass (optional). To do this, it is recommended to use zip ties and a rubber bladder. Secure the tie around the pillars, then inflate the chamber previously located on the surface of the windshield, as shown in the photo. It is prohibited to perform any actions on the car while the sealant is drying, as this may result in a loose fit of the glass (you cannot even slam the doors).
The drying time of the sealant is at least 12 hours (indicated in the instructions). At this point, the process of replacing the windshield on a Lada Priora car is completed, and using expert instructions, it will not be difficult to implement such actions yourself. At the same time, you can save several thousand rubles and spend them on consumables or spare parts. Below is a video instruction on how to replace the windshield on a Priora.
After a day, you can start checking the windshield for the possibility of a leak. To do this, you should pour water around the perimeter and pay attention to the presence of leaks in the cabin. The absence of signs of moisture only indicates that the work was performed correctly and efficiently.
This is worth summing up and noting the importance of a responsible approach to the implementation of the process. If you are not confident in your abilities, then it is better to entrust the work to professionals and pay for their work, but using the above instructions, you will understand that it is not so difficult to dismantle and install the windshield on a Priora.