Having heard the word “classic”, most car enthusiasts in our country do not remember the works of Chekhov and Tolstoy or symphonic music, but the family of cars of the Volzhsky Automobile Plant, which originates from the legendary “penny” VAZ-2101, first released in 1970. Rear-wheel drive small cars were produced until 2012, and, despite their archaic design, are beloved by many motorists in the vastness of Russia and the countries of the former socialist camp. The characteristics of the Zhiguli, regardless of the model, are very modest, and the design is angular and not too sophisticated, but the simplicity of the design provides extensive opportunities for tuning. Let's look at the most common solutions for improving the style and driving characteristics of the "classic".
- Styling of the VAZ classic: external and internal modifications
Tuning the front optics of the ZhiguliChanging the shape of head lighting equipment by installing overlays
- Installing angel eyes on a Zhiguli
- Xenon headlights for VAZ classics
- Video: tuning VAZ 2106 headlights with lenses
- Tinting: style, comfort and law
- Interior noise insulation
- How to improve the handling and stability of the “classic”
Refinement of the Zhiguli suspension
- Video: charged “seven” against supercars at drag racing competitions
- Four-point seat belts for driver and front passenger
Easy tuning of a car hood
The simplest options for tuning a hood with your own hands, which even a beginner can handle, are pasting it with special materials, installing additional emblems or a spoiler on the vehicle.
Pasting with vinyl film
If the hood of your car has defects and scratches, or you just want to make it original, you can tune it using special adhesive films. It will be much cheaper than painting the part. This upgrade will give your hood an original look.
There are special vinyl films that can be purchased on the market or at any car store. They come in different types: matte, glossy, carbon fiber, plain or with different patterns. Everyone can choose a product according to their own color and taste.
It is advisable to use two people to paste the film. Before starting work, you must thoroughly wash and degrease the hood using a solvent. To begin, fix the film in the center of the product. One person heats the film with a hairdryer, the other carefully stretches it and straightens it from the center to the sides using a spatula with a soft tip. Thus, you will receive a new tuned body element without defects or scratches.
Tuning using a deflector
Deflectors are especially popular when tuning the hood. You can install them yourself by purchasing them in the store. It is very easy to install a deflector or spoiler on a car according to the instructions and special fasteners that come with the kit. There are also deflectors that are made of soft plastic and are installed by gluing.
The deflector, on the one hand, decorates the car and makes it original, on the other hand, it performs protective functions. It protects the vehicle windows and hood from damage from small stones. The deflector is also popularly called a fly swatter, since, in addition to stones, it also reflects insects flying towards it.
Experts recommend purchasing hood deflectors from VIP tuning, which are of good quality and reliability. By installing a deflector on your car, you will protect the hood and windshield from dirt and corrosion as much as possible, and also add brightness and originality to your car.
https://youtube.com/watch?v=jnFwPgBR2u4
Hood locks as a tuning element
Often, as a tuning element, car owners use sports hood locks, which give the vehicle an aggressive and predatory look. They are most often used on sports cars that participate in racing and rallies, however, they can be installed on any car model.
Sports locks are both a decorative element and a protective device against opening the hood while the car is moving. You can install the locks yourself using step-by-step instructions for them.
To install the hood locks, you need to drill several holes in the hood cover and frame. Therefore, before starting work, read the installation instructions very carefully and check the markings several times to ensure that the body part is not damaged. Before installing the lock, cover the surface near the hole with masking tape so as not to damage the car’s paintwork during operation. The locks are secured using specific fasteners that are included in the kit.
Styling of the VAZ classic: external and internal modifications
Many owners of “classic” VAZ models want to make the car unique, and the interior more comfortable and bright, while some simply consider the appearance of their cars unfinished. Both of them resort to visual tuning, sometimes without affecting the technical part. Let's look at the most popular ways to improve the appearance and interior of a Zhiguli.
Tuning the front optics of the Zhiguli
The front lighting of a car is often associated with the eyes of the car. Headlights are often the defining element of design, so it is not surprising that most often car enthusiasts first of all take on tuning optics. Depending on the model, tuning tasks and the amount of money that the owner is willing to spend on modifying his car, we can roughly distinguish three types of headlight improvements. Let's consider them in order from the most budgetary to the most complex and costly.
Changing the shape of head lighting equipment by installing overlays
This method of tuning headlights is most often used by owners of VAZ-2104, 2105 and 2107 cars. Their rectangular lighting technology with a smooth surface of the lampshade allows you to easily install overlays of almost any shape. Front light tuning kits are sold at most domestic auto parts stores. Often, motorists make attachments themselves, because this requires only thick plastic, a sharp saw and sandpaper or a file.
Headlight covers give the “classic” a more “predatory” look
The attachments are usually attached using glue directly to the headlight dome. When using screws, the attachment must be installed on the car body to prevent water from entering the headlight, so this method is used less frequently.
You should carefully consider the choice of glue. It must be heat-resistant, since the headlights can heat up to high temperatures when used for a long time.
Installing angel eyes on a Zhiguli
The so-called angel eyes are a more complex version of tuning the “classic” headlights. Most often, such modifications are made on VAZ-2106 and 2103 models, since on these cars the LED strip can also be attached to the outside of the headlights. However, this modification is found quite often on other products of the “classic” line. To install angel eyes on a “four”, “five” or “seven”, you need to drill a reflector inside the lampshade and install diodes in each hole. In addition, a box for a block of diodes and resistors is placed on the rear side.
Angel eyes are most often installed on the VAZ-2103 and 2106 models
The rear optics can be improved in a similar way. LEDs will make it possible to increase the brightness of brake lights, change the design of the rear lights and reduce the load on the vehicle’s on-board electrical network.
All holes drilled in the reflectors for installing diodes must be treated with sealant to prevent water from entering the headlight.
Xenon headlights for VAZ classics
The most radical and expensive modification to the Zhiguli headlights is the installation of xenon headlights. Xenon light is much brighter than halogen, and the illumination spot from such headlights is much wider. The installation process itself is simple. It is enough to remove the headlights, drill holes in the reflectors and install new lamps. However, starting equipment and the lamps themselves can be quite expensive.
Xenon headlights are much brighter than halogen headlights
Video: tuning VAZ 2106 headlights with lenses
Tuning of Zhiguli windows
To create a cozy atmosphere in the cabin, as well as to protect from bright sunlight, Zhiguli owners often resort to tinting the windows, as well as installing a grille on the rearview glass.
More information about VAZ-2107 glass: https://bumper.guru/klassicheskie-modeli-vaz/stekla/lobovoe-steklo-vaz-2107.html
Tinting: style, comfort and law
Car window tinting is probably the most common type of tuning. As a rule, windows are tinted using film. There is also electrical tinting, but its cost is measured in thousands of dollars, so it is not used on Zhiguli cars. There are several types of tint film:
- Painted is the most common option. It is attached with glue applied to the surface of the film itself. The degree of darkening depends on the preferences of the car owner.
Blind tint looks stylish, but is unsafe and therefore illegal - Metallized. Has a metallic mirror finish. This film can have different shades, which means it can be matched to the body color of your car. It is attached to the window in the same way as a painted one.
Metallic tinting perfectly hides the interior of the cabin from prying eyes - Perforated. Consists of small opaque cells and holes between them. Typically installed on rear windows.
- Silicone. This tinting technology was a response to emerging laws limiting the degree of shading of front windows, namely: part 3.1 of article 12.5 of the Code of Administrative Offenses and GOST 27902. Silicone tinting is attached using a static effect, without the use of glue.
A car enthusiast planning to tint the windows of his car should be aware of the legal regulations regarding the level of shading. The main points of GOST 27902 (light transmittance of glass):
- The windshield should not lose more than 25% of light transmittance.
- For the front windows of car doors, losses can be up to 30%.
- The rear center window and side windows on the rear doors can be darkened by up to 95%.
- Drawings and the use of perforated film are not allowed on the front windows.
- The use of red, green, yellow and blue tint films on front windows is prohibited.
Rear window grille: a classic for a “classic”
The grille on the rear window is a decorative element made in the spirit of powerful American cars of the seventies. In addition to purely aesthetic purposes, it protects the rear of the cabin from direct sunlight, and the rear window from dirt.
When properly combined with other tuning elements, the grille on the rear window looks very impressive
As a rule, the grille is sold in the form of two separate parts and is attached with a special protrusion located along the entire perimeter of the part. This protrusion must be placed under the rear window rubber seal. It is advisable to clean and degrease contacting surfaces.
For ease of installation, the grille is sold in two halves.
Aerodynamic body kits and spoilers for Zhiguli
If you want to radically change the appearance of your “classic”, you can’t do without an aerodynamic body kit. However, it is worth understanding that the word “aerodynamic” in relation to most tuning packages for Zhiguli is used in a figurative sense. Parts that actually improve streamlining or increase traction are not that common and usually cost quite a lot of money.
Body kit parts determine the appearance of the car, so their choice must be approached carefully and with taste.
Typically, an aerodynamic body kit includes:
- modified front bumper with imitation air intakes and spoilers;
- door sills;
- rear bumper (sometimes with a decorative diffuser).
Sometimes the aero kit also includes a rear wing, which is most often attached to the trunk lid.
The rear wing (spoiler) is attached to the trunk lid
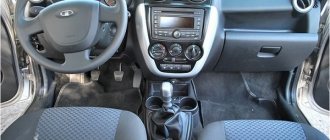
Refinement of the “classic” interior
Refinement of the interior of the Zhiguli seems to be the most appropriate direction of styling, because it is the interior of the car that is most often visible to the driver and passengers. In addition, in addition to aesthetic changes, the level of comfort can be significantly increased, which is low in the basic configurations of the “classic” line models.
Interior noise insulation
Speaking of comfort, first of all you should pay attention to sound insulation. It is practically absent from the factory configuration of Zhiguli cars.
The silence in the cabin is worth the effort that needs to be made to install high-quality sound insulation
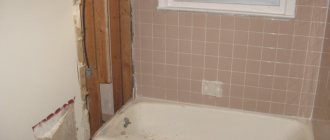
To cover the interior with soundproofing material, you will have to remove all the seats, the dashboard, and the door trim . For sound insulation, you can use penofol or a special coating, which is sold in spare parts stores.
Front panel: replacement, modification and trim
The front panel on VAZ cars of the “classic” family can be modernized or replaced entirely. Some owners prefer to install torpedoes from other VAZ models on their cars, but there are also those who decide to install parts from cars of other brands. On the Internet you can find photographs of Zhiguli cars with torpedoes from Mitsubishi Galant and Lancer, Nissan Almera and even Maxima. The BMW brand is especially popular in our country, so craftsmen install front panels from most old models of the Bavarian automaker on the “classics”. Naturally, donor torpedoes need to be seriously modified and adjusted so that they fit into the interior of the Zhiguli.
Craftsmen even manage to install a front panel from BMW on a Zhiguli
The original front panel can be covered with leather or other material. This is quite a complex process. In order for the new sheathing to look good, it is necessary to fit the material perfectly so that it does not sag or form wrinkles. The torpedo itself must be completely dismantled to carry out the plating.
Sometimes interior tuning changes a car beyond recognition
New devices are often installed on a standard front panel. Ready-made instrument clusters for different Zhiguli models are sold in car stores, but the most creative car owners make scales, arrows and lights with their own hands.
Non-standard instrument units are sold assembled in stores
Video: tuning the dashboard of a VAZ 2106
Seats: trim or covers
There are a lot of companies producing car seat covers. Their range includes models for almost any brand. Moreover, many of these companies produce cases according to individual customer wishes. Thus, choosing an option for the “classics” will not be difficult. However, in most cases, covers are a temporary solution; they stretch and begin to “walk” on the seats.
Cases with side support are often found on sale.
If you have cutting and sewing skills, you can cover the seats yourself with the material that suits you. It is important that the fabric, leather or vinyl is durable and resistant to deformation.
Read about the seats of the VAZ-2107: https://bumper.guru/klassicheskie-modeli-vaz/salon/sidenya-na-vaz-2107.html
Door card trim
After replacing the seat trim and front panel, it makes sense to pay attention to the door cards. As a rule, in the basic configuration they are upholstered in cheap black dermantine and low-quality plastic. To improve this part of the interior, the inner door trim will have to be removed, after first dismantling the armrest, the inner door handle and the window lifter lever.
You can cover not only the door with leather, but also the armrest
Installation of electric windows
In the process of tuning the door trim, you can also install electric windows. Installation kits are available at auto parts stores.
Pulling the ceiling
The ceilings on Zhiguli cars suffer almost more than other elements of the interior. The material with which the ceiling is upholstered often sags, breaks or gets dirty. There are two ways to reupholster a ceiling:
- Direct upholstery replacement. This procedure requires the removal of the arches on which the material is stretched. During this operation, you can glue the ceiling with additional sound insulation.
- Stretching a new layer of upholstery over the old one. This method is suitable if the old ceiling has not yet sagged.
Replacing the steering wheel and gearshift lever
If the tuning of a “classic” is made in a sporty style, it makes sense to install a three- or two-spoke sports steering wheel with a smaller diameter. To do this, you need to remove the old steering wheel, the mounts of which are located under the signal cushion. The screws that hold the airbag in place are located either under the emblem or on the back of the steering wheel, depending on the model.
The three-spoke steering wheel is an integral part of the sports styling of the Zhiguli.
It also makes sense to choose an attachment for the gearshift lever in accordance with the color scheme and style of interior trim. Some owners shorten the lever itself to reduce its travel, but this can lead to reduced shifting efficiency.
Video: do-it-yourself tuning of the VAZ 2107 interior
Lowered landing
Lately, lowering the car's suspension has become popular among young car enthusiasts, who are most often involved in tuning classics. This is done solely for aesthetic reasons and often leads to a decrease in the driving properties of the car. This direction of improvement is not recommended for residents of those parts of our country where the quality of the road surface leaves much to be desired.
With unobvious aesthetic advantages, a lowered car loses cross-country ability
Downgrading a “classic” is quite easy. It is necessary to disassemble the front and rear suspension units and cut the springs to the required length.
"Bad Boy" for VAZ 2110
Today, a very popular type of tuning for VAZ cars is the production of a “Bad Boy” hood.
This gives the car an aggressive and assertive style. Let’s look at how to make a “Bad Boy” hood on your own on a VAZ 2110. You can, of course, turn to car service specialists for help. However, keep in mind that financial costs in this case will be 5 times higher. Tuning the hood “Bad Boy” To cope with the work, you need to have metal working skills. The step-by-step process is as follows:
- Using a grinder, cut out 2 triangles from sheet metal for the front part.
- We process them so that they are absolutely symmetrical, and attach them to the hood using self-tapping screws.
- Using a welding machine, we weld them and remove the self-tapping screws.
- Grind the weld seams.
- Using an angle grinder we level the surface.
- We carry out puttying using putty with carbon fiber.
- After drying, sand it.
- Cover with soil.
- We paint with a spray gun and wait for it to dry.
- After the paint has dried, we can consider the work of tuning the VAZ 2110 completed.
Installing protection on a car yourself
If you decide to install and purchase the specified product, let’s take a closer look at the installation procedure.
Necessary conditions for installation of molding:
– cleaned and degreased surface of the element installation;
– the air temperature should not be less than 21 degrees.
Step by step procedure:
1. Remove the protective film from it, first exposing the mounting tape.
Please note that only the corners of the molding are freed from the tape. In this case, the ribbon must extend beyond the part
Attention, make no mistake. It is forbidden to completely remove the protective film
This way you make it harder for yourself to move parts.
2. After correctly removing the tape from the corners, move it.
3. Treat the area where the molding is installed with a primer. This product will react with the glue on the mounting tape. This will improve the adhesive properties.
4. Complete the final installation of the element in its intended place. To do this, you need to pull the edge that sticks out and remove it from the mounting tape.
5. Press the bar firmly against the body.
6. In order to improve the adhesive properties, keep it for 24 hours in a warm room.
This procedure completes the installation of the new product. To secure the adhesion of the element to the vehicle body, it is recommended to keep it for 24 hours in a warm place and not to wet the body.
Now let's talk about tuning headlights and upgrading electrical systems
To put it mildly, original headlights are not the best option. They don’t add any attractiveness or charm. If present, the “nine” looks gloomy and stern. Replacing factory headlights is a necessary procedure.
It also comes in three types:
- The headlight unit is also called human headlights. They change the appearance of the car. Add softness, style and attractiveness.
- Tinting headlights is a dangerous thing. It changes the quality of lighting not for the better;
- Xenon headlights irritate passersby. They cause a reaction of rejection, but add attractiveness to the appearance of the car. And yet, traffic police officers severely fine them for them.
The plastic elements on the taillights look ugly. During bad weather, they illuminate the road poorly, and this situation can lead to disaster. The easiest way is to purchase new plastic and completely replace the old one. Or use your own hands again and polish the old factory plastic with them. When this operation is carried out, the taillights take on a more attractive appearance and will shine simply gorgeous.
When there is fog on the highway, a car with such headlights will be noticed by cars moving behind, and, therefore, the risk of an accident will be significantly reduced.
Nothing is impossible
But still, tuning a VAZ 2110 with your own hands can be done if you plan to make minor improvements in the car’s simple equipment, improve some of its parts or replace and improve the audio system, install a convenient trunk, replace the car’s wheels and much more.
https://youtube.com/watch?v=f7bBjiWTNhU
These simple jobs can be done independently or with an assistant; here, tuning a VAZ 2110 with your own hands becomes a realistically feasible task, provided that you have the necessary knowledge base.
And in order to get this knowledge base, I offer you a multimedia manual, Tuning a VAZ 2110 with your own hands, which will teach you how to do many jobs yourself, and maybe more.
This manual contains complete information on tuning VAZ-2110, VAZ-2111, VAZ-2112 cars, so it will be of interest to a wide range of VAZ car owners.
Video tuning VAZ 2110 - what can be achieved.
Since tuning the VAZ 2110 engine and VAZ 2111, 2112 cars is a very complex process, it is not specifically covered in this manual.
The main issues that are discussed in it are those that will allow car enthusiasts to tune the VAZ 2110 with their own hands without the involvement of high-level specialists. And you understand that the higher class the specialist is, the more money he should be paid.
I hope you understand that tuning a VAZ 2110 with your own hands is an expensive undertaking and it is not worth doing it right away and in full. Tuning the VAZ 2110 engine should be carried out separately, since it is very expensive and entails a number of additional works to change the gas distribution mechanism and transmission.
Tuning of the remaining components and assemblies of the VAZ 2110 can be carried out separately, depending on how much your budget allows.
In the presented manual you will find the entire necessary list of works with drawings and diagrams, color illustrations, thanks to which tuning a VAZ 2110 with your own hands will not be a chore for you, but an interesting hobby.
Make your car unique. Good luck everyone.
- Format: Multimedia;
- Language: Russian only;
- Car brands covered by the manual: VAZ-2110, VAZ-2111, VAZ-2112;
- Medicine: not required.
- Size: 108 MB.
Video of reupholstering the interior of a VAZ 2110-12 car.
Tuning a VAZ 2110 with your own hands - the file was deleted at the request of the copyright holder, we apologize.
Read on the topic: Tuning the car interior.
Dashboard tuning: interesting solutions
The instrument panel is constantly in front of the driver's eyes while driving, so why not give it an original look? There are several options for this, which can be either quite simple or involve a radical replacement.
Installing LED lighting will transform the appearance of the panel. To do this, you will need an LED strip, which can be easily purchased at the store. To carry out tuning, you will need to remove the panel and work with a soldering iron. New lighting is not only a decoration; it can be much more convenient. Drivers often complain that the factory version is too dim or, conversely, blinds the eyes. In this case, changing the lighting is really necessary so as not to strain your eyesight. It is better to place the tapes along the entire length of the panel, and also use several short pieces rather than one long one. This reduces the likelihood of LEDs burning out quickly.
A simple way that does not require any special tools is to use film. You only need to disassemble the panel to the backlit base. And then the pieces of film are glued to the places with numbers and lines. The light from the bulbs will pass through the film and change its hue. There are no limits to your imagination here; you can find film of any color and even choose different tones for the numbers, arrows and divisions on the scale. This method is simple and safe; it does not require working with the electronic components of the car, so there is no need to fear any accidental damage.
Another option similar to film is special dashboard stickers. The required scale with divisions is already drawn on them; you don’t need to cut anything out, just stick a large sticker on it. Each car model has its own version, so when purchasing it is important not to mix it up, otherwise the sticker will not fit the panel.
Important! Do you want drastic changes? Then you can completely update the dashboard. Such a replacement costs more than all other options, but the new panel can be completely customized to the driver’s tastes - choose the backlight, arrangement of instruments and other parameters.
Even an old car can be given an unusual and modern look in this way by installing a panel with a computer display and high-quality equipment. Such an update will look very impressive, especially if it is carried out simultaneously with tuning the entire interior.
Average prices
For a VAZ 2111, re-welding the thresholds from a corrugated pipe will cost up to 1,500 rubles. for self-repair, provided that you have a semi-automatic welding machine. Prices for consumables:
- pipe - from 700 rub. for 3 meters;
- bitumen mastic - 500 rub. jar;
- primer, putty - 300 rub.
The installation of decorative overlays on a metal structure will add originality and style. Plastic covers with backlight, shagreen, chrome, etc. can be installed in 30 minutes.
Prices for repairs at a car service center start from 10,000 rubles. The price includes replacement of a body element, use of original replicas, putty, painting. In most cases, owners have to pay extra for reinforcement of the bottom, since part of the body on half of the models requires repair.
What are the main functions of eyelashes on a car?
If you are looking for an answer to this question, then the main reason for using eyelashes on a car is to improve the design because after their installation, the vehicle begins to seem more brutal and even aggressive. Well, another advantage of installing a bad boy hood with eyelashes is the increase in density between the headlights and the hood.
You can also purchase special, ready-made hoods with the bad boy style, which already have headlights.
Read more about how to make a BadBoy hood for a VAZ car
The bad boy hood style is increasingly gaining popularity among VAZ car owners. But it is very rare to find a similar hood on a VAZ 2110. After this, a similar question arises: is it difficult to make the same hood for a VAZ 2110 with your own hands?
ATTENTION! To do work of this level in a garage, you must have at least some experience in tin work or invite an assistant who has already done similar work. Otherwise, you are more likely to waste your money.
So, step by step instructions:
- We make the hood by extending metal pieces that need to be taken from another similar car. Using a grinder, cut out the right side of the hood to the desired size. We check whether the right part of the metal sheet fits in place and if so, then cut out the same part, only for the left side (it is at this stage that you can give the car an evil or good look by changing pieces of metal);
- After the above, you should attach the cut metal pieces on the hood. Do not forget to measure the distance to the middle of both sides, they must be secured symmetrically;
- Using self-tapping screws, fix the metal sheets and then weld them with a welding machine (once this step is completed, the screws must be removed);
- At the end of the third step, you should make the hood smooth and level the surface. To level the surface of the hood you will need to use an angle grinder. When you have leveled the surface, start applying putty (a good move would be to use putty with reinforced carbon fiber). We wait until the putty dries and sand the hood again, then prime and paint.
If you compare prices, making a hood by hand can cost you 1,500-2,000 rubles in materials. Well, if you decide to entrust your vehicle to a service station, then in such cases be prepared to pay about 7,000-10,000 rubles.
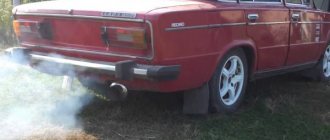
Finishing up the exhaust system
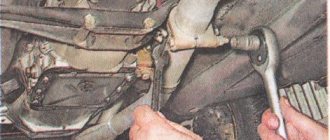
For high-quality and durable isolation from vibration and engine vibrations, the VAZ 21099 body is mounted on elastic rubber-metal supports. However, all dynamic loads are transferred in full to the exhaust gas exhaust system, which is rigidly connected to the engine. Vibration effects on exhaust pipes are complemented by internal stresses associated with unpredictable alternations of heating and cooling, exhaust gas pressure, stone impacts and other factors.
To reduce the level of harmful parasitic vibrations, it is necessary to install a corrugated pipe in the exhaust system - a bellows-type metal compensator, which is sold in auto parts stores. Thanks to this, you will forget about the problems of a muffler knocking on the body, as well as sudden perforations of the exhaust tract in the most unexpected places.
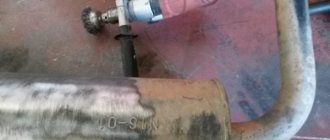
This kind of tuning is not difficult to do with your own hands, only if you professionally know how to handle a semi-automatic welding machine. In addition, you need to be able to use a grinder to cut off part of the exhaust pipe, and weld a compensator bellows into the already prepared gap. For those who do not have an electric welding machine, the solution is to use a high-temperature sealant. A tube of cold welding plus a couple of clamps will also help.
How to remake an old body kit
The front and rear body parts of a VAZ car are being redesigned. To implement this, several methods are used:
Soldering, gluing.
Use adhesives made from high-quality ingredients or a high-power soldering iron
When performing an operation, when installing additional components on a body element, it is important that they have the same type of plastic as the object of modification
Use of technical plasticine, polyurethane foam, polystyrene foam.
These materials are the basis for creating a part of the buffer or a new part using fiberglass. The method has disadvantages. The material is toxic, so it is recommended to work in well-ventilated areas and use gloves and a respirator.
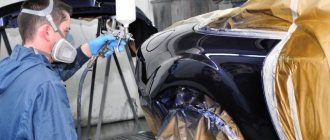
Painting, pasting.
When the color changes, a paint coating is applied to the sanded and primed surface. And when pasting - a special film.
A converted buffer installed on a car significantly changes the appearance of the car body
This vehicle looks fresh, stylish, which attracts attention. Tuning is performed in service centers and auto repair shops, but the price for these services is quite high
Therefore, many motorists carry out bumper modifications themselves.
Tuning VAZ 2113—2115 cars
Front-wheel drive cars VAZ 2113, 2114 and 2115 are usually equipped with a sports suspension. It improves stability and controllability while driving:
- To begin with, we are modifying the front struts, turning them from oil-filled to gas-oil-filled. This is done by pumping gas into the working chamber. Thanks to this, the rod will automatically return to its original position after immersion;
- to protect yourself from the spring flying out while moving, we limit the stroke of the rod;
- standard rods can be replaced with “kailovers” - sports racks. They will make it possible to sit the car lower. This will give it stability. In this case, shortened springs are used, which helps to minimize the level of car roll when cornering;
- the above-described wishbones. They will provide improved car handling, precise suspension tuning and increased castor.
This is how we tune the suspension of models of the 2113-2115 group with our own hands, making it sporty. This improves handling, reduces roll, and increases your safety on the road while the car is moving.
Suspension and engine
Modernization can be done in two ways: replacing only small parts or globally upgrading large car systems, which will lead to much better results.
The working volume of the VAZ-2104 engine is increased by boring the cylinders by treating their surfaces with a drill, which can be done in a couple of hours. The next step should be to replace the crankshaft and install new forged connecting rods and pistons to increase the stroke of the latter. As a result, the car will accelerate faster, and the efficiency of the engine will increase significantly.
Supporters of radical measures believe that it is better to immediately send the engine for scrap, because wear of parts and metal fatigue leave little chance for high-quality modifications, and instead install and tune a 1.9 liter Niva engine. To force it, you will need to do the following:
- bore the head channels;
- grind the intake manifold;
- install cast pistons with a diameter of 82 mm;
- change the valve timing using a new camshaft;
- install an 88 mm sports crankshaft.
The chassis requires, first of all, suspension adjustments, for which the “native” struts are replaced with sports struts with double springs, which will come in handy for Russian off-road conditions.
If the Lada drives only on smooth asphalt, you can lower the ground clearance using short springs and discs of smaller diameter, and for the outback a body lift is suitable.
Putting the car at “high speed” refers to aerobatics - springs from Volga are used for the front suspension, and shock absorbers from Gazelle are used for the rear suspension to lift the body. At the same time, the body metal will have to be strengthened. Upon completion, the car must be taken to a service center to adjust the wheel angle.
What can tire wear cause?
The car “pulling” to the side can occur due to a difference in tire pressure or a defect in the rubber parts of one of the struts. This is also possible due to tire wear. Rapid tire wear is directly related to improper operation of the machine. Sharp acceleration and braking, overloads often cause tire wear. But often this situation arises:
- if the wheel alignment angle is violated;
- when the hinge mechanisms are worn;
- when the chassis is unbalanced.
If you know what a large number of suspension parts are intended for, then you can monitor its condition every time you inspect the car on a pit or overpass. Pay close attention to how the protective covers on the ball mechanisms look. Are there any defects on them?
Attention should be paid to the condition of the rubber suspension parts; under the influence of time or excessive loads, they can wear out, and this also leads to frequent replacement of tires
Engine and suspension upgrades
Let's start with the machine filling. The first thing we have to do is to improve the car engine, since the car itself is weak. Temperature changes, transportation of various cargoes and uneven roads: all this does not have the best effect on the car’s engine. It, together with its parts, experiences constant loads, as a result of which it wears out. Moreover, wear occurs unevenly. To restore worn parts, machine cylinders need to be bored. If you also strengthen the piston stroke, the car will pick up speed and speed much faster.
Lada Priora: strengthening the frame
Lada Priora strengthening
The popular Priora car also needs to modernize the body, despite its modern production. The car frame is not at all as strong as we would like. In addition, such factors as load, external environment, etc. also have a negative impact. What to do in this case is clearer to the owner.
So, tuning the Priora body makes it possible to significantly improve handling. At the same time, if you use ready-made kits sold today in the store specifically for Priora, you can save a lot, because the range of models is very wide.
In car stores today you can purchase the following tuning kits designed specifically for Priora.
| Name | Purpose | Price |
| Lower extension 2801.0300.04 Lada Priora from TechnoMaster | Reduces movement of the front suspension arm bracket. Reduces stresses occurring in the lever bracket and the spar-to-floor connector and stresses occurring on the front end in the area of the right steering gear bracket. | 720 rub. |
| Front strut AR 0140 from AutoProduct | Increasing the rigidity of the front end of the body, reducing stress at the attachment points of the front suspension supports. | 850 rub. |
| Right subframe lever AR 0031 | The right subframe lever AR 0031 / AR10-2902750 is installed on Lada Priora cars (VAZ 2170, 2171, 2172) and their modifications together with a subframe to strengthen the body. | 4280 rub. |
| Drive subframe without protection | Increased rigidity of the body as a whole and suspension mounting points. Improved SA suspension. Protecting the power unit from impacts from below and increasing the rigidity of the subframe assembly. Increase castor by 1.5 degrees. Increasing the vehicle base by 15 mm. You can choose from aluminum (4 mm), galvanized steel (2 mm) protection. Additional support is not included and can be purchased separately. | 8000 rub. |
| Ready rear amplifier AR 0260 for Priora station wagon and hatchback | Increased body rigidity as a whole. Installing the amplifier allows you to increase the torsional rigidity of the body up to 11%. | 2290 rub. |
| Ready front panel amplifier 16-cl. for Priora, VAZ 2110 | Reducing the movements of the steering mechanism, improving vehicle controllability. | 500 rub. |
| Ready rear strut amplifier for Priora, VAZ 2110 | It is used to increase the torsional rigidity of the body up to 11% and the rigidity of the body as a whole, as well as to reduce the movements of the upper mounting points of the rear suspension struts and stress in the body elements. | 2600 rub. |
| Body reinforcement Priora sedan | The body amplifier is designed using mathematical modeling specifically to eliminate the effect of “impressive” behavior. An increase in body rigidity entails improved handling and stability of the vehicle, increased durability of the body and increased passive safety of the vehicle. | 3500 rub. |
| Body reinforcement Priora hatchback and station wagon 5601 | The body amplifier is designed using mathematical modeling specifically to eliminate the effect of “impressive” behavior. An increase in body rigidity entails improved handling and stability of the vehicle, increased durability of the body and increased passive safety of the vehicle. The upper connecting bar is removable, which allows you to use a large luggage compartment even with the amplifier installed. | 3800 rub. |
Technical tuning of Zhiguli: increasing performance
The simplicity of the Zhiguli design makes cars of this family an ideal construction kit from which you can assemble a fast and maneuverable car. And the rear-wheel drive layout allows you to build a real car for drifting competitions or amateur circuit racing. However, to seriously improve the handling, dynamics and safety of the Zhiguli, deep improvements are required. Let's look at where you can start this process.
How to improve the handling and stability of the “classic”
Despite the classic layout (front engine, rear wheel drive), Zhigulis are characterized by mediocre handling. And cars of this family do not handle the road very well. It is quite possible to correct this situation. To do this, you need to pay attention to tuning the suspension and brakes.
Refinement of the Zhiguli suspension
The standard tuning scheme for the “classic” suspension allows you to increase its rigidity and significantly reduce roll. It consists of three stages:
- Installation of springs from Niva (VAZ 2121). The springs are more rigid, but at the same time they are ideal for installation on a Zhiguli. At this stage, you also need to replace the rubber bumpers.
- Replacing shock absorbers with sports ones. Preference should be given to gas-oil struts. The range of these components in spare parts stores is very wide.
- Installation of stiffer anti-roll bars.
Refinement of the suspension will not only improve handling and stability, but also increase comfort when driving the Zhiguli.
Improved suspension improves agility and comfort
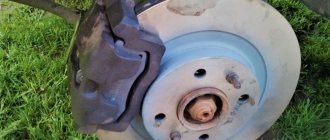
Brake system tuning
It is worthwhile to improve the brakes on the Zhiguli before you begin to increase power and dynamic characteristics. Standard "classic" brakes have never been particularly effective or reliable, so they may simply not cope with increased speeds.
As a rule, all Zhiguli cars were equipped with front disc brakes and rear drum brakes. It is better to start the improvement process by replacing the rear brakes. Brake system tuning kits from reputable manufacturers can be purchased at parts stores, but their price can be quite high. A budget option is to install ventilated disc brakes from a VAZ-2112. They stop the car much more effectively.
Rear disc brakes significantly improve braking performance
Tuning the rear brakes comes down to replacing the drum mechanisms with disc ones. The donor could be a VAZ-2108. The front brake calipers from the “eight” or “nine” are easy to adapt and install on the “classic” as rear ones, but you will have to buy discs separately.
How to increase the power and dynamic characteristics of a “classic”
The Achilles heel of the “classics” is its dynamics. Even the most budget foreign cars pick up speed noticeably faster than Zhiguli cars. Many owners of “classic” VAZs are not ready to put up with this. They resort to tuning the engines of their cars, and also modify the exhaust system.
Video: charged “seven” against supercars at drag racing competitions
Tuning the Zhiguli engine
Owners of fuel-injected Zhiguli cars have access to chip tuning. This procedure does not require intervention in the engine structure. Changing the characteristics of the motor occurs due to adjustments to the engine software. With the help of chip tuning, you can change the level of saturation of the combustion mixture with gasoline, which, in turn, leads to changes in power and efficiency parameters.
Find out more about the design of the VAZ-2107 engine: https://bumper.guru/klassicheskie-modeli-vaz/dvigatel/dvigatel-vaz-2107-inzhektor.html
If your Zhiguli has a carburetor engine, chip tuning, unfortunately, is not available to you. However, power can be increased by installing two carburetors or increasing the diameter of the carburetor fuel and air jets. The effect of this upgrade is to speed up the flow of the air-fuel mixture into the combustion chamber.
Installing a second carburetor significantly increases engine performance, but also increases fuel consumption
If these modifications are not enough, you can use the following methods to increase the engine power of the “classic”:
- Installing a zero-resistance air filter will increase power by improving the process of saturating the combustible mixture with air. Engine performance is improved without loss of efficiency.
- Installation of compressor and turbine.
- Increasing the working volume by boring the cylinder block.
Video: chiptuning of the “Seven” engine
Exhaust system tuning
Proper modification of the exhaust system of a Zhiguli can bring an increase in power of up to 10 horsepower. Noise absorption, environmental friendliness and efficiency of the machine are sacrificed to improve performance.
The straight-through muffler is externally distinguished by an extended exhaust pipe pipe
You can reduce the resistance of the exhaust system and thereby increase power by installing a direct-flow exhaust. The difference between a conventional exhaust and a forward exhaust is the linear arrangement of the muffler chambers.
A direct-flow muffler differs from a conventional muffler in the linear arrangement of the chambers
It is worth understanding that a direct flow made by yourself may not bring an increase in power . In this case, the whole point of the changes will be only to increase the exhaust volume. For greater confidence in the results of tuning, it is best to purchase a direct-flow muffler developed by specialists for your car model.
This rule also applies to replacing the muffler “pants”. An incorrectly selected part can disrupt the operation of the cylinders. However, a high-quality manifold with reduced resistance increases engine power due to more efficient removal of exhaust gases.
Improving the safety of the “classic”
If you have seriously modernized your “classic”, made it noticeably faster and more maneuverable, you should think about increasing the level of safety. This direction of tuning becomes especially important if the car will be used in one kind of competition or another.
Four-point seat belts for driver and front passenger
Standard seat belts have a three-point fastening system. They cope with fixing the driver and passenger in the event of a frontal and side impact, but do not hold the body securely enough. Four-point seat belts can save people even in an overturned car. They come into contact with the body like the shoulders of a backpack and are securely held in the chair.
The combination of a roll cage and four-point belts is most often found on cars adapted for racing.
The lower four-point belt anchors are installed on the lower part of the seat backs, and the upper ones are installed on special eyes that must be mounted into the floor behind the driver and front passenger or into the safety cage. This usually leaves insufficient legroom for rear passengers, so four-point seat belts are mainly the province of sport modifications that do not have rear seats.
Safety frame for Zhiguli
The safety cage serves to protect the driver and passenger from injury in the most serious accidents. Most racing cars are equipped with roll cages; moreover, in most racing series, the presence of a roll cage is a prerequisite for a car to be allowed on the track. In addition to its protective function, the frame can also increase the rigidity of the supporting structure, which has a positive effect on the handling of the car.
There are two types of safety cages available for installation on Zhiguli:
- Welded. Mounted into the body by welding. Such a structure cannot be dismantled.
- Bolted. It is installed with bolts and is usually attached to the bottom and ceiling of the car. The reliability and strength of fastening of such a frame is somewhat lower than that of a welded one, but for the “classics” its characteristics are usually sufficient.
Tuning VAZ cars of the “classic” line can turn an outdated budget car into a real racing monster or into a stylish compact vehicle with a very high level of comfort. It is important to know when to stop visual tuning and to approach technical tuning competently. Modify your Zhiguli with taste and wisdom, then the result will pleasantly surprise you and your neighbors on the road.
Do-it-yourself tuning gills or air intakes for the hood of a car
The previous tuning options can be done by any beginner in this matter. A more complex type of modernization is the creation of tuning air intakes or gills.
Indeed, this type of change is more complex than the previous ones, but you can also do it yourself without turning to specialists.
For practical purposes, the gills are placed where the car's air filter is located. If your car's air filter is located in the center, then it is correct to position the air intake in the center of the hood. When the filter is located on the side, the gills are located along the edges of the product for symmetry.
First you need to make markings on the body parts that you are going to tune. Using a grinder, cuts are made in the shape of the letter p. At the cut site, the metal is bent under the hood; it is best that the angle of the air intake is no more than forty-five degrees. Cut metal triangles to size. Using triangles and a welding machine, we close the ends of the hole. We can say that the product is ready for use; all that remains is to sand the welded areas, treat it with a primer and paint.
Fiberglass gills are made a little differently. In the places where you are going to make air intakes, apply plaster or foam, after covering the product with film to protect the paintwork from damage. Wait until the mounting material is completely dry and begin cutting out the air intake. Polish it with sandpaper, impregnate it with several layers of fiberglass and mastic. After drying, you can begin priming and painting the product.
As you can see, there is nothing complicated about tuning a hood with your own hands. The main thing is patience and the desire to achieve results.
Tuning from Alexander Gvozdev (Lyubertsy)
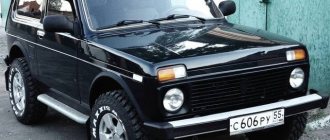
Third prize for the “stuffing” The choice of the cheapest and most common car in Russia, the unsightly VAZ 2106 assembled in Izhevsk, was primarily due to financial capabilities for Alexander Gvozdev. However, he continues to believe that all cars are essentially the same. The most important thing for a car owner is what’s inside, not what’s on the outside. In the end, the driver should be luckier than those around him. Therefore, we will not talk about such innovations as tuning the VAZ 2106 grille or tuning the VAZ 2106 headlights.
- Alexander started tuning the VAZ 2106 with his own hands with gas shock absorbers from. Judging by his words, he could easily begin the tuning process with both the VAZ 2105 and the VAZ 2101, but the result would not be much different. It’s all about the sensations from the shock absorbers themselves, since the car has ceased to be rigid, in contrast to the well-known opinion of the majority of “advisers,” but, on the contrary, has become “tight and muscular.” Indeed, both the roll in turns and the rolliness/smeariness in movements have disappeared. Moreover, this amateur owner unearthed such a fashionable hood stretcher in his barn in the 80s, resulting in a completely different car. This is where you can look for the best spare parts for tuning the VAZ 2106!
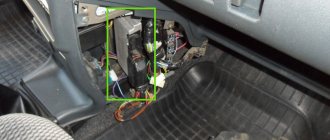
- The driver replenished the workplace with a thermometer with indicators of external and internal temperatures, as well as a voltmeter from a VAZ-2105 instead of an oil pressure indicator, and an upper lamp above the rear-view mirror. But the most important find is an automatic heater tap from the Ryazan plant, which is adjustable within a very wide range by turning the potentiometer knob and at will.
- Knowing full well that laziness was, is and will be the engine of progress, the owner added control from the key fob to the trunk lock. As a result, central locking is such a must-have and convenient thing nowadays.
- The engine tuning of this VAZ 2106 is an equipped cooling system with a non-autonomous heater (Tyumen plant) with an on-timer. Now, in any frost, the engine always remains hot when Alexander arrives. In other words, complete comfort, even in a 30-year-old car!
So, go for it, amateurs and professionals! Who said that the VAZ 2106 does not deserve tuning? And the next competition and new achievements are just around the corner...