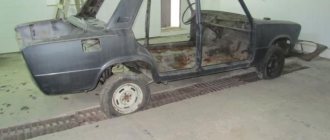
It’s easy to understand how important suspension is in a modern car by taking an ordinary cart as an example. As a rule, driving on bumpy roads on it is not synonymous with comfort. In order to smooth out all the irregularities and dampen vibrations as much as possible, rear and front suspensions were invented. In addition, this system connects the wheels to the body.
The purpose of all pendants is the same. But the design features are different. For example, Lada Largus is a representative of the budget class on the B0 platform and has a simple suspension arrangement.
Characteristics and design
The suspension on the Lada Largus has proven itself to be reliable, soft, energy-intensive and as simple as possible. Like many components, it migrated almost unchanged from Renault Logan. Manufacturers decided not to modernize this Logan part, which was recognized by car enthusiasts as indestructible on Russian roads.
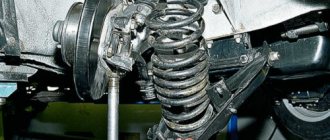
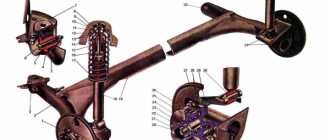
Front suspension device
The main structural details are the following elements:
- stretcher;
- levers;
- spherical bearing;
- silent blocks;
- repeated fist;
- hub;
- shock absorber with spring;
- anti-roll bar.
Experienced car enthusiasts will immediately understand that structurally this is an ordinary MacPherson, but there are some dissimilar parts. Unlike other models of the Volzhsky Automobile Plant (with the exception of the Vesta family), the Lada Largus suspension is equipped with a subframe to which an anti-roll bar with silent blocks is attached.
The front suspension of the Largus is independent, and the subframe serves to increase rigidity.
Also, in previous AvtoVAZ models, the ball joint is changed separately from the lever. Largus uses the Logan suspension platform, so here the ball joints are changed only together with the lower arm. At the same time, we must pay tribute: the suspension design is reliable and durable.
The next difference between Largus is the mounting of the anti-roll bar. Here it is not rigidly attached to the strut with the shock absorber; it is attached directly to the lower arm. In this design there are no so-called tips, which are located on the rod connecting the strut and stabilizer. They usually wear out over time and become a source of suspension noise.
If you do not take into account the ball joint, which is assembled with the lower arm, the Largus front suspension is simple, and most importantly, repairable. Basically, problems begin to arise with fairly active mileage (more than 100,000 km). Due to the simplicity of the device and the small number of elements, even beginners can diagnose a fault.
Largus rear suspension diagram
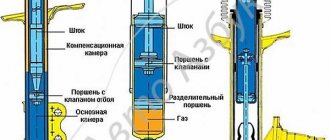
Rear suspension features
The basis of the entire structure is a semi-independent beam. Inside it there is a stabilizer bar, which is rigidly fixed to the lower arms. The latter, in turn, (namely, the amplifiers) are supported by shock-absorbing springs.
The main feature of the Largus rear suspension is that the spring and shock absorber are not a single module, but are located separately from each other.
Structurally, the Largus rear suspension consists of a beam, shock absorbers, springs and silent blocks (not counting fasteners and other connecting elements). There are usually no special problems with the rear suspension, even with high mileage. The system, both front and rear, is reliable and easy to repair, and spare parts are always available.
I’m buying Largus - which one should I choose?
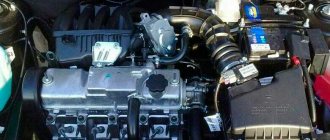
Take a car with a brand new 16-valve K4M engine - it’s peppy and predictable. Consumption, however, is high, but this problem is partially solved by a small upgrade of the gearbox. And hurry up with your purchase! Such cars have not been made for three years.
This Lada Largus, as well as many other proven used cars, can be purchased from Automama
.
- When planning to ride off-road, it is always better to put chains on your wheels in advance. If the need for chains is not obvious, make sure you have bracelets. Antibuks will also come in handy!
- Few people know about car accessories that don’t cost a lot of money and bring real benefits! We recommend taking a look at the windshield drain, hood and trunk struts, and radiator guards. Their installation is simple, the benefits are undeniable!
Lada Largus aftermarket: indestructible suspension and capricious electrics
Front and rear unit malfunctions
Lada Largus is considered one of the most popular domestic cars. The first of its main advantages is its “indestructible” suspension. But despite its high reliability and durability, the system will sooner or later need maintenance and repair. Thanks to this, it will be possible to extend the life of the suspension and prevent failure of other elements. You can avoid unpleasant consequences and costly repairs by identifying faults correctly and in a timely manner.
Signs of problems with the subframe on Largus
In the case of this element, you need to understand that it serves as the basis of the front suspension. And identifying its malfunctions in a timely manner means avoiding more serious problems, including replacing a failed unit. Not only the suspension arms, but also the exhaust system cushions, as well as the rear part of the power plant are attached to the subframe.
Wear or damage to the suspension subframe can be easily determined independently by some characteristic signs. For example, the main indicator is the play in the places where attachments are attached. In addition, a knock from the front will indicate a malfunction (a knock is generally a characteristic sign of problems with the suspension).
Problems with the subframe can also be indicated by wheel alignment/camber problems.
Signs of faulty shock absorber struts
These parts are designed to level the car while driving. And also to ensure smooth suspension movement when hitting various obstacles and uneven surfaces. Shock absorbers and springs prevent the body from swaying too much and also provide vehicle clearance.
Malfunctions of shock absorbers and springs can be easily recognized by the following symptoms:
- oil leaks;
- strong body swaying when hitting obstacles;
- vibration, squeaks and knocking when moving;
- controllability decreases;
- strong shocks and impacts (suspension breakdown) when falling even into small holes.
An equally important role in the suspension is played by springs, which have their own characteristic symptoms of malfunctions. These include reduced ground clearance, jolts and strong swaying when hitting obstacles. When the coils of springs break, you can notice how the body tilts in one direction or another when the car is standing on a level surface.
Signs of a malfunctioning stabilizer bar
This element is designed to maintain vehicle stability in a flat plane and prevent the body from swaying. The stabilizer functions together with levers, with the help of which it is attached to shock absorber struts and hubs. The part is quite durable, but due to natural wear and tear, the time comes to replace the suspension stabilizer.
The malfunction of this element can be diagnosed by a number of general signs and some special symptoms.
| What's happening: | In what situations: |
| metallic knock; | when driving over uneven surfaces; |
| big roll; | when passing sharp turns; |
| the body sways strongly; | during sudden braking. |
An important part of the suspension is the levers, with their help the angle of rotation of the drive wheels is limited. The lever is connected to the steering knuckle through a ball joint. This element itself is a metal tube bent in a certain way. Accordingly, it fails very rarely.
Malfunctions associated with suspension arms will most often be the result of wear or damage to the silent blocks with which the arms are secured.
Malfunctions can be identified by the following signs:
- imbalance of the drive wheels;
- knocking when hitting obstacles;
- While driving, the car pulls to the left or right.
In addition, if there is a problem with the levers, noticeable play in the steering appears. Similar symptoms occur when the hub or steering knuckle malfunctions. These elements are subject to heavy loads during vehicle operation and therefore also often fail due to wear. If there are problems with the hub or steering knuckle, the car is pulled in different directions when driving, tire wear becomes uneven, and a squeaking sound appears when the steering wheel is turned.
Suspension diagnostic methods
This is a mandatory procedure before carrying out repairs. It allows you to identify components and elements that require replacement. The algorithm for checking the suspension is as follows.
- First you need to inspect the shock absorber strut supports. The distance between the top of the support and the glass ideally does not exceed 1.5 cm.
- The steering wheel should rotate without force in both directions (creaking, crackling or delay, as well as play indicate a malfunction).
- Rock the car in different directions from all angles: if there are no problems with the shock absorbers, the body should swing no more than two times and take its original position.
- Try to swing the rods, balls and levers from side to side. There should be no backlash.
Suspension diagnostics are carried out only on level ground.
You should also carefully inspect the silent blocks. They should not have cracks, delaminations or tears. For a more detailed check, experts recommend using an overpass or inspection hole. This way you can carefully inspect the subframe and anti-roll bar for damage and deformation. Most suspension parts (with the possible exception of shock absorbers) cannot be repaired. Will need replacement.
Restoration of suspension elements of Lada Largus
Repair work mainly involves the removal and replacement of worn parts. To carry them out you will definitely need the following set of tools:
- jack (if there is no lift);
- set of socket heads and wrenches;
- screwdrivers;
- hammer, mounting blade, etc.
Suspension repairs at the rear and front differ slightly. In addition, the front suspension is structurally more complex. Therefore, most of the work on replacing failed parts is considered from the front.
Replacing the anti-roll bar
Elements crack, tear, and wear out as they wear out, causing play to appear at the joints. Therefore, in the case of Largus suspension stabilizer struts, it is necessary to replace worn rubber-metal parts. Replacing the Lada Largus stabilizer is as follows.
- Raise the front of the car (or use a lift).
- Unscrew the stabilizer mount to the arms (you should first clean the screw from dirt so you can use a spanner).
- When unscrewing the fastener (nut), use a wrench to hold the screw, preventing it from turning.
- Remove the lower rubber bushing.
- Pull out the screw along with the bushing and the plastic washer located below.
The fasteners of the stabilizer and suspension arm are removed in the same way. New parts are installed in the reverse order of removal. When tightening the fasteners, do not overtighten. To replace the rod pads, you need to unscrew the bolt securing the bracket and subframe using a spanner. Next, you should dismantle the pillow and install a new part in its place in the reverse order. The suspension bar cushion on the other side is changed in the same way.
To dismantle the rod itself, you need to unscrew the fastenings on the lever side and remove the brackets. If, upon inspection, signs of wear are found in the places where the cushions are attached, it is better to change the bar.
Replacing levers
On Lada Largus cars it is not necessary to change them so often. This is usually done when changing ball joints or silent blocks. To work, you also need to hang the entire front part - if you lift only one side, the stabilizer will not allow you to remove the lever.
To remove it, you will need to unscrew the attachment of the rod to the lever and remove the motor protective shield. Next, the bolt securing the ball joint and steering knuckle is unscrewed. This bolt needs to be pulled out if you can’t knock it out with a hammer. Use a flat-head screwdriver or pry bar to loosen the connection between the ball joint and the steering knuckle.
The next step is to press the lever down. The ball end will disengage with the steering knuckle. Use a socket to unscrew the bolt securing the bracket to the subframe, after which it can be removed.
Using a wrench, unscrew the nut of the lever mounting bolt from the front, and then knock it out. Then you also need to unscrew the rear bolt nut and knock out the bolt in the same way. Now the lever can be removed and a new one installed in the reverse order.
Replacing the ball joint
These parts are changed much more often than other suspension elements, even despite the long service life of these parts. Typically, replacement of the unit is required when the rubber boot is damaged, play appears, etc. Using the instructions above, you need to dismantle the lever along with the ball joint.
Using a screwdriver, you need to pry up the assembly housing and knock out (press out using a special puller) the ball from the housing.
Before installing a new ball, you need to carefully inspect the seat and clean this place from dust and dirt. Using a suitable mandrel or placing a socket of the appropriate size under the lever, install a new ball, pressing it into the seat with a hammer. Then everything needs to be done according to the reverse removal procedure.
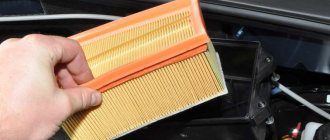
Replacing wheel bearings
At high mileage they often fail. These parts need to be replaced immediately. A new bearing is also required after removing the hub (the bearing will be damaged in most cases).
The work of replacing the unit should be done like this.
- Raise the parking brake lever and engage 1st gear (place wheel chocks under the wheels).
- Unscrew the nut securing the hub to the axle (if necessary, ask an assistant to press the brake pedal to prevent turning). In general, the hub nut must be loosened before the car is jacked up.
- Remove the wheel (the wheel bolts are loosened before hanging).
- Disconnect the speed sensor and front brake protection.
- Remove the tip of the drive rod from the knuckle and remove the ball end from the seat on the steering knuckle.
- Unscrew the bolts securing the shock absorber strut from the steering knuckle.
- Using a special puller, press the wheel bearing out of its seat on the hub.
The wheel bearing is held in place by a snap ring, so you need to remove that ring first, then the seal, and then the wheel bearing.
Before installing a new bearing, you need to clean the place for it and the groove for mounting the retaining ring. The bearing is pressed into the seat using the same puller. Further assembly is carried out in reverse order.
The principle of operation for replacing the wheel bearing at the rear is similar to the actions with the front element and is even simpler, since the steering knuckle and levers are absent. Here, as in the front, silent blocks may need to be replaced. As for the shock absorber struts, if necessary, changing them on the rear suspension is very difficult.
The front pillars are another matter. Not only is the design and dismantling more complicated, but a device for compressing the springs is also required. Replacing the front struts on Largus is not difficult, but it requires skill and experience. The work is not the most pleasant, and besides, when dismantling the steering knuckles, hubs and shock-absorbing struts on the front Largus, a camber/toe adjustment procedure will definitely be required. Replacing the Largus rear strut does not imply such an operation to adjust the suspension.
About repair prices
The work also includes replacing the Largus support bearing. It is difficult to do this procedure at home, so you will still have to contact a car service. The cost of repairing the Lada Largus suspension is not too high. For example, replacing struts will cost 500–600 rubles per side, depending on the region; rear struts are priced cheaper. Silent blocks are replaced for 100–300 rubles, levers, subframe, etc. - no more than 1,000.
The prices are not outrageous, and given the need for wheel alignment, there is little point in doing suspension repairs yourself, especially for beginners. Why spend extra money on pullers and other special tools if they are rarely needed?
Front suspension arm ball joint - removal and installation (repressing)
Attention. The front suspension arm ball joint can only be replaced once. For this purpose, ball joints from spare parts are marked with the letter “R” and are equipped with a locking spring 4, Figure 6-1. The ball joint, without retaining spring, is a standard part and can be replaced.
Note: For test results of ball joints from different manufacturers, see the end of the article.
The ball joint with retaining spring is a replacement part and cannot be replaced. In addition, it should be borne in mind that by the time the second set of ball joints (R) wears out, the silent blocks of the lever will already be worn out. If it is necessary to replace the ball joint again, replace the front suspension arm assembly.
Figure 6-1 - Distinctive features of the ball joint supplied as spare parts: 1 - marking of the ball joint supplied as spare parts “R”; 2 — ball joint; 3 — front suspension arm; 4 - locking spring
Jack up or place the vehicle on a two-post lift, apply the parking brake and turn off the ignition.
Remove the front wheel
Remove the front suspension arm. (see here)
Clean the front suspension arm from dirt (metal brush).
If there is no special equipment for pressing out
Using a powerful slotted screwdriver, evenly (from different sides) pry the support body under the shoulder and, leaning on the edge of the lever.
. press the ball joint out of the hole in the lever.
We inspect the lever eye - there should be no cracks or breaks around the hole.
Before pressing in the new ball joint, thoroughly clean the seating surface of the lever hole from dirt and corrosion.
Place a tool head or a piece of pipe of suitable diameter under the lever and insert a new ball joint into the hole. Applying blows with a hammer to the mandrel (you can use a tool head) resting on the shoulder of the support body, we press the support into the hole of the lever until it stops.
Attention. The lower control arm ball joint is supplied in a protective case. Remove the cover only after pressing the ball joint into the front suspension arm and installing the lock spring 4, Figure 6-1.
If special equipment is available
Remove the ball joint boot clamps and the boot (flat head screwdriver).
Place a stop marked “D1” on the press table, install the front suspension arm on the stop, install a mandrel marked “D2” on the ball joint body for pressing out and press the ball joint out of the front suspension arm (hydraulic press type KS-124 (Kochubeyevsky), stop marked “D1” and mandrel marked “D2” for pressing out from set Tav. 1929).
Place a stop marked “R1” on the press table, install the front suspension lever on the stop, install a new ball joint in the hole in the lever, install a mandrel marked “R2” on the ball joint body for pressing and press the ball joint into the front suspension arm (hydraulic press type KS-124 (Kochubeyevsky), a stop marked “R1” and a mandrel marked “R2” for pressing out from the Tav. 1929 set).
Other operations
Install the retaining spring into the groove of the ball joint, using the protective boot as a guide.
Remove the transport cover from the ball joint.
Install the front suspension arm.
Install the front wheel
Check and, if necessary, adjust the alignment angles of the front wheels
Results of comparative tests of the strength of ball joints from various manufacturers
Tests were carried out by Za Rulem magazine in 2021. The participants were ball joints suitable for Lada Largus, Renault Sandero and Logan cars.
All products met the standard, but the difference in results is double.
Results of spectral analysis of ball joint pin material
| Brand | steel grade |
| Kroner | steel 40X |
| Lada Standard | steel 45 |
| Renault group | steel 45 |
| Sasic | steel 40Х |
| Sevi | steel 40Х |
| TRT | steel 38ХГМ |
Results of measurements of the hardness of the ball surfaces of the supports
| Brand | Hardness, HRC (three points) | ||
| Kroner | 28 | 28 | 28,5 |
| Lada Standard | 32 | 32.5 | 32,5 |
| Renault group | 32 | 34 | 34 |
| Sasic | 28 | 28 | 24 |
| Sevi | 31 | 31 | 29 |
| TRT | 24 | 23,5 | 26 |
Results of measuring the surface roughness of balls and pins of ball joints
| Brand | Roughness (Ra), µm | |
| Finger surface | Ball surface | |
| Kroner | 2.30 | 0.53 |
| Lada Standard | 1.34 | 0.28 |
| Renault group | 1.79 | 0.25 |
| Sasic | 1.62 | 0.24 |
| Sevi | 0,93 | 0.15 |
| TRT | 0.92 | 0.19 |
Results of measurements of pullout and extrusion forces of ball joints
| Brand | Ball diameter mm | Breakout force kgf (standard -1500) | Extrusion force kgf (standard - 2100) |
| Kroner | 25 | 4210 | 3520 |
| Lada Standard | 25 | 2500 | 3300 |
| Renault group | 25 | 2180 | 2700 |
| Sasic | 25 | 4240 | 3060 |
| Sevi | 25 | 2300 | 3100 |
| TRT | 25 | 4180 | 5100 |
General view of balls with brief results
Kroner (K330120) , country not specified Retaining ring - for expansion pliers. The boot fits into the lever hole with difficulty. The fit of the support is tight; in the freezer the elastic band fell apart at -50°C - this is not good. We cannot recommend
Lada Standard (LS000-2904192-81) , Russia Retaining ring - for expansion pliers. The boot fits freely into the lever. The tension in the support fit is average. The product was not afraid of fifty degrees of frost. The result is second place in our tests. We recommend
Renault group (41 60 25 23R) , France The most expensive product. The retaining ring is thin and wire. The boot fits into the lever freely. Landing of the support with medium force. The power reserve is the smallest. At a temperature of -40°C, the anther fell into pieces. We cannot recommend it.
Note: The product sold under the name “Renault group” with code 41 60 25 23R cannot be classified as original spare parts. The Renault representative informed us that neither the packaging nor the label corresponded to the original ones. In addition, the reference of original Renault spare parts consists of ten characters, not nine. At the same time, Renault does not produce a ball with a side groove: the original products have a groove machined across the entire surface of the cylindrical part of the pin.
Sasic (7574013) , EU The boot easily fits into the hole in the lever, and the support is fixed with a thin wire and an ax ring. In the freezer at -50°C, the anther lost its integrity. We cannot recommend
Sevi (7013-4192 ), Russia The retaining ring is wire, frankly “frail”. The boot fits easily into the hole in the lever. The tension when landing the support is average. The product passed the frost test. The result is third place. We recommend
TRT (RS8018) , South Korea The cheapest support. The locking ring is powerful - for pliers. The boot squeezes into the lever. The fixation in the hole is tight. The low roughness of the ball and significant extrusion forces indicate an increased service life of the product. First place! We recommend
No obvious defects were found during mechanical tests - and this is good news. However, thermal tests eliminated half of the participants: only Lada, Sevi and TRT remained. It was these ball joints that made it into the top three. We award the absolute victory to the TRT product: at the lowest price in the sample, it promises the highest resource. And the weak wire retaining ring of the Sevi pushes it to the third level, giving way to second place to the Lada Standard product.
Video
Ways to increase the clearance of Largus
The domestic station wagon is very popular due to its unpretentiousness and reliability. One of the important indicators is solid ground clearance. Transporting goods with these vehicles is a common occurrence. And this inevitably leads to an increase in the load on the suspension, namely on the shock-absorbing struts, which sag due to weight, resulting in a decrease in ground clearance.
We must not forget the quality of Russian roads. It is sometimes impossible to move through potholes and potholes without damaging the suspension. In any case, the amount of ground clearance in this regard is crucial. Because of these factors, many Largus owners try to increase the ground clearance with their own hands. Today there are several ways to do this inexpensively and quickly.
Increasing ground clearance with your own hands
In order to increase ground clearance (suspension lift), car owners use several basic techniques:
- installation of wheels or tires with a larger radius;
- installation of special spacers for shock-absorbing struts;
- replacing the springs with stiffer ones, as well as installing extended shock absorbers.
Some people use air suspension for these purposes. From the point of view of rationalism (and Largus is mainly used by people who prefer the practicality of a station wagon), this is unjustified. Firstly, the equipment is expensive, and secondly, not every car owner can install air suspension with his own hands. Plus, the compressor and receiver will take up useful space in the trunk, which is again impractical.
This type of suspension tuning is not popular.
Installation of wheels with a larger radius
Largus comes standard with 15R wheels. Many motorists choose the 16 or 17 radius option instead of the one proposed by the factory. Additionally, this makes the car's exterior more attractive. However, this option also has a significant drawback, namely the unstable position of the car when driving, as well as malfunctions in the ABS system and some related sensors.
Installation of spacers
The most budget option (and popular) is to install special spacers, which are sold at any auto parts store. The only thing that is required from the car owner is the removal of the suspension struts. The parts themselves are unified and suitable for many VAZ cars. Spacers are installed between the rack and the body bowls (as an option - between the beam and the rack).
Replacing strut parts
One of the best methods for increasing ground clearance is to install stiffer springs and longer shock absorbers. As a rule, such racks are approximately 20 mm longer than standard devices. In combination with reinforced springs, they are able to significantly increase ground clearance, and the car does not sag all the way when transporting the maximum permissible weight of cargo. The only drawback is the higher price of such kits.
Repairing the suspension yourself and increasing the ground clearance on the Lada Largus is easy to do if you have at least minimal car repair skills. If you have never done this before, it is still recommended to carefully study the instructions. And if you are unsure of your own abilities, it is better to turn to qualified car service specialists.
We recommend reading:
- Lada Largus car data
- Tips for installing and operating roof rails on Largus
- Universal and original DRLs for Lada Largus
- Methods for attaching a spare tire on Largus
- The principle of operation of LPG on the Lada Largus: which gas is better?
- Alternator belt Lada Largus - types and replacement on different types of engines
Conclusion
Of course, detailed diagnostic procedures and timely elimination of the causes of the malfunction will allow you to quickly repair the suspension. In this matter, it is better to trust the specialists of service centers, who will help prevent major repairs by replacing some components or tightening the connections that secure them.
Similar articles:
- Steering column Lada Largus - its removal and possible malfunctions
- Diagnostics of Largus ball joints: identifying faults and finding optimal methods for eliminating them
- How to flash a Lada Largus radio
- Crash test results of Lada Largus
- Active and passive safety of Lada Largus