If you are faced with the fact that your wipers on your VAZ 2114 are working slowly, do not worry. Many motorists have to deal with this problem; the problem lies in the mechanism used; it often fails. This is evidenced by numerous reviews from the owners of this model, and the reasons for the breakdown can be very diverse. Often products stop working due to imperfect design. Be sure that you will be able to modify the wipers of the VAZ 2114.
Frequent causes of breakdown
If you want to have fast wipers on your VAZ 2114, then you should figure out what causes the breakdown. The system on a car quickly wears out and becomes unusable, it is worth considering the main causes of breakdowns:
- A short circuit occurs in the winding, which is why it is worth carefully monitoring the operation of the structure. If you notice that the winding is worn out, then the best solution would be to replace it.
- The system levers have failed, this directly affects the operation of the wipers, in particular the speed.
- The problem may be that the brushes themselves are simply frozen to the glass; this often happens in winter. Therefore, in winter it is worth monitoring your brushes more carefully.
- Problems with power cords cause products to malfunction due to lack of power.
- Our roads are not blessed with the absence of stones, so it is worth checking whether a stone or other foreign object has entered the system. It is better to avoid such problems, since a foreign body can not only slow down the wipers, but also cause serious damage.
How to solve a problem?
If you are thinking about how to increase the speed of the VAZ 2114 wipers, then you should look at the root of the problem. And the main reason lies precisely in the motor of the mechanism and the trapezoid of the structure. If you do not pay attention to your wipers for at least a couple of months, then as a result you will notice a decrease in the speed of their operation.
To prevent such a problem, it is necessary to take care of the mechanism in a timely manner, and to take care of it correctly.
To return the structure to the required speed, you will need to disassemble the mechanism, clean the motor, or you can sand it with sandpaper. It is also worth lubricating the hinges that are located between the slats. If such care does not help, then all that remains is to replace the product or take the car to a service center.
Gear motor design
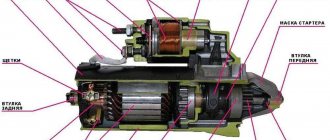
In short, a gearmotor is a pair of worms driven by an electric motor. The engine is two-speed. One brush has a common contact for both speeds, the other two, due to the “transfer” of power from one to another, change the frequency of rotation of the armature.
The gearmotor is protected from overload by a bimetallic thermal fuse 6.
The driven gear has a contact plate, and the cover has three contacts sliding along it (indicated by a red arrow in the figure below).
This design is made in order to ensure that current is supplied to the first-speed brush when the contacts of the steering column switch are opened until the windshield wipers are “parked,” as well as during intermittent operation.
How to speed up wipers in intermittent mode?
If you are wondering how to make wipers faster on a VAZ 2114, then you should turn to the features of the wipers. This car has 3 wiper modes, namely intermittent, fast and normal.
Intermittent and normal modes imply movement of the brushes at the same speed, which is slightly less than in fast mode. You can set the speed in intermittent mode to be maximum, but in this case it will decrease in fast mode. In fact, to do this you need to swap the wires in the connector to which the wipers are connected. In order to determine which wires to change, it is worth looking at the diagrams.
Original diagrams of VAZ 2109 modification VAZ -21093
Here are high-quality electrical circuits of additional equipment installed on modifications of the VAZ-2109 car, model VAZ-21093
Electrical diagram for connecting the front fog lights on a VAZ 21093
| Position number on the diagram | Explanation of position |
| 1 | front fog light |
| 2 | front fog lamp connection connector |
| 3 | relay and fuse box |
| 4 | ignition switch |
| 5 | size switch |
| 6 | Checking the connection of the front fog lights |
| 7 | front fog light switch with light bulb |
| A | to terminal “30” of the generator |
| B | to the instrument panel light switch |
The front fog lights are connected by switch 7 using an auxiliary switch 2, brand 113.3747-10, mounted under the hood. Front fog lights can be connected if the side lights or main headlights are connected.
Connection diagram for front door windows on VAZ-21093
| Position number on the diagram | Explanation of position |
| 1 | relay and fuse box |
| 2 | ignition stick |
| 3 | ignition switch |
| 4 | right door electric window motor |
| 5 | left door electric window motor |
| 6 | right door power window connector |
| 7 | left door power window switch |
| K7 | power window power relay |
| A | to contact “30” of the generator |
| B | to the terminal block, a bundle of wires connected to the lighting panel of the stove levers |
| IN | to the stove lever lighting display |
| G | conventional numbering of terminals in the gear motor block |
Electric motors 4 and 5 are connected by switches 6 and 7 located on the instrument panel. Electricity is supplied to the switches through fuse “6” when the ignition is connected, if the contacts of the power window switch K7 are closed.
Diagram of the VAZ 21093 door lock system
| Position number on the diagram | Explanation of position |
| 1 | relay and fuse box |
| 2 | ECU |
| 3 | electric motor for locking the right front door lock |
| 4 | Right rear door locking gearmotor |
| 5 | electric motor with gearbox for locking the left rear door lock |
| 6 | electric motor with gearbox for locking the left front door |
| A | to contact “30” of the generator |
| B | order of allowed terminal numbering in the ECU block |
| IN | method of relative numbering of contacts in blocks of electric motors with gearboxes |
Contact diagram in the terminal connector of the trip computer
| Addresses of output plugs of the trip computer VAZ 2109 modification VAZ 21093 | ||
| Plug number | Connected wire color | Plug address |
| 1 | green | Gasoline consumption meter output |
| 2 | orange | Fuse “5” (to contact “87” of the ignition switch) |
| 3 | red with blue | Fuse “12” (to “+” battery |
| 4 | black | to minus |
| 5 | white | "+" speed meter |
| 6 | blue | "-" gasoline consumption sensor |
| 7 | pink | “+” of the gasoline consumption meter |
| 8 | brown | Fuse “7” (to the headlight switch) |
| 9 | grey | "-" speed meter |
Useful video
You can see the results of the work on “speeding up” the wipers in the video below:
Are you faced with the fact that your VAZ-2109 wipers are working slowly? It doesn’t matter, this problem haunts many motorists. A careless mechanism, which only yesterday worked like a clock, has a stupid habit of slowly and inexorably breaking down. This unpleasant feature of cars of this brand has already managed to annoy all owners of the VAZ model 2109, if you believe the reviews of the majority of domestic motorists.
There can be a huge number of reasons for this, and it is not always due to driver negligence. Windshield wipers often fail due to banal technical imperfections in the design of everyone's favorite VAZ. But you shouldn’t scold the manufacturers prematurely and go to a car service center. Speeding up a worn-out mechanism with your own hands is simple and anyone can do it.
VAZ 2109 carburetor diagram
A diagram of the electrical equipment of VAZ-21083, 21093 and 21099 cars since 1998 is presented. exhaust (with carburetor, “high” instrument panel type 21083, with mounting block 2114-3722010-60):
| Position number on the diagram | Explanation of position |
| 1 | block headlights |
| 2 | electric motors and headlight wipers |
| 3 | fog lights |
| 4 | signal |
| 5 | engine cooling fan motor |
| 6 | engine compartment lamp switch |
| 7 | fan motor switching device |
| 8 | tips of wires connected to sensor 7 in case of installation of mounting block type 17.3722 |
| 9 | connectors for connecting to front brake pad wear gauges |
| 10 | washer fluid level meter |
| 11 | electromagnetic throttle for headlight washers |
| 12 | solenoid valve for connecting the rear window washer (not installed on VAZ-21099) |
| 13 | electromagnetic breather connection for windshield washer |
| 14 | windshield washer motor |
| 15 | oil level meter |
| 16 | generator VAZ 2109 model 37.3701 |
| 17 | oil pressure warning light sensor |
| 18 | carburetor limit switch |
| 19 | spark plugs |
| 20 | carburetor solenoid valve |
| 21 | engine compartment lamp |
| 22 | ignition distributor sensor VAZ 2109 |
| 23 | control unit with solenoid valve |
| 24 | windshield wiper motor |
| 25 | Ignition solenoid |
| 26 | starter |
| 27 | switch |
| 28 | starter relay |
| 29 | TOZh indication meter |
| 30 | brake fluid level sensor |
| 31 | reverse light switch |
| 32 | source of electricity |
| 33 | fog light connection stick |
| 34 | coolant level meter |
| 35 | connection block |
| 36 | handbrake control switch |
| 37 | brake light switch |
| 38 | door lock control unit |
| 39 | cigarette lighter |
| 40 | boardlight bulb |
| 41 | heater fan motor |
| 42 | additional resistor for heater motor |
| 43 | heater fan switch |
| 44 | heater control light bulb |
| 45 | front door electric window motors |
| 46 | front door locking motors |
| 47 | Rear door locking motors |
| 48 | headlight wiper switch |
| 49 | Right front door power window switch |
| 50 | ignition switch |
| 51 | left front door power window switch |
| 52 | ignition switch |
| 53 | pads for connecting to the front seat heating elements |
| 54 | right front seat heating switch |
| 55 | left front seat heating switch |
| 56 | connector for heated front seats |
| 57 | front seat heating circuit fuse |
| 58 | instrument lighting switch |
| 59 | steering column switch |
| 60 | Checking the heated rear window connection |
| 61 | rear window heating switch |
| 62 | fog light connection indicator light |
| 63 | fog light switch |
| Position number on the diagram | Explanation of position |
| 64 | rear fog light connection indicator |
| 65 | rear fog light switch |
| 66 | side turn signals |
| 67 | light switch on the rear door pillars (not installed on VAZ-21083) |
| 68 | light switch on the front door pillars |
| 69 | individual interior lighting bulb |
| 70 | lamp |
| 71 | size switch |
| 72 | instrument cluster |
| 73 | carburetor choke control switch* |
| 74 | hazard warning light switch |
| 75 | emergency signal connection control |
| 76 | block for connecting to the trip computer |
| 77 | rear lights |
| 78 | rear window heating element |
| 79 | gear motor for rear window wipers (not installed on VAZ-21099) |
| 80 | pads for connecting to an additional brake light |
| 81 | room lighting bulbs |
| 82 | fuel level indicator and fuel reserve meter |
| A | rear lamps (pin numbering in order from top to bottom) |
| B | headlight, headlight and rear window cleaners |
| IN | gear motors for power windows and gear motors for door locks |
| G | interior lamp |
| D | mounting block, instrument cluster, ignition switch, windshield wipers, and door lock control unit (for blocks with a different number of plugs, the numbering order is similar) |
| E | ignition distributor sensor |
| AND | fuel level meter |
| Z | switch and carburetor electromagnetic throttle control unit |
*Not installed on vehicles equipped with a carburetor with a semi-automatic starting device.
Common causes of malfunction
Why did the wipers start working slowly? This question is asked most often among VAZ owners. It just so happens that almost all cars of the 2109 model suffer from this disease. So why do the wipers not work? Why does the system wear out so quickly? Below is a list of the most common windshield wiper problems:
- Damage to system levers. Even a slight change in the shape of these parts can affect the speed of the mechanism.
- Faulty power cords. If there is not enough electricity supplied to the system, it is no wonder that it will slow down.
- Foreign objects in the mechanism. Any pebble or blade of grass that accidentally gets into the device can cause serious damage, not to mention slowdown.
- The blades are frozen to the windshield. In winter, you need to pay especially close attention to the mechanism if you do not want to tear off its frozen parts from the glass.
- Short circuit in the winding or excessive contamination of parts. The structure must be carefully monitored; it must be cleaned from time to time and the winding changed if necessary.
Disassembling the gearbox
If the wiper does not work due to contamination of the gearbox, then it will not be difficult to clean it. But under no circumstances should you unscrew the adjusting screw installed in it - otherwise you will most likely not be able to properly restore the armature clearance later.
The procedure is as follows:
- remove the protective panel from the gearbox;
- remove the gear;
- take out the cage nuts, having first unscrewed two bolts;
- The gear housing is disconnected together with the brush holder from the motor;
- the anchor is removed and cleaned with a compressor.
Removing the rear wiper generally follows the same algorithm, but you will also have to remove the door trim to get to the wires and other elements.
True problems and ways to solve them
The mechanism’s motor and the windshield wiper trapezoid itself are the main pitfalls of this malfunction. Once you forget about them for just a couple of months, the wipers begin to slow down, gradually becoming unusable. Unfortunately, there is no easy way to find out about this problem. You can learn how to properly and promptly care for a car only by facing all its shortcomings face to face or by asking your friends, at worst.
The thing is that without timely cleaning and lubrication, both parts quickly wear out and eventually refuse to work. Trapezium malfunctions lead in frequency of occurrence. Either the hinges begin to jam, or the strips bend for unknown reasons. However, the motor is also not far behind. Coupled with the loss of voltage due to damage to the wires, the part causes many problems, sometimes forcing an inattentive driver to buy a new one if he does not check the serviceability of the electrical wiring.
So what can you do to return your wipers to their former speed?
The answer is simple: disassemble the mechanism, clean and sand the motor with sandpaper, lubricate the hinges located between the trapezoid bars - that’s all.
Unfortunately, if this does not help, and you have not found any other faults, only replacing parts or a trip to the service center can help you. However, replacing the notorious trapezoid or motor solves the problem in most cases.
