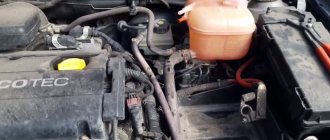
BOSCH injectors
Their use depends on the engine size and the number of valves. There is no particular variety in VAZ-2114 engines, so there are only the following options:
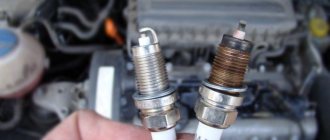
- Nozzle BOSCH 0280 158 022. The nozzle is marked black, has a productivity of 1.9644 mg/sec, operates under a standard pressure of 3.8 atmospheres. Installed on a 1600 cc engine with 16 valves. Works with January 7.2 controller.
BOSCH nozzle: productivity 1.9644 mg/sec
- Nozzle BOSCH 0280 158 017. The nozzle is also marked black, has a thin spray and a productivity of 1.922 mg/sec. The standard pressure is identical to the previous one - 3.8 atm, can be installed on a 1.6 liter 8-valve engine. Works with January 7.2 controller.
- Injector BOSCH 0280 158 996. Used until 2006, can be replaced with BOSCH 0280 150 110. Both injectors are designed for use in an 8-valve 1.5-liter engine. The only difference is in performance - the 996 has a performance of 1.653 mg/sec, the new 110 operates with a performance of 1.7 mg/sec, which has virtually no effect on engine performance.
The new injector may have a thicker O-ring and, accordingly, a longer nozzle. The injectors are completely interchangeable. These injectors can only work with the January 5.1 controller.
In addition, you need to know which engine control controller is installed on the car, since January 5.1 and January 7.2 may require injectors of different capacities.
Cleaning injectors
There are two common methods of cleaning injectors among specialists, and each of them has its own nuances. We will describe both methods in a few words, and you yourself will choose which method suits you best.
For the first method, you will need a spare O-ring, as well as injector cleaner and carburetor cleaner spray.
The procedure for cleaning injectors using the first method:
- remove all injectors;
- select a suitable container and pour injector cleaner into it;
- put the sprayers in a container and leave them for a while so that they deoxidize;
- At the same time, you can clean the idle speed sensor with carburetor cleaner;
- pay attention to the nozzles of the injectors, carbon deposits in the form of coke always form there, the consistency of which resembles resin;
- take a suitable tool and carefully pick out this carbon deposit, this way external cleaning is carried out;
- for internal cleaning you will additionally need a power source with a voltage of 3 to 12 volts and a regular foot pump equipped with a pressure gauge;
- pour injector cleaner into the end of the pump hose and then put the nozzle on this hose;
- pump to 6 atmospheres and apply a minimum voltage to the injector - 3V (if your injector does not start clicking, then you should add voltage);
- Perform this operation several times with each nozzle.
For the second method, you will also need a pump, pressure gauge, O-rings and carburetor cleaning spray. In this method, we replace the bottled injection cleaner with a spray for carburetors. We repeat all the operations described in the previous method, only with a carburetor cleaner. We also carry out additional external cleaning by spraying a cloth with spray and wiping all fuel units. Gradually the carbon deposits will become wet and you can easily remove it with a toothpick or a small screwdriver.
Both of these operations will take two to three hours of your time, but at the same time you can save a lot on the services of auto repair shops.
Siemens Deka injectors
There is no certainty with Siemens injectors, since the plant can install injectors of different markings on the same engine. However, there is a clear difference between the injectors for eight-valve and 16-valve engines.
In the first case, the nozzle is single-flame, in the second - double-flame, that is, it sprays fuel onto each of the intake valves separately.
They are marked as VAZ20734 (orange markings) and 20735 (blue markings). On eight-valve engines, a Siemens 6393 nozzle with a thick torch can be used. Its productivity is 1.662 mg/sec, and its operating pressure is 3 atm. Each of these injectors can be installed on a VAZ-2114 engine.
Methods for cleaning VAZ 2109 injectors (step by step)
There are two methods for cleaning fuel nozzles, each of which has its own nuances.
First way. You will need: a spare o-ring, carburetor cleaner (spray), injector cleaner.
Features:
- We remove each nozzle.
Injector torches - Take any container and pour injector cleaner into it.
- Place the sprayer in the container and let them sour for a while.
- At the same time, clean the idle speed control using carburetor cleaner.
- There is carbon deposits around the injector nozzles - coke. Its consistency is similar to resin. You'll have to pick it out and tinker a little with the dirt. This is how external cleaning is done.
- As for internal cleaning, you will need a pump with a pressure gauge (foot) and a voltage source of 3-12 Volts.
- In the pump, remove the end of the hose and pour injection cleaner inside, then put the hose on the nozzle.
- We pump it up to six atmospheres and apply a voltage of three volts. Add power if the injector does not click.
- It is necessary to supply electricity periodically, for a short time, while pumping it up with a pump. In the same way we pump all the fuel nozzles.
Second way. You will need: O-ring, pressure gauge, pump, carburetor cleaner (spray).
Features:
- We change the injector cleaner to a spray.
- We repeat the above steps, only with carburetor cleaner.
- Then we make sure to clean the outside of the devices to remove carbon deposits.
- To do this, apply the spray to a clean cloth and treat the fuel units with it.
- Thanks to the product, the coke will soften and be cleaned off without any problems. You can help yourself with toothpicks or a screwdriver.
- Before installing the sprayer in place, be sure to lubricate the O-rings with a solution of water and soap.
When to change: self-diagnosis
The fuel system of an injection engine has a fairly extensive architecture and faults can only be identified after an accurate diagnosis of each of the system elements. For example, a drop in engine power may be the result of either a malfunction of the injectors, insufficient performance of the fuel pump or a clogged fuel filter.
In addition, jerks and dips, unstable idle and difficult starting, increased consumption, can occur when the injector is simply clogged.
You can check the injectors themselves directly on the engine without removing them. To do this, just start the engine and remove the wires from the connector one by one. If the stability of the engine changes at the same time, the engine starts to oscillate, then the injector is in order. If, when removing the wires from the connector, the stability of the motor does not change, the injector needs to be cleaned or replaced.
Methods for cleaning injectors
Injector flushing additives
There are a huge number of different additives for flushing the injector. Such additives are poured into the car tank and mixed with fuel. The mixture of fuel and additives enters the main elements of the fuel system and flushes them, including the injectors. But, as a rule, such washings do not bring much results, since all the dirt that was washed away to the injectors gets and settles on them, which can only aggravate the situation. Using this method is not recommended.
Replacing injectors (full technology)
Before replacing injectors on a VAZ-2114 of any generation, it is necessary to relieve the pressure in the power system.
To do this, remove the rear seat cushion, open the hatch and remove the contact block from the fuel pump. Now it is de-energized and will not build up pressure.
We start the engine and wait a few minutes until all the fuel in the system is used up. The pressure has been relieved, now you can safely remove the old injectors and replace them with new ones. We proceed according to the following algorithm:
- We de-energize the car by removing the negative terminal from the battery.
Disconnect the negative terminal from the battery
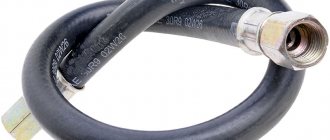
- Remove the air filter and hose from the pressure regulator in the power system.
Remove the hose from the pressure regulator
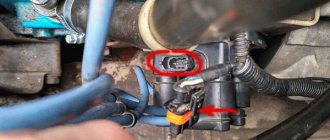
- We press the plastic latch and remove the connector from the throttle position sensor.
Disconnect the electrical connector of the throttle position sensor
- In the same way, remove the connector from the idle air regulator.
Disconnect the connector from the idle air regulator
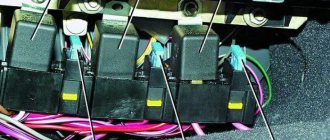
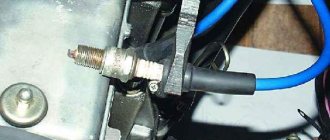
- Disconnect the connector block from the injector wiring harness.
Disconnect the connector block from the injector wires
- Unscrew the fuel rail mounting bolts.
Unscrew the fuel rail mounting bolts
- We move the fuel rail so that each of the injectors comes out of their seat.
We dismantle the fuel rail with injectors
- We release the spring clip and remove the wires from each injector.
Squeeze the spring clip and disconnect the electrical connector of the injector.
- We remove the injector from the ramp and replace it with a new one.
Rock the injector and remove it from the fuel rail.
Installation of injectors is carried out in the reverse order. Before installation, it is advisable to check the integrity of the O-rings; if they have lost their elasticity, it is better to replace them with new ones. The injectors are installed and ready for further use. Good luck to everyone!
Signs of malfunction of VAZ 2109 fuel injectors
There are a number of signs that indicate the need to at least remove and inspect the fuel nozzles. After this, a decision is made to replace or clean the components. Pay attention to how the vehicle and specifically the power unit behaves. They will point you to problems with the injectors. This can manifest itself like this:
- The motor produces less power, and the previous acceleration efficiency is not felt.
- With poor engine performance and lack of power, fuel consumption continues to increase.
- Poor starting is not a rare symptom of injector failure.
- If the power unit does not hold idle speed well, this may also indicate problems with the injectors.
- Increased amount of toxic elements in exhaust gases.
- Increasing idle speed.
Carburetor. Advantages and disadvantages
Let's start with the negative points. These include:
- Such engines have not been installed on production cars for a long time. In Europe, due to environmental requirements, carburetors are blacklisted. That is, they are prohibited because they heavily pollute the atmosphere;
- At high speeds, the engine's capabilities drop significantly. Torque does not reach the desired levels. But at low speeds it is effective and allows you to accelerate well from zero to hundreds;
- When overtaking, the carburetor is a pain. It is problematic to overtake cars normally and confidently. Especially considering the power of the carburetor nines;
- High fuel consumption when compared with injection engines. On average, a nine with a carburetor in normal mode consumes about 8.5-9 liters of fuel per 100 kilometers;
- The air damper is controlled manually. The exception is some versions of the latest samples, where automatic devices have been installed. Some motorists claim that manually controlling the throttle in winter has its advantages, as it allows you to feel the engine. But only experienced drivers can understand this.
Nine carburetor
But let's not just talk about the bad. The VAZ 2109 with a carburetor also has positive qualities:
- The cost of a carburetor is much cheaper than an injection engine;
- Engine maintenance costs less, and the work itself is easier to perform if you repair it yourself;
- Fans of carburetors claim that the absence of control units and microcontrollers is an undeniable advantage. Although one can argue with him;
- If the engine fails even 100 kilometers from the nearest settlement or service station, it is not a problem for experienced drivers, since repairs can be carried out even in the field. But this will require the availability of appropriate tools and passenger assistance.
Swapping a couple of armored pipes and doing a purge is a simple option for quickly repairing a carburetor yourself. The injection engine does not understand such tricks.
Injector. Advantages and disadvantages
In short, all the advantages of the injector are the disadvantages of the carburetor, and all the disadvantages are the advantages of the carburetor.
Injection nine
The key features of injection engines include:
- Injectors are more environmentally friendly and meet the requirements for emissions of harmful substances;
- Although the torque is insufficient at low speeds, it makes overtaking easier at high speeds. The engine seems to get a second wind;
- Injector maintenance costs are higher;
- For normal operation of such an engine, clean fuel is needed. The carburetor “feeds” on everything;
- To check faults, it is necessary to perform diagnostics, which is time-consuming and expensive;
- The injector consumes less fuel. The average is 6-7 liters per 100 kilometers;
- Almost all systems function through computer control, therefore, when working correctly, the engine operates as efficiently and economically as possible;
- It is possible to install HBO on the injector. But with a carburetor, such a step is fraught with a number of difficulties.
How to clean the injectors from dirt on a VAZ 2108-VAZ 21099?
Preparation: 1) First, prepare the surface on which you will clean the injectors.
Note! In order to prevent the ingress of small particles of dirt and dust, it is best to clean the injectors on a clean surface, for example, laying down a clean rag!
2) Now take the phone charger in your hands, connect two wires to its terminal and wrap the whole thing with electrical tape.
3) Next, pick up two hoses, one of which is thin and the other thick. And then press the thin hose inside the thick one, and into the hole of the thin hose insert a small stick that comes from the spray head of the carburetor cleaning cylinder.
Note! Place a clamp on top of all the hoses so that all the hoses are tightly attached to each other!
4) Then connect the resulting hose structure to the fuel injector.
Note! After the nozzle is connected to the hose structure, tighten this place with a clamp so that the nozzle does not fly out when spraying. Also pay attention to how the nozzle is installed in the hose; carefully ensure that the spray part of the nozzle comes out!
5) And to complete the operation, connect the carburetor cleaning fluid to the spray head and as a result you should get the following thing:
Cleaning the injectors:
1) In order to start cleaning the injectors, they must first be removed. (For detailed instructions on how to remove them, read the article: “Replacing fuel injectors”)
2) Now, if you haven’t done this yet, then build absolutely all the things that were described in the “preparation” section. When all things are collected, place the cylinder along with the nozzle in a vertical position as shown in the figure below:
3) Then connect the charger to the outlet and then to the two terminals of the electrical connector of the injector, gradually begin to touch the tips of the two wires that come from the charging.
Note! When the wires touch the injector terminals, the injector will automatically begin to spray the liquid that is in the carburetor cleaning bottle, thereby cleaning the fuel injector. When cleaning, the pressure in the system will gradually drop, due to which the nozzle will stop working, in order to return the pressure to normal, press for a short duration of “2-4 seconds” on the spray head of the cylinder, indicated by the arrow in the bottom photo, and after which the pressure will return to normal !
4) When cleaning the nozzle, watch how its spray part will spray the liquid in the cylinder.
Note! During spraying, the stream of liquid that is in the cylinder from the nozzle will come out faster or slower, it all depends on the contamination of the fuel injector. The fuel injector must be cleaned until the fuel stream stops changing!
Additional video materials: Not all people like to work with instructions; most people understand and remember better using the example of a video clip, which is why we posted it for these purposes. In the video you will find detailed information on cleaning injectors:
Note! Still, after watching this video, we recommend that you read the article, because after all, it may contain something that you will not find in the video!
Important! • Cleaning injectors should only be done when necessary; it is not recommended to simply clean working injectors, because cleaning them too often can lead to the injector dying out!
• If you want your fuel injectors to last you a longer life, then refuel only at proven gas stations because low-quality gasoline is the main enemy for the life of the injectors!
Now we will talk about self-cleaning of injectors on VAZ cars (2109, 2110, 2115, Kalina, Granta with 8-valve engines). How often should this be done? There is no clear answer to this question. It all depends on the quality of the fuel. But on average, it is recommended to clean injectors every 20-25 thousand kilometers.
But mileage is not the main indicator on which you should rely. The main thing here is to notice in time the incorrect behavior of the engine - floating speed, increased fuel consumption, dips in dynamics, etc. All of these factors may indicate clogged injectors.
You can clean the injectors without removing them from the engine by pouring a special liquid into the gas tank. But this method is not always effective. And, besides, we will not be able to personally see the result. Therefore, the second method is predominantly used - washing the injectors with removal.
There are two methods here - ultrasonic cleaning and cleaning with special liquids. The latter does not require particularly complex additional equipment, so it is better to use it yourself.
Work order
1
. It is necessary to remove the pipe from the air filter. Remove the terminals from the battery.
2
.
We take some kind of container for draining gasoline. 3
. We take a screwdriver and a container, approach the car, unscrew the cap from the valve on the fuel rail (TR), prying the valve nipple with a screwdriver, release the pressure (gasoline will flow from the FR), then screw the cap back on.
4
. Next, we take the keys for 24 and 21 or 22 (so for a square TR, for a round one there are most likely two keys for 24, I don’t know for sure) and try to unscrew the tube that goes to the TR under the throttle pipe on the driver’s side and try to pull it out of the ramp.
5
.
Then he unscrews the fuel pressure regulator (FPR) with a ratchet or just a 6-point 5-pointer, we also try to pull it out of the TP, to do this we carefully pull up so as not to tear the white hose that goes from the RTD to the receiver. 6
. We disconnect the chip, impulses pass through it to the injectors.
7
. We unscrew the fuel rail (TR) itself with a ratchet or just a 6-point 5-pointer.
We pull it towards the receiver, then when the injectors come out, we turn the TR injectors up and carefully pull it out towards the right wing, everything came out and went back in without any problems!
8
. We remove the wiring from the injectors, here you need a screwdriver, press your finger on the spring (U-shaped piece of iron).
We try to push it upward with a screwdriver (towards the wires coming out of the injector).
Next, we move the spring forward, one end should come out, the other will remain in place, pull the chip up, i.e. remove from the nozzle.
9
. Now you need to remove the clamps from the injectors; to do this, use a screwdriver to pry them off on both sides.
Then we try to pull them out with our hands or a screwdriver (whichever is more convenient) and pull them to the side.
Then we pull the injector up, if there are rings left in the ramp, as I had, then we take them out with a screwdriver, they come out easily, don’t forget about the ring on the RTD, it’s better to change it in advance, I didn’t buy rings on the RTD, I left the old one. 10
. Everything was removed.
This is interesting: Increased fuel consumption on the VAZ-2114 - gasoline consumption standards